The Platefull

Inspiring home cooks to be creative with accessible, nutritious recipes.

  • The Platefull Blog
  • Lifestyle
  • Kids
  • Shop
  • About
    • Privacy Policy, Terms & Conditions, and Disclosures

Archives for October 2019

Chicken Tortilla Soup

October 30, 2019~ Soups, The Platefull Blog

I have to admit, I’m not a huge soup fan. It’s not often that you’ll find a soup recipe here, simply because I don’t make soup much! This soup though, is one that I love. It’s easy to throw together, can be made in the crockpot, and the leftovers freeze well. If I’m having guests over in the Fall, you’ll always find this on the menu because its a crowd favorite and I can make it ahead, which means I get to enjoy my guests instead of working in the kitchen!

Print
clock clock iconcutlery cutlery iconflag flag iconfolder folder iconinstagram instagram iconpinterest pinterest iconfacebook facebook iconprint print iconsquares squares iconheart heart iconheart solid heart solid icon

Chicken Tortilla Soup

  • Author: Sarah
  • Prep Time: 15 minutes
  • Cook Time: 30 minutes
  • Total Time: 45 minutes
  • Yield: 6 servings 1x
Print Recipe
Pin Recipe

Ingredients

Scale

2 T olive oil

1 large onion, chopped

2 medium carrots, chopped

2 T minced garlic

3 cups chicken broth

1 (14 oz) can diced tomatoes, undrained

1 cup mild picante sauce

1 (15 oz) can ranch-style beans, undrained

1 (15oz) can black beans, rinsed and drained

1 can shoe peg white corn or 1 cup frozen corn ( I use shoe peg)

1 teaspoon ground cumin

1/2 teaspoon black pepper

1/2 teaspoon dried oregano leaves

1/2 teaspoon chili pepper

1/8 teaspoon paprika

2 cups cooked shredded rotisserie chicken

1/4 cup cilantro

Tortilla chips

Sliced avocado

Shredded cheddar cheese

Sour cream


Instructions

Heat the olive oil in soup pot over medium heat. Add onion, carrots, and garlic. Cook until the onion is tender.  While the onion is cooking, shred the rotisserie chicken.

Increase heat to high and add broth, tomatoes, picante sauce, beans, corn, and spices. Bring to boil. Reduce heat and simmer 30 minutes. Add chicken. Cook until thoroughly heated.

Ladle in soup bowls and top with cilantro, tortilla chips, sliced avocados, sour cream, and cheese. 

Did you make this recipe?

Tag @the.platefull on Instagram and hashtag it #theplatefull

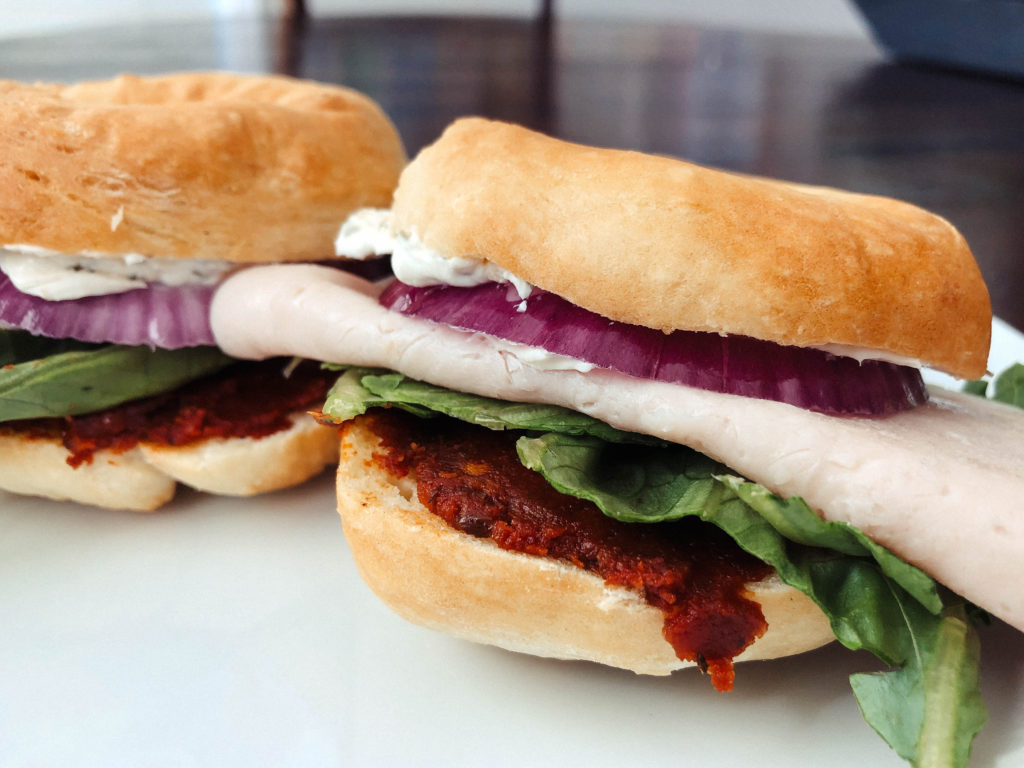
Sun Dried Tomato and Turkey Bagel Sandwiches

October 28, 2019~ Main, The Platefull Blog

When I was in college, I worked in a lab and Bruegger’s Bagels was right across the street. Every day that I was in lab, I got the same thing for lunch – the Herby Turkey bagel sandwich. We don’t have a Bruegger’s here, but I still need my Herby Turkey fix to this day! I used to buy bagels to make this recipe – my favorite was always putting it on Panera’s Asiago bagels. However, as you all know by now, I recently got an air fryer and it changed my life. Haha, well that might be a stretch, but I have found that I use it a lot! I bought the Skinnytaste Air Fryer cookbook, which has the BEST recipe for super easy, made from scratch bagels. I seriously make these at least once a week now. I’m addicted and so are my kids! My youngest asks for bagels and “green cheese” every day for an after school snack (his way of saying cream cheese….and no matter how many times I try to correct him, he insists that I am wrong and it is called green cheese…so green cheese we shall call it). So, now I use these bagels to make my Herby Turkey sandwich because not only are they insanely good, but I don’t have to feel so guilty about it since they are made with Greek yogurt! While you could go all out and make your own Garlic and Herb cream cheese, in my mind, making the sun-dried tomato spread and bagels is enough, so I stick with Kraft Garlic and Herb Cream Cheese. 🙂

Print
clock clock iconcutlery cutlery iconflag flag iconfolder folder iconinstagram instagram iconpinterest pinterest iconfacebook facebook iconprint print iconsquares squares iconheart heart iconheart solid heart solid icon

Sun Dried Tomato and Turkey Bagel Sandwiches

  • Author: Sarah
  • Prep Time: 10 minutes
  • Cook Time: 20 minutes
  • Total Time: 30 minutes
  • Yield: 1 sandwich 1x
Print Recipe
Pin Recipe

Ingredients

Scale

For the sandwiches

1 bagel

1 Tbsp sun dried tomato spread (see below)

1 Tbsp Garlic and Herb cream cheese

2 slices deli turkey

Thinly sliced red onion, for serving

1 romain lettuce leaf, for serving

For the sun dried tomato spread

1 6-oz can tomato paste

1 8.5-oz jar sun-dried tomatoes, packed in oil (I use Trader Joe’s)

1 Tbsp brown sugar

1 tsp dried basil

1 tsp garlic powder

1/2 tsp salt


Instructions

For the sun dried tomato spread

Place all ingredients in a blender or food processor and blend until well combined.  Store in the refrigerator up to one week.

For the sandwiches

Halve the bagel.  Spread 1 Tbsp sun dried tomato spread on one side and 1 Tbsp Garlic and Herb cream cheese on the other side.  On the bottom half of the bagel, layer lettuce, then turkey, then thinly sliced red onion.  Close up the bagel sandwich with the half topped with cream cheese and enjoy!


Notes

Make the bagels and sun-dried tomato spread ahead of time so all you have to do at lunch is assemble!

Did you make this recipe?

Tag @the.platefull on Instagram and hashtag it #theplatefull

Essentials for the Best Homemade Pizza

October 27, 2019~ Lifestyle, The Platefull Blog

Every Friday night in our house goes the same way. Kids get home from school, eat half of the refrigerator of food, and play for a bit while they anxiously await the official start of our beloved pizza night. When it’s time to start making the pizza, they grab their cooking towers, anchor them on each side of the kitchen island, and prepare to eat their weight in pizza ingredients….I mean, make pizza. While the pizzas are cooking, we move the living room coffee table out of the way, spread out the picnic blanket on the floor, and pop in a movie. It’s always Cars 3 or Toy Story. So now if you ever come over on a Friday night, you know exactly what to expect. 😉

Really though, our whole family has come to love this tradition. It’s the perfect way to wind down a busy week. The boys look forward to pizza night and so do we! Great food, happy kids, and a relaxed evening. I won’t lie, some weeks after working full-time, I’m too tired to put any effort whatsoever into our Friday night plans, so we order pizza to be delivered. Either way, we never miss a pizza night!

Today, I’m rounding up my pizza night essentials. I buy all of my ingredients for pizza night at Trader Joe’s. This isn’t a sponsored post, I just really love the ingredients I get there and think they come together to make the best homemade pizza. And after doing this for 3 years now, I’ve tried a lot of different brands! Here are my favorites:

Trader Joe’s Shredded Mozzarella – this one isn’t dry and chalky like most other brands of shredded cheese. It’s shredded a little thicker and melts perfectly.

Trader Joe’s Quattro Formaggio – this blend of cheese gives your pizza the little extra something that makes people go hmmm….this is really good!

Trader Joe’s Sliced Prosciutto – I use this for my Fig and Prosciutto Pizza.

Trader Joe’s Fig Butter – I think I have tried nearly every fig spread out there for this pizza, and this one is hands down the best in terms of both taste and texture. The thickness is just right for a pizza base and it doesn’t liquify as it cooks, which means you don’t end up with a soggy pizza. I use this for my Fig and Prosciutto Pizza.

Trader Joe’s Pizza Sauce – I think I have also tried nearly every pizza sauce out there, and this one is my favorite. It’s the perfect blend of spices – so good that I haven’t even attempted to make my own. No reason to!

Trader Joe’s Ciao Pepperoni – This pepperoni has great flavor, and is mild enough for my kids to eat.

William’s Sonoma Grilling Pizza Pan – this pizza pan is better than a pizza stone. While they sell it during grilling season, I use this pan year round – both on the grill and in the oven. I now have four of these pans so that I can prep two pizzas while two are in the oven!

Cauliflower Mexican Rice

October 27, 2019~ Side Dishes, The Platefull Blog

Okay, I’m starting this post by putting this out there. I HATE the cauliflower rice trend. Does anyone actually think riced cauliflower tastes remotely like rice?! All I taste is cauliflower. And I don’t even like cauliflower. So for me, the cauliflower rice trend is a no-go. Except for this recipe. This is the sole cauliflower rice recipe that is allowed in my kitchen. And dare I say, it’s actually good! For me to say that is saying a lot since I consider all other riced cauliflower dishes to be inedible. LOL.

Now that we’ve got that out of the way, on to the recipe. This is really a pretty simple recipe, but it is best served immediately after it is prepared. I like to serve this with my Fajita Stuffed Chicken. I prepare this dish while the chicken is baking, so dinner is still on the table in 30 minutes or less!

Start by chopping the onion, garlic, and tomatoes. I like to pre-measure out the rest of my ingredients as well so that I don’t have to think as I cook.

Next, you will heat the oil in a skillet over medium high heat. Add the onions and tomatoes. If you like spicy rice, you could add some diced serrano or jalapeño pepper here.

Once the onion is softened, add the garlic and saute for about 1 minute. Then add in the riced cauliflower and saute for another 2-3 minutes. Then add the tomato paste and spices and stir to mix well.

Last, add the salsa and heat through.

Print
clock clock iconcutlery cutlery iconflag flag iconfolder folder iconinstagram instagram iconpinterest pinterest iconfacebook facebook iconprint print iconsquares squares iconheart heart iconheart solid heart solid icon

Cauliflower Mexican Rice

  • Author: Sarah
  • Prep Time: 5 minutes
  • Cook Time: 10 minutes
  • Total Time: 15 minutes
  • Yield: 6 servings 1x
Print Recipe
Pin Recipe

Ingredients

Scale

4 cups riced cauliflower 

2 tsp olive oil

1/2 white onion, diced

2 roma tomatoes, diced

2 garlic cloves, minced

2 Tbsp tomato paste

1/2 tsp cumin

1/4 tsp smoked paprika

1 tsp kosher salt

1 cup salsa


Instructions

In a large skillet, heat the olive oil over medium high heat.  Add the onions and tomatoes and cook until the onions are soft, 3-4 minutes.  Add the garlic and saute for about 1 minute.  Add the riced cauliflower and saute for 2 more minutes.  Add the tomato paste, cumin, and paprika and stir to combine well.  Add the salsa and heat through.  Serve immediately.


Did you make this recipe?

Tag @the.platefull on Instagram and hashtag it #theplatefull

Mixed Greens with Bacon, Apple and Dried Cherries

October 26, 2019~ Salads, The Platefull Blog

This is one of those salads that you help yourself to seconds, then thirds, and then before you know it, the whole salad bowl is scraped clean. It’s salty and sweet and really, just a perfect salad! Can you tell how much I love it?! I make this dressing ahead and keep it in the fridge all week. Side note – the dressing is also amazing warmed and drizzled over pork tenderloin, but that’s another recipe for another day. For today, enjoy this amazing salad!

Print
clock clock iconcutlery cutlery iconflag flag iconfolder folder iconinstagram instagram iconpinterest pinterest iconfacebook facebook iconprint print iconsquares squares iconheart heart iconheart solid heart solid icon

Mixed Greens with Bacon, Apple and Dried Cherries

  • Author: Sarah
Print Recipe
Pin Recipe

Ingredients

Scale

1 bag spring mix salad

3 strips applewood smoked bacon, cooked and crumbled

1/2 cup dried cherries

1 granny smith apple, chopped

1/2 cup candied pecans

5 oz crumbled Gorgonzola

1/2 cup extra light olive oil

1/3 cup honey

3 tablespoons balsamic vinegar

1/8 teaspoon dry mustard

1/8 tsp ground pepper


Instructions

In a small bowl, combine extra light olive oil, honey, balsamic, dry mustard and pepper.  Whisk to combine well.  (You may need to whisk again before serving, as it does tend to separate).

In a salad serving bowl, toss spring mix, dried cherries, chopped apple, pecans, gorgonzola cheese, and crumbled bacon.  Top with the dressing and serve immediately.


Did you make this recipe?

Tag @the.platefull on Instagram and hashtag it #theplatefull

Fig and Prosciutto Pizza

October 25, 2019~ Main, The Platefull Blog

One of my favorite restaurants in town used to serve the most amazing Fig and Prosciutto Pizza. For some reason that I can’t fathom, they took the pizza off the menu! I knew I had to make it at home, because my love for the Fig and Prosciutto Pizza wasn’t going anywhere. My copycat version is my most-requested pizza when we have guests over for pizza night. It’s a great way to add in a non-traditional pizza!

Tip: If you don’t like arugula, leave it off – this pizza is still delicious. Though my definite preference is with arugula, so I’d encourage you to at least try it!

Print
clock clock iconcutlery cutlery iconflag flag iconfolder folder iconinstagram instagram iconpinterest pinterest iconfacebook facebook iconprint print iconsquares squares iconheart heart iconheart solid heart solid icon

Fig and Prosciutto Pizza

  • Author: Sarah
  • Prep Time: 5 minutes
  • Cook Time: 10 minutes
  • Total Time: 15 minutes
  • Yield: 1 pizza 1x
Print Recipe
Pin Recipe

Ingredients

Scale

1 pizza crust, prepared and rolled out

2 Tbsp Trader Joe’s Fig Butter

2 slices of prosciutto

1/2 cup mozzarella cheese

1/4 cup 4-cheese mix (Italian or pizza cheese)

2 Tbsp gorgonzola cheese

Arugula, for serving


Instructions

Spread the fig butter evenly on the prepared pizza crust.  Top with mozzarella and 4-cheese mix.  Tear the prosciutto slices into pieces and spread over the top. Sprinkle on gorgonzola.  Bake at 400 degrees for 10 minutes.  When the pizza comes out of the oven, top with arugula.


Notes

If you do not want the prosciutto to get a little crispy, put it under the cheese.

Did you make this recipe?

Tag @the.platefull on Instagram and hashtag it #theplatefull

Buffalo Chicken Quinoa Bowls

October 24, 2019~ Main, The Platefull Blog

I love buffalo chicken anything. One of my favorite recipes is Buffalo Chicken Stuffed Sweet Potatoes because it’s healthy (can be Whole 30 compliant) but I still get all that yummy buffalo flavor. While that’s my go-to buffalo chicken dinner recipe, these quinoa bowls are my go-to lunch. It’s so easy to make a big batch of quinoa (or use the microwavable frozen organic quinoa from Trader Joe’s), mix up a batch of the sauce, and keep the veggies on hand all week. During the day, I can quickly throw together a bowl so I can keep on working. BRB…must go make these for lunch right now!

Print
clock clock iconcutlery cutlery iconflag flag iconfolder folder iconinstagram instagram iconpinterest pinterest iconfacebook facebook iconprint print iconsquares squares iconheart heart iconheart solid heart solid icon

Buffalo Chicken Quinoa Bowls

  • Author: Sarah
  • Prep Time: 15 minutes
  • Total Time: 15 minutes
  • Yield: 1 bowl
Print Recipe
Pin Recipe

Ingredients

For the bowls

1 cup cooked quinoa

1/4 cup shredded carrots

1/4 cup shredded purple cabbage

1/4 cup broccoli florets, chopped small

1/4 cup diced avocado

2 Tbsp gorgonzola

1 Tbsp sliced green onions

1/2 cup shredded rotisserie chicken

For the buffalo sauce

1/2 cup Frank’s Hot Sauce

1/3 cup olive oil

1 tsp seasoned salt


Instructions

Whisk together the hot sauce, olive oil, and seasoned salt until well combined.  To assemble the bowls, put the cooked quinoa in the bottom of a bowl.  Top with carrot, cabbage, chicken, broccoli, gorgonzola, sliced green onion, and avocado.  Drizzle the buffalo sauce over the top and serve immediately.


Did you make this recipe?

Tag @the.platefull on Instagram and hashtag it #theplatefull

Fajita Stuffed Chicken

October 23, 2019~ Main, The Platefull Blog

I make so many variations of stuffed chicken breasts (because, hello, they are easy to make ahead!), but this Fajita Stuffed Chicken is probably my favorite. It’s got my favorite Mexican flavors all rolled into one easy to make dish. I prep this meal ahead on Sundays and roll the stuffed chicken breasts in plastic wrap, to package individually. I then refrigerate for up to 2 days. On the night I plan to serve them, I remove the plastic wrap, place on a baking sheet, and bake. I typically serve these with my Mexican Cauliflower Rice, but if I’m short on time, I love to serve it with Trader Joe’s Mexican Style Roasted Corn with Cotija Cheese. Or even better, serve it with both!

To start prepping this recipe, chop the onion and bell peppers. Dice the pepper jack cheese and measure out the spices and cheddar cheese. Quick prep tip: If you can’t be bothered with mixing up the spices yourself, Penzy’s Fajita Seasoning is a perfect substitution!

Next up, sautés the veggies over medium-high heat until they begin to char. You want that yummy fajita veggie flavor!

Once the veggies are cooked, you will combine the cream cheese, cheddar cheese, pepper jack cheese, and veggies. My kids are pretty picky about any sort of “spicy” in their food, so I typically mix everything except the pepper jack cheese and stuff their chicken first. Then, I add the pepper jack to the cheese/veggie mixture before stuffing the remaining chicken breasts. Once you’ve stuffed the chicken, sprinkle the top with the spice mixture. Don’t be shy! Place on a baking sheet and bake at 375 for about 25-30 minutes, or until cooked through.

When they come out of the oven, they are super ooey-gooey and oh so delicious!

Print
clock clock iconcutlery cutlery iconflag flag iconfolder folder iconinstagram instagram iconpinterest pinterest iconfacebook facebook iconprint print iconsquares squares iconheart heart iconheart solid heart solid icon

Fajita Stuffed Chicken

  • Author: Sarah
  • Prep Time: 20 min
  • Cook Time: 25 min
  • Total Time: 45 minutes
  • Yield: 4 servings 1x
Print Recipe
Pin Recipe

Ingredients

Scale

2 Tbsp olive oil

1 small onion, diced

1 red bell pepper, diced

1 yellow bell pepper, diced

1 green bell pepper, diced

1/2 cup shredded cheddar cheese

4 oz pepper jack cheese, cubed

4 oz cream cheese

4 boneless, skinless chicken breasts

1 Tbsp chili powder

1 Tbsp cumin

1 tsp garlic powder

To serve:

Salsa

Sour Cream

Guacamole


Instructions

Preheat the oven to 375 degrees.  Set out 4 oz of a cream cheese block to soften while you prep the veggies.

In a large skillet, heat the olive oil over medium high heat.  Add the peppers and onions and cook until softened and beginning to char.  Remove from the heat.

In a mixing bowl, combine the cream cheese, cheddar cheese, and pepper jack cheese cubes.  Add the veggie mixture and mix to combine well.  

Slice a pocket lengthwise in the chicken breast.  Stuff with the veggie and cheese mixture.  In a small bowl, combine the spices.  Generously sprinkle the spices over the stuffed chicken.  Place on a baking sheet and bake at 375 for 20-30 minutes, or until the chicken is cooked through.  Serve topped with salsa, sour cream, and guacamole.


Did you make this recipe?

Tag @the.platefull on Instagram and hashtag it #theplatefull

Perfect Blueberry Muffins

October 22, 2019~ Baking, Breakfast, The Platefull Blog

On the weekends, we love to make breakfast from scratch. During the week, it’s nothing fancy, but when Saturday morning rolls around, you’ll find me in the kitchen, making muffins, pancakes, eggs, or biscuits. It’s become a tradition in our house and the boys look forward to weekend breakfasts. They usually request pancakes, but anytime I can convince them to stray from their favorite, I make these muffins. They are like a big, fluffy bakery muffin with a crumb topping.

Here’s a couple tips for making these muffins: Let your butter come to room temperature before making the crumb topping. It will mix in to the sugar and flour much more easily. The crumb topping will still seem dry, but don’t worry – sprinkle it on anyway. The batter for these muffins is thick. If it’s so thick that you can’t get the dry ingredients mixed in, add 1 Tbsp oil and 1 Tbsp milk. You shouldn’t need any more than that. Here’s a picture of the batter after it’s mixed. You can get an idea of how thick it is by looking at the back of the spoon.

I hope you make these muffins and love them as much as we do!

Print
clock clock iconcutlery cutlery iconflag flag iconfolder folder iconinstagram instagram iconpinterest pinterest iconfacebook facebook iconprint print iconsquares squares iconheart heart iconheart solid heart solid icon

Perfect Blueberry Muffins

  • Author: Sarah
  • Prep Time: 20 minutes
  • Cook Time: 20 minutes
  • Total Time: 40 minutes
  • Yield: 12 muffins
Print Recipe
Pin Recipe

Ingredients

For the muffins

3 cups all purpose flour

1 1/2 cups white sugar

1 tsp salt

4 tsp baking powder

2/3 cup extra light olive oil (or vegetable oil)

2 eggs

2/3 cup milk

1 1/2 tsp vanilla extract

1/4 tsp almond extract

2 cups fresh blueberries

For the crumb topping

1/2 cup brown sugar

2/3 cup all purpose flour

1/4 cup butter, at room temperature

1 tsp ground cinnamon


Instructions

Preheat oven to 400ºF. Grease muffin tin well or line with muffin liners. Lightly spray the top of the muffin pan with cooking spray so that the crumb topping doesn’t stick.

In a large bowl, use a fork to combine flour, sugar, salt, and baking powder. In another bowl, mix the extra light olive oil, milk, eggs, vanilla extract, and almond extract. Mix with the flour mixture, just until flour is moistened, being careful not to over mix.  Gently fold in the blueberries. Fill the muffin cups right to the top. 

To make crumb topping

Combine brown sugar, flour, butter, and cinnamon. Mix with a fork, and sprinkle over muffins before baking.

Bake for 20 to 25 minutes, or until a toothpick comes out clean. 


Did you make this recipe?

Tag @the.platefull on Instagram and hashtag it #theplatefull

Apple Cider Sangria

October 21, 2019~ Drinks, The Platefull Blog

We are headed to the pumpkin patch for our annual trip to pick out pumpkins to carve. The pumpkin patch we always visit makes their own apple cider and its amazing. All that thought about apple cider inspired me to make this recipe! Why not celebrate our trip to the pumpkin patch with an apple cider drink?! Apple Cider Sangria is perfect for a Halloween party or to serve at Thanksgiving. It’s also a perfect drink by the fire pit with the cool Fall air. Whenever you decide to drink this, I promise you’ll love it! Hint – serve the kids plain apple cider, with some chopped up fruit in their drink and they’ll feel pretty special too. Just be warned – if your kids are like mine, you’ll end up with sticky hands from fishing the fruit out of their cup to eat it. 😉

Print
clock clock iconcutlery cutlery iconflag flag iconfolder folder iconinstagram instagram iconpinterest pinterest iconfacebook facebook iconprint print iconsquares squares iconheart heart iconheart solid heart solid icon

Apple Cider Sangria

  • Author: Sarah
  • Prep Time: 5 minutes
  • Total Time: 5 minutes
  • Yield: 4 servings 1x
Print Recipe
Pin Recipe

Ingredients

Scale

1 bottle white wine (Sauvignon Blanc or Pinot Grigio)

2 cups apple cider

1/4 cup bourbon

3 cinnamon sticks

1 orange, sliced

1 apple, diced

1 pear, diced


Instructions

In a large pitcher, combine the white wine, apple cider, and bourbon.  Add the cinnamon sticks, orange, apple, and pear and stir well.  Refrigerate until cold.  Note: If you plan to make this ahead, take the cinnamon sticks out after a couple hours so it doesn’t get too spiced.  To serve, pour into wine glasses and lay a cinnamon stick across the top.


Did you make this recipe?

Tag @the.platefull on Instagram and hashtag it #theplatefull

  • 1
  • 2
  • 3
  • Next Page »

Categories

  • Appetizers
  • Baking
  • Breakfast
  • Dessert
  • Drinks
  • Kids
  • Lifestyle
  • Main
  • Recipes
  • Salads
  • Sauces and Dressings
  • Side Dishes
  • Soups
  • The Platefull Blog
  • Uncategorized

Archives

  • March 2025
  • July 2021
  • January 2021
  • July 2020
  • June 2020
  • May 2020
  • April 2020
  • March 2020
  • February 2020
  • January 2020
  • December 2019
  • November 2019
  • October 2019
  • September 2019
  • August 2019
  • September 2017
  • April 2017
  • March 2017
  • February 2017
  • January 2017
  • November 2016
  • October 2016

Recent Comments

  • Jennifer on Avocado and Egg Breakfast Stack
  • Christine Kish on Recipe Organization
  • Sarah on Easy Recipes for the Whole30
  • Jenn on Easy Recipes for the Whole30

- THEME BY ECLAIR DESIGNS -