The Platefull

Inspiring home cooks to be creative with accessible, nutritious recipes.

  • The Platefull Blog
  • Lifestyle
  • Kids
  • Shop
  • About
    • Privacy Policy, Terms & Conditions, and Disclosures

Archives for November 2019

Bunny Juice

November 11, 2019~ Drinks, The Platefull Blog

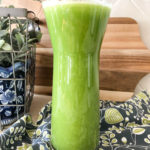
Apparently we have a thing for naming juices after animals (see the Green Gorilla Juice recipe), but hey, if it makes juicing fun for my kids, I’m all for it! They love this juice and so do I. During cold and flu season, I’ll sometimes add in a small piece of peeled turmeric, but it stains my hands pretty badly, so it’s not my favorite thing to do. :). More often, you’ll find me buying a turmeric shot at Whole Foods and just dumping it in at the end. I also sometime buy a ginger shot if I don’t feel like peeling ginger. I know, lazy. Another great add in is mango juice!

Print
clock clock iconcutlery cutlery iconflag flag iconfolder folder iconinstagram instagram iconpinterest pinterest iconfacebook facebook iconprint print iconsquares squares iconheart heart iconheart solid heart solid icon

  • Author: Sarah
  • Prep Time: 10 minutes
  • Total Time: 10 minutes
  • Yield: 4 servings 1x
Print Recipe
Pin Recipe

Ingredients

Scale

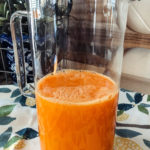
8 oranges, peeled and quartered

5 carrots, ends removed and halved

1 lemon, peeled and quartered

1 1-inch piece of ginger, peeled


Instructions

Run all ingredients through a juicer. Chill before serving.


Did you make this recipe?

Tag @the.platefull on Instagram and hashtag it #theplatefull

The Ultimate Thanksgiving Menu

November 10, 2019~ Lifestyle, Main

Does the thought of preparing Thanksgiving dinner from scratch overwhelm you? It does me too, honestly. It’s a lot to prep and I hate feeling like I’m missing out on all of the fun because I have to spend the whole day in the kitchen! After years of being in charge of the Thanksgiving meal, I’ve nailed it down to a science. Most of my Thanksgiving menu is prepped ahead, meaning that on the day of, I get to relax and watch the Macy’s Thanksgiving Day Parade with everyone else! I’ve got the recipes and the game plan all laid out for you here…couldn’t be easier! So, what’s on the menu you ask?

  • Thanksgiving Herbed Butter Turkey
  • Garlic Herb Mashed Potatoes with Crispy Fried Sage
  • Traditional Sage Stuffing
  • Sweet Potato Casserole
  • Green Bean Casserole
  • Grandma Ruth’s Sweet Corn
  • Pomegranate and Vanilla Buttered Brussels
  • Pear and Cranberry Chopped Salad
  • Pumpkin Cheesecake
  • Apple Cider Sangria

After scrolling through all of those pictures, are you hungry yet?! If you’re ready to get cooking (or planning), here’s the step by step schedule of how to get all of this food on the table (while all still warm, which is quite a feat!).

Up to 12 months in Advance:

  • Grandma Ruth’s Sweet Corn: This corn should be prepared and frozen ahead. For serving, simply microwave until hot! My family makes huge batches of this corn in the summer, at the height of sweet corn season, and freezes for the winter.

4-5 Days in Advance:

  • If the turkey is frozen, place in in the refrigerator to thaw. Assume about 24 hours for every 5 pounds. I usually give my bird an extra 24 hours in the fridge, so assuming I have a 15-20 pound bird, I need 4-5 days for it to thaw.

1 Day in Advance:

  • Turkey: Soften the butter, chop the herbs, and make the herb butter. Quarter the orange, lemon, and onion. Cover and refrigerate.
  • Garlic Herb Mashed Potatoes: Prepare the potatoes, up to the point of baking. Chop the sage for the crispy sage topping. Cover and refrigerate.
  • Sweet Potato Casserole: Prepare the sweet potato mixture, place in the baking dish, cover, and refrigerate. Mix the dry ingredients together for the crumb topping, and store in an airtight container on the counter. You will add the butter to the crumb topping and put the topping on the casserole just before baking.
  • Green Bean Casserole: Mix the green beans, cream of mushroom soup, milk, salt, and pepper (everything except the fried onions). Pour into a baking dish. Cover and refrigerate.
  • Pomegranate and Vanilla Buttered Brussels: Prepare the Brussel sprouts by halving them (or into quarters if you have large sprouts). Soften the butter and mix in the vanilla bean paste. Prepare the pomegranate (or buy the pomegranate arils to save yourself a prep step).
  • Traditional Sage Stuffing: Prepare the stuffing up to the point of baking. Place in a baking dish, cover, and refrigerate.
  • Pumpkin Cheesecake: Make the pumpkin cheesecake. Let cool. Do not top with whipped cream or pecans, just cover and refrigerate undecorated.
  • Apple Cider Sangria: Mix all ingredients and fruit in a pitcher. Cover and refrigerate. (This is actually much better if it’s had time to sit for a day before serving).

Thanksgiving Day

  • 1-2 hours before the turkey goes in the oven, set out the herb butter mixture for the turkey to soften.
  • T-5.5 hours: Roast the Brussel sprouts; cool and refrigerate. Reduce oven temp. Get turkey out of the fridge and prep with the herb butter. Let sit on the counter while the Brussel sprouts roast.
  • T-4.75 hours: TURKEY GOES IN THE OVEN (Assume about a 4 hour cook time).
  • T-1.5 hours: Stuffing goes in the oven (350 degrees), prepare crumb mixture for sweet potatoes and put on top of the sweet potato casserole. Set out the vanilla butter mixture for the Brussel sprouts to soften.
  • T-45 minutes: Turkey comes out, tent and rest. Sweet potato casserole goes in the oven (350 degrees), add French Fried Onions to green bean casserole and stir. Remove the foil from the stuffing.
  • T-30 minutes: Garlic Herb Mashed Potatoes and Green Bean Casserole go in oven. Mix the Brussel sprouts and vanilla butter together and place in a baking dish. Prep the salad, but do not dress.
  • T-15 minutes: Brussel sprouts go in the oven to heat through. Heat butter on the stove to fry the sage for the mashed potatoes. Carve the turkey. Microwave the corn. (Recruit a helper if you can for these last 15 minutes until the finish line!)
  • T-5 minutes: Top the green bean casserole with a sprinkle of French Fried Onions.
  • Go-Time! Mashed potatoes, sweet potatoes, green beans, Brussel sprouts, and stuffing come out. Top the mashed potatoes with crispy fried sage and browned butter. Toss the Brussel sprouts with pomegranate arils and pecans.
  • EAT!
  • When ready for dessert, decorate the top of the cheesecake with whipped cream and sprinkle with chopped pecans.

Pumpkin Cheesecake

November 10, 2019~ Baking, Dessert, The Platefull Blog

Every year for Thanksgiving, I make my apple pie. It’s beautiful and delicious and my absolute favorite. But, the weird people in my family love pumpkin pie. I will never understand the love for pumpkin pie, with its mushy texture. But, I do love pumpkin flavor. This cheesecake makes the perfect compromise! Don’t ask me how the mushiness of cheesecake is okay but the mushiness of pumpkin pie is inedible…that’s just the way it is. This cheesecake can be made ahead and refrigerated. On Thanksgiving Day, just decorate and serve!

Start by preparing the crust. Combine the melted butter with the graham cracker crumbs and 1 Tbsp of the sugar. I try to buy graham cracker crumbs, but if I can’t find them, I let my kids turn graham crackers into crumbs for me since they are experts at making crumbs.

Then, press the crumb mixture into a springform pan. I used a pan with a bottom that lifts out because I couldn’t find my springform pan and I just wanted to eat the cheesecake already. It worked fine too.

Once you’ve mixed the filling, pour it into the pan and bake for 60-70 minutes at 350.

It will turn golden on top. My cheesecakes always crack, and it really doesn’t bother me because I just cover them with a topping. If you are super fussed about your cheesecake cracking, rumor has it you could try starting with room temperature cream cheese and bake it in a water bath. Sounds like a lot of effort to me for a cheesecake that will taste the same. I say just cover the top with whipped cream and no one will ever know. 😉

Print
clock clock iconcutlery cutlery iconflag flag iconfolder folder iconinstagram instagram iconpinterest pinterest iconfacebook facebook iconprint print iconsquares squares iconheart heart iconheart solid heart solid icon

Pumpkin Cheesecake

  • Author: Sarah
Print Recipe
Pin Recipe

Ingredients

Scale

1 1/2 cups graham cracker crumbs

5 Tbsp butter, melted

1 cup plus 1 Tbsp granulated sugar

3 8-oz packages cream cheese, softened

1 tsp vanilla extract

1 cup canned pumpkin

3 eggs

1/2 tsp cinnamon

1/4 tsp nutmeg

1/4 tsp allspice

Whipped Cream, for serving

Chopped Pecans, for serving


Instructions

Preheat the oven to 350 degrees.  Combine graham cracker crumbs, melted butter, and 1 Tbsp sugar.  Stir with a fork until the mixture is combined well with the butter.  It should be crumbly.  Pour the crust mixture into an 8 inch springform pan.  Press the crumb mixture into the bottom and about 2/3 of the way up the sides of the pan.  Bake the crust for 5 minutes, then set aside.

In a mixing bowl, add the cream cheese, 1 cup of sugar, and vanilla.  Beat until smooth.  Add the eggs, pumpkin, and spices and beat until well combined.  Pour the filling into the crust.  Bake for 60-70 minutes.  Allow the cheesecake to cool completely before refrigerating. 

When ready to serve, top the cheesecake with whipped cream and chopped pecans.


Did you make this recipe?

Tag @the.platefull on Instagram and hashtag it #theplatefull

Pomegranate and Vanilla Buttered Brussel Sprouts

November 10, 2019~ Side Dishes, The Platefull Blog

As recently as 5 years ago, I had never met a Brussel sprout I liked. That all changed with this recipe and now you’ll find me eating them in a variety of ways! This is the perfect holiday side dish because its got beautiful colors and is definitely a crowd pleaser.

Print
clock clock iconcutlery cutlery iconflag flag iconfolder folder iconinstagram instagram iconpinterest pinterest iconfacebook facebook iconprint print iconsquares squares iconheart heart iconheart solid heart solid icon

Pomegranate and Vanilla Buttered Brussel Sprouts

  • Author: Sarah
Print Recipe
Pin Recipe

Ingredients

Scale

1 lb brussel sprouts, trimmed and halved (or quartered if they are large)

2 Tbsp olive oil

5 Tbsp butter, softened

1 vanilla bean (or vanilla bean paste equivalent)

Pomegranate arils

1/4 cup chopped pecans


Instructions

Preheat oven to 375 degrees.  Toss the trimmed and halved Brussel sprouts with the olive oil.  Roast for 30 minutes, until tender.  In the meantime, mix the vanilla bean paste into the softened butter.  When the Brussel sprouts are still hot, toss with the vanilla butter.  Toss in the pomegranate arils and chopped pecans and serve immediately.


Did you make this recipe?

Tag @the.platefull on Instagram and hashtag it #theplatefull

Green Bean Casserole

November 10, 2019~ Side Dishes, The Platefull Blog

Green Bean Casserole is something that I assumed all people ate growing up. That is apparently not true, because my husband had never had it until he met me. What a lucky guy! It’s a favorite of mine and the boys and super simple to make. I’ve gone away from making it with canned Cream of Mushroom soup and I now use this recipe to make Cream of Mushroom soup from scratch. It is SO delicious! The recipe contains instructions for swapping the homemade soup for 1 can. Use it in this green bean casserole – or stick with the canned soup if you’re short on time!

Start by mixing the Cream of Mushroom soup with the milk, salt, and pepper.

Add the green beans and 1/2 cup French fried onions.

Stir to combine.

Bake at 350 for 25 minutes. After 25 minutes, add the remaining French fried onions on top and bake for 5 more minutes, until they start to crisp up.

Print
clock clock iconcutlery cutlery iconflag flag iconfolder folder iconinstagram instagram iconpinterest pinterest iconfacebook facebook iconprint print iconsquares squares iconheart heart iconheart solid heart solid icon

Green Bean Casserole

  • Author: Sarah
Print Recipe
Pin Recipe

Ingredients

Scale

1 15 oz can cream of mushroom soup

2 15 oz cans French style green beans

3 Tbsp milk

1/4 tsp salt

1/8 tsp pepper

1 cup French Fried Onions, divided


Instructions

Preheat the oven to 350 degrees.

In a baking dish, combine the cream of mushroom soup with 3 Tbsp milk, salt, and pepper.  Mix well.  Stir in the green beans and 1/2 cup French fried onions.  

Bake for 25 minutes.  After 25 minutes, sprinkle the remaining 1/2 cup French Fried Onions over the top and bake for 5 more minutes.  


Did you make this recipe?

Tag @the.platefull on Instagram and hashtag it #theplatefull

Grandma Ruth’s Sweet Corn

November 10, 2019~ Side Dishes, The Platefull Blog

When I was a little girl, we would visit my Grandma Ruth in the summer, at the peak of sweet corn season. Everyone would sit out on the driveway at my Grandma’s house and shuck corn to put up for Winter. My Grandma would make pans and pans of this corn and each family would take some home for their freezer. This corn is served at every holiday meal and has been since I was a kid! It’s creamy, sweet, and oh so delicious. A favorite family tradition! The past 2 years, my kiddos have gotten in on the action, helping to shuck corn outside at our picnic table. They love getting to help, and even more, they love getting to eat!

Print
clock clock iconcutlery cutlery iconflag flag iconfolder folder iconinstagram instagram iconpinterest pinterest iconfacebook facebook iconprint print iconsquares squares iconheart heart iconheart solid heart solid icon

Grandma Ruth’s Sweet Corn

  • Author: Sarah
Print Recipe
Pin Recipe

Ingredients

Scale

16 cups sweet corn, cut off the cob (about 36 ears)

1 pound butter, cut into pieces.

1 pint half and half


Instructions

Preheat the oven to 350 degrees.  Cut the corn off the cob and place in a large roasting pan.  Mix in the butter pieces and half & half.  Bake at 350 for one hour, stirring every 10 minutes or so.  Cool the corn completely, bag, and freeze.


Notes

If you don’t have a pan that will fit all of the corn, you can split it into two pans.  Just split the butter and half & half as well.

Did you make this recipe?

Tag @the.platefull on Instagram and hashtag it #theplatefull

Sweet Potato Casserole

November 10, 2019~ Side Dishes, The Platefull Blog

This may be more of a dessert than a side, but at Thanksgiving, who cares! My kids still turn their noses up to sweet potato in every dish (despite the number of times I’ve given it to them, which has to be in the hundreds at this point), but they will eat it in this. Of course, because it’s loaded with butter and sugar. I still have hope though, because this dish is one of the first that got me to like sweet potatoes too!

To prepare the sweet potato mixture, soften the butter. Microwave the sweet potatoes to cook them through. Let them cool a little so they are easier to handle, then scoop the potato out of the skin, into a mixing bowl. Let the potato cool in the bowl so that it doesn’t scramble the eggs when you add them. Once the potato has cooled a little, whip the potato alone until it is fluffy (this will also help it cool faster). Then add the softened butter, eggs, vanilla extract, and sugar and mix until well combined. Spoon the mixture into an 8×8 pan. At this point, you can cover and refrigerate if you are preparing this recipe ahead. I typically make this the day before Thanksgiving. I mix the dry ingredients for the crumb topping the day before as well.

When you are ready to bake the sweet potato casserole, preheat the oven to 350 degrees. Melt the remaining 1/3 cup of butter and combine it with the dry ingredients for the topping. Top the sweet potato casserole with the crumb topping. Bake at 350 for 45 minutes.

Print
clock clock iconcutlery cutlery iconflag flag iconfolder folder iconinstagram instagram iconpinterest pinterest iconfacebook facebook iconprint print iconsquares squares iconheart heart iconheart solid heart solid icon

Sweet Potato Casserole

  • Author: Sarah
  • Prep Time: 20 minutes
  • Cook Time: 45 minutes
  • Total Time: 1 hour 5 minutes
  • Yield: 8 servings
Print Recipe
Pin Recipe

Ingredients

For the sweet potatoes

3 large sweet potatoes

2 eggs

1 tsp vanilla extract

1 cup granulated sugar

1 stick butter, softened

For the topping

1/3 cup melted butter

1 cup brown sugar

1 Tbsp cinnamon

1/2 cup flour

1 cup chopped pecans


Instructions

Preheat the oven to 350 degrees.  Cook the potatoes in the microwave.  Let cool (enough to handle) and scoop the potato into a mixing bowl.  Whip until fluffy.  Add the softened butter, eggs, vanilla extract, and sugar, and mix until well combined.  Pour the potato mixture into an 8×8 pan.  Melt the butter for the crumb topping and mix with remaining ingredients.  Spread over the top of the potato mixture.  Bake at 350 degrees for 45 minutes.


Notes

If you want to make enough for a bigger crowd, double the recipe and place in a 9×13 baking dish.

Did you make this recipe?

Tag @the.platefull on Instagram and hashtag it #theplatefull

Traditional Sage Stuffing

November 10, 2019~ Side Dishes, The Platefull Blog

There are two kinds of stuffing that I love, but in my mind, Traditional Sage Stuffing just can’t be beat. (My other favorite stuffing recipe is William’s Sonoma’s Cornbread Stuffing With Dried Cherries). I love this recipe because it’s pretty simple to put together and I can make it the day before. Just cover and refrigerate until ready to bake.

Start by chopping the onion and herbs.

Melt the butter in a skillet and add the chopped onions. Cook the onions until they are soft.

Place the bread pieces in a large mixing bowl. Top with the softened onions and butter mixture, then add 1 1/4 cups of the chicken broth, chopped herbs, salt, and pepper. Toss to combine.

In a small bowl, whisk together the eggs and remaining 1 1/4 cups of chicken broth. Pour over the bread mixture and toss again to combine well. Pour the mixture into a buttered 9×13 baking dish and dot with remaining butter, cut into pieces.

Bake, covered, at 350 for 30 minutes. Uncover and bake for an additional 45-50 minutes, or until the top is lightly browned.

Print
clock clock iconcutlery cutlery iconflag flag iconfolder folder iconinstagram instagram iconpinterest pinterest iconfacebook facebook iconprint print iconsquares squares iconheart heart iconheart solid heart solid icon

Traditional Sage Stuffing

  • Author: Sarah
  • Prep Time: 15 minutes
  • Cook Time: 90 minutes
  • Total Time: 1 hour 45 minutes
  • Yield: 9x13 baking dish 1x
Print Recipe
Pin Recipe

Ingredients

Scale

2 sticks (1 cup) butter

1 pound dried bread pieces

1 yellow onion, diced

2/3 cup Italian parsley, chopped

1/4 cup sage, chopped

3 Tbsp rosemary, minced

2 Tbsp thyme, minced

1 tsp salt

1 tsp pepper

2 1/2 cups low-sodium chicken broth, divided

2 eggs


Instructions

Preheat the oven to 350 degrees.  Butter a 9×13 baking dish, on the bottom and sides.  Place the dried bread pieces in a large mixing bowl.  In a skillet, melt 1 1/2 sticks of butter (3/4 cup). Add the onions and cook until soft.  Pour the butter and onions over the bread pieces.  Add the herbs, salt, pepper, and 1 1/4 cups of chicken broth.  Stir to combine well.  In a small bowl, whisk the eggs and remaining 1 1/4 cup chicken broth.  Pour over the bread mixture and stir well.  Pour the mixture into the prepared baking dish.  Cut the remaining 1/2 stick of butter into pieces and dot the top of the stuffing. Cover with foil and bake for 30 minutes.  After 30 minutes, remove the foil and continue baking for another 45-50 minutes, until lightly browned.


Notes

If you can’t find fresh bread pieces that have been dried out at your grocery store, you can do this yourself by placing cubed bread on a baking sheet and baking at 250 degrees until dried out.

Did you make this recipe?

Tag @the.platefull on Instagram and hashtag it #theplatefull

Thanksgiving Herb Buttered Turkey

November 10, 2019~ Main, Recipes, The Platefull Blog

This is my absolute favorite Thanksgiving Turkey. The herb butter keeps the turkey moist and provides great flavor. Don’t skip out on the fresh herbs for this recipe – they are a must. Plan on 1.25-1.5 pounds of turkey for each person. For leftovers, 1.5 pounds per person is a good sized turkey.

It’s really a quite simple recipe. Chop the herbs, grate the lemon zest, and mix with the softened butter. You can mix the herb butter, then cover and refrigerate until Thanksgiving Day. You will just need to allow time for the herb butter to soften again.

To prep the turkey, first let it thaw in the fridge. You can plan on about 24 hours for every 5 pounds. I usually give myself another 24 hour buffer just in case it isn’t fully thawed. When you are ready to prep the turkey, remove the neck and giblets. Pat the turkey dry with paper towels, but do not rinse it in your sink. Place the turkey in a roasting pan, breast side up. Use your fingers to gently separate the skin over the breast portion of the turkey so that you can spread the herb butter under the skin. Be careful not to poke holes in the skin. If you can get down to the leg portion without tearing through the skin, spread the butter mixture there too. Spread the herb butter over the top of the turkey. If you find the herb butter hard to spread, microwave it for a few seconds (it doesn’t need to melt fully, just soften more) and use a pastry or grilling brush to brush it on. Last, you will stuff the turkey with the quartered orange, lemon, and onion. Tuck the wings under, and tie the legs if that has not already been done for you.

Bake the turkey at 325 using the following as a rough guideline for an unstuffed turkey:

  • 8-12 pounds: 2 3/4 hours to 3 hours
  • 12-14 pounds: 3 hours to 3 3/4 hours
  • 14-18 pounds: 3 3/4 hours to 4 1/4 hours
  • 18-20 pounds: 4 1/4 hours to 4 1/2 hours
  • 20-24 pounds: 4 1/2 hours to 5 hours
Print
clock clock iconcutlery cutlery iconflag flag iconfolder folder iconinstagram instagram iconpinterest pinterest iconfacebook facebook iconprint print iconsquares squares iconheart heart iconheart solid heart solid icon

Thanksgiving Herb Buttered Turkey

  • Author: Sarah
Print Recipe
Pin Recipe

Ingredients

Scale

2 sticks butter, softened

1 Tbsp chopped sage

1 Tbsp chopped thyme

1 Tbsp chopped Rosemary

1 Tbsp lemon zest

1 lemon, quartered

1 onion quartered

1 orange, quartered


Instructions

Preheat oven to 325 degrees.  Combine the softened butter with the chopped fresh herbs and lemon zest.  Remove the neck and giblets.  Pat the turkey dry with paper towels, but do not rinse it in your sink.  Place the turkey in a roasting pan, breast side up.  Use your fingers to gently separate the skin over the breast portion of the turkey.  Spread not quite half of the butter mixture under the skin, working it as far around the turkey as you can, being careful not to poke holes in the skin.  If you can get down to the leg portion without tearing through the skin, spread the butter mixture there too.  Spread the herb butter over the top of the turkey.  If you find the herb butter hard to spread, microwave it for a few seconds (it doesn’t need to melt, just soften a little more) and use a pastry or grilling brush to brush it on the outside of the turkey.  Last, stuff the turkey cavity with the quartered orange, lemon, and onion.  Tuck the wings under, and tie the legs if that has not already been done for you. Roast the turkey at 325 until the thickest part reads 160-165 degrees.  Remove from the oven and let it rest for 30 minutes before carving.


Notes

I am typically roasting brussel sprouts at 400 degrees right before putting the turkey in the oven.  When the turkey goes in, my oven is at 400 but I immediately lower the temp to 325.  Starting in a hotter oven will help the skin get crispier.

Did you make this recipe?

Tag @the.platefull on Instagram and hashtag it #theplatefull

Green Gorilla Juice

November 8, 2019~ Drinks, The Platefull Blog

About a year ago, I bought a juicer. To be honest, at the time I wasn’t really sure if I would ever use it. I was looking for a way to keep us healthy through flu season and was hoping I could trick my kids into consuming mass amounts of vegetables in juice form since they aren’t always great about consuming them in food form. Most tricks like that don’t work on my kids though. My youngest can sense a vegetable from a mile away.

I ended up using the juicer more than I initially thought I would. I definitely noticed a difference in how often my kids got sick when I was juicing for them (in addition to trying my best to get them to eat healthy foods). This juice is bright green, which my kids think is kinda cool. They LOVE putting the fruits and veggies into the juicer because they think the way the juice and solids come out is hilarious (put your frame of mind in boy humor and you’ll know what I mean). Much like other meals, if they make the juice, they drink the juice! Win, win! This Green Gorilla Juice is one they are happy to drink – and I’m happy to serve.

Print
clock clock iconcutlery cutlery iconflag flag iconfolder folder iconinstagram instagram iconpinterest pinterest iconfacebook facebook iconprint print iconsquares squares iconheart heart iconheart solid heart solid icon

Green Gorilla Juice

  • Author: Sarah
Print Recipe
Pin Recipe

Ingredients

Scale

1 broccoli stem (only the stem – no florets), sliced in half

1 cucumber, quartered

2 kale leaves, torn into pieces

2 pears, quartered

2 apples, quartered

1 lemon, peeled and halved

16 oz Pineapple Juice


Instructions

Feed the broccoli, cucumber, kale, apples, pears, and lemon through the juicer.  Pour the juice into a pitcher and fill with 100% pineapple juice (my pitcher takes about 16 oz pineapple juice to fill to the top).  Chill and serve.


Notes

You could juice a pineapple, but I personally hate cutting fresh pineapple, so I take the shortcut of using store bought pineapple juice.  I buy the R.W. Knudsen Organic 100% pineapple juice for this recipe.

Did you make this recipe?

Tag @the.platefull on Instagram and hashtag it #theplatefull

  • « Previous Page
  • 1
  • 2
  • 3
  • Next Page »

Categories

  • Appetizers
  • Baking
  • Breakfast
  • Dessert
  • Drinks
  • Kids
  • Lifestyle
  • Main
  • Recipes
  • Salads
  • Sauces and Dressings
  • Side Dishes
  • Soups
  • The Platefull Blog
  • Uncategorized

Archives

  • March 2025
  • July 2021
  • January 2021
  • July 2020
  • June 2020
  • May 2020
  • April 2020
  • March 2020
  • February 2020
  • January 2020
  • December 2019
  • November 2019
  • October 2019
  • September 2019
  • August 2019
  • September 2017
  • April 2017
  • March 2017
  • February 2017
  • January 2017
  • November 2016
  • October 2016

Recent Comments

  • Jennifer on Avocado and Egg Breakfast Stack
  • Christine Kish on Recipe Organization
  • Sarah on Easy Recipes for the Whole30
  • Jenn on Easy Recipes for the Whole30

- THEME BY ECLAIR DESIGNS -