I’ve been working on ways to add protein and fiber to my kids’ diet, as they aren’t big meat eaters. My youngest is going through a carb and cheese only phase, so it’s hard to get him to eat anything else right now. Luckily, this Mixed Berry Protein Smoothie saves the day! He will happily drink this and asks for it every day. I love it too! It’s simple to make and by soaking the chia in the yogurt and milk before blending, he doesn’t even notice that its there.

To start, combine the yogurt, milk, and chia seeds in a blender and let sit for about 10 minutes to soften the chia seeds. After 10 minutes, add the frozen mixed berries and honey. Blend (I use the smoothie setting on my Vitamix) and serve immediately!

Sit back and watch your kiddos enjoy! (He’s the cutest, isn’t he?!). My kids love this smoothie with a side of pancakes. 🙂

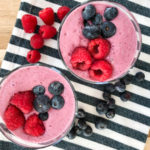
Mixed Berry Protein Smoothie
- Yield: 3 cups 1x
Ingredients
1 cup milk
8 oz yogurt (I use Stonyfield Organics Strawberry Yo Kids)
2 Tbsp chia seeds
1 cup frozen mixed berries
2 Tbsp honey
Instructions
In a 2 cup measuring cup with a spout (or bowl – it’s easier to pour out of a container with a spout), whisk together the milk, yogurt, and chia seeds. Let stand for 5-10 minutes.
Add the milk mixture, frozen berries (do not thaw) and honey to a blender. Blend until the mixture reaches smoothie consistency. Serve immediately.