The Platefull

Inspiring home cooks to be creative with accessible, nutritious recipes.

  • The Platefull Blog
  • Lifestyle
  • Kids
  • Shop
  • About
    • Privacy Policy, Terms & Conditions, and Disclosures

Berry Acai Bowl

July 25, 2021~ Breakfast, The Platefull Blog

My brothers have all lived in California for quite some time. Every time I go visit, my favorite thing to get for breakfast or lunch is a Berry Acai Bowl! I would come home and attempt to recreate the bowl at home in my fancy blender, and every time ended up with liquified fruit. Not exactly what I was going for.

A couple months ago, my Magic Bullet quit on me, so I was at the store we all love best (Target, obviously), looking for a replacement. I happened to see the Ninja Foodi Smoothie Bowl Maker. I knew nothing about it and hadn’t read any reviews, but decided that maybe this little tool was the secret to my açaí bowl dreams!

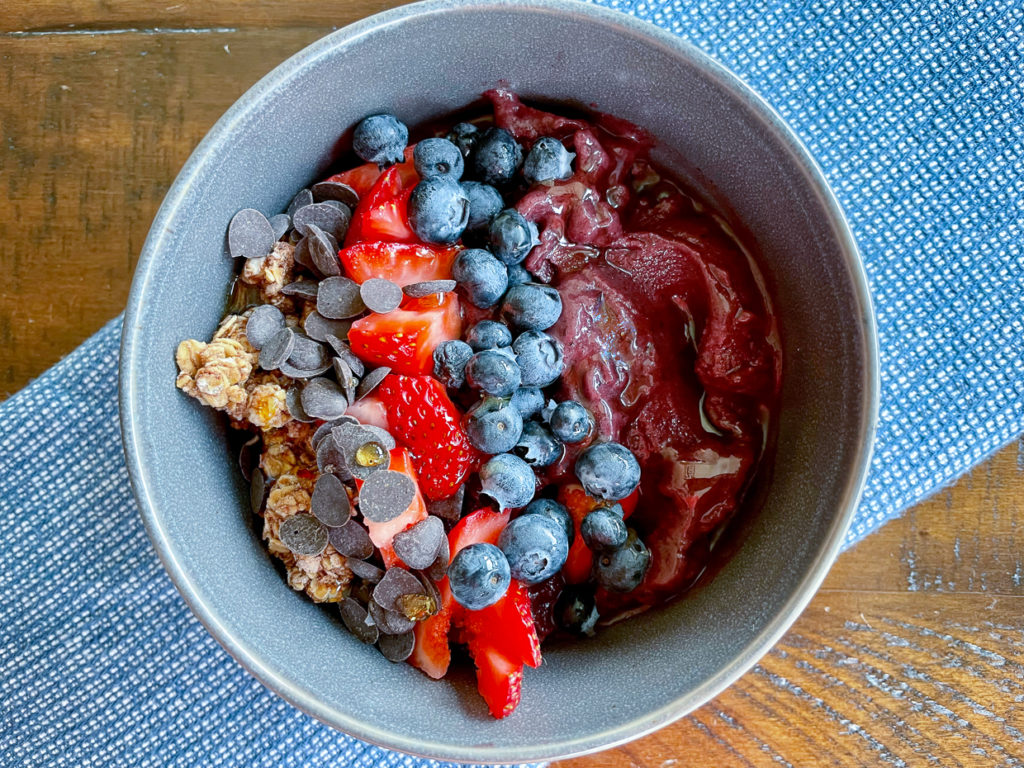
Over the next several weeks, I tested the ratios of all of the ingredients, determined to get it just right. I have finally mastered the perfect Berry Acai Bowl and can’t wait to share it with you! It’s as thick as ice cream, with just the right amount of sweetness. The thing I love about the Ninja Foodi Smoothie Bowl Maker is that it has a paddle in the top of it that gets all of the pieces of fruit equally blended as you twist it. It’s so easy and gives the perfect açaí bowl consistency every time! I know the measurement sound very exact (6 slices of banana), but trust me, this will get you perfect results! Just look at how perfectly thick this açaí bowl is!

Acai Bowl

Now that I have perfected a thick açaí bowl, it has become my go-to breakfast, especially on busy mornings because there’s no cooking involved. For other great breakfast ideas, check out some of my favorites!

Avocado and Egg Breakfast Stack

Egg and Feta Breakfast Wrap

Protein Pancakes

Print
clock clock iconcutlery cutlery iconflag flag iconfolder folder iconinstagram instagram iconpinterest pinterest iconfacebook facebook iconprint print iconsquares squares iconheart heart iconheart solid heart solid icon
Acai Bowl

Berry Acai Bowl

  • Author: Sarah
Print Recipe
Pin Recipe

Ingredients

Scale

1/4 cup apple juice

6 slices frozen banana

6 slices of sliced frozen strawberries

1/4 to 1/3 cup frozen blueberries

1 frozen açaí packet

Granola

Cacao chips

Honey

Fresh berries


Instructions

Add the apple juice to the blender cup.  Run the açaí packet under hot water for a few seconds, until you are able to break it into 3-4 pieces.  Add the açaí packet to the blender cup.  Add the strawberries and banana, then fill to the fill line with blueberries.  Secure the lid and process on the “bowl” setting, twisting the top the entire time.

Once well blended, scoop the açaí base mixture into a refrigerated bowl.  Top with granola, fresh berries, cacao chips, and a drizzle of honey.


Notes

Tip:  I like to store a couple small bowls in the refrigerator so that they are nice and cold when I make my açaí bowl.  It makes the base melt less quickly.

Tip: My favorite toppings are the Organic Toasted Coconut Granola from Trader Joes and the Organic Cacao chips from Trader Joes.

Did you make this recipe?

Tag @the.platefull on Instagram and hashtag it #theplatefull

Barbecue Cocktail Hot Dogs

January 19, 2021~ Appetizers, The Platefull Blog

Every time our family serves Fruit Pizza, we have these Barbecue Cocktail Hot Dogs with it. They are both part of our Christmas Eve meal tradition. One of my brothers makes the Fruit Pizza every year, and another makes these hot dogs. They are both kid-friendly and fun to serve!

Print
clock clock iconcutlery cutlery iconflag flag iconfolder folder iconinstagram instagram iconpinterest pinterest iconfacebook facebook iconprint print iconsquares squares iconheart heart iconheart solid heart solid icon
Cocktail Hot Dogs

Barbecue Cocktail Hot Dogs

  • Author: Sarah
Print Recipe
Pin Recipe

Ingredients

Scale

1 package hot dogs or lil smokies

3/4 c ketchup

3/4 c barbecue sauce

1/2 cup brown sugar

1 Tbsp chopped onion


Instructions

If using hot dogs, cut each hot dog into 4 equal pieces.  In a small saucepan, stir together the ketchup, barbecue sauce, brown sugar, and onion over medium heat.  Add the hot dogs and simmer until heated through.


Did you make this recipe?

Tag @the.platefull on Instagram and hashtag it #theplatefull

Fruit Pizza

January 17, 2021~ Dessert, Main, The Platefull Blog, Uncategorized

It’s been a minute, but I’m back with a really fun recipe! As we’ve added people to our family, this recipe is often highly debated. When I was a kid, we ate this for dinner, but as our family has grown, no one else seems to consider this a meal….weird. They all consider it dessert. Whatever you want to consider it, it’s delicious! I will admit, I make this as a super-fun-special-treat for my kids. They think its awesome when they get to basically eat cookies for dinner. While fueling their bodies with nourishing food is very important to me, you only live once! My family makes this Fruit Pizza every Christmas Eve, as part of our Christmas Eve Appetizer tradition.

It’s super simple to make. Roll out refrigerated sugar cookie dough into the shape of a pizza and bake according to package directions.

Make the cream cheese frosting and spread over the cooled sugar cookie crust. Set out different types of cut fruit and let people top their fruit pizza the way they like!

Print
clock clock iconcutlery cutlery iconflag flag iconfolder folder iconinstagram instagram iconpinterest pinterest iconfacebook facebook iconprint print iconsquares squares iconheart heart iconheart solid heart solid icon
Fruit Pizza

Fruit Pizza

  • Author: Sarah
Print Recipe
Pin Recipe

Ingredients

Scale

1 roll of sugar cookie dough

8 oz cream cheese

1/2 c powdered sugar

1 tsp vanilla

Assorted fruit, washed and cut


Instructions

Spread the sugar cookie dough in a pizza sized circle on a pizza pan.  Bake at 375 for 12 min.  Using a mixer, cream together the cream cheese, powdered sugar, and vanilla.  When the cookie dough is finished cooking, let cool completely.  Once cool, spread the cream cheese mixture over the top of the cookie.  Top with cut fruit of your choice.  (I use berries, apples, kiwi, banana).  


Did you make this recipe?

Tag @the.platefull on Instagram and hashtag it #theplatefull

Berry and Goat Cheese Salad

July 3, 2020~ Salads, The Platefull Blog

Please note that this post contains affiliate links and any sales made through such links will reward me a small commission – at no extra cost for you. All opinions are my own. See my disclosure for more information.

I love salads for lunch or as a side with dinner. Berry and Goat Cheese Salad is a great way to get in some extra vitamins! It’s packed with flavor and brightens up any meal. It is incredibly easy to throw together too!

I get asked a lot if my kids eat the salads I make. The answer is yes and no. I find that they often eat things better in a “deconstructed” fashion. So, I don’t typically cook separate meals for them, but I do serve things a bit differently to them. They also eat much better and are willing to try more new things if they serve themselves. So, when serving something like this salad, I’ll make the bowl of salad for my husband and I, but for the boys, I will put the fruit, avocado, greens, and pecans in small bowls or on a plate, but with each ingredient separated. I put that on the table with a spoon and they will serve themselves. One of the best books I’ve read on feeding kids is called Fearless Feeding: How to Raise Healthy Eaters from High Chair to High School. It breaks down feeding strategies for every age group and walks through what’s normal and not. I’ve found that the strategies have worked very well for us. Who knew that something as simple as no longer plating their food for them would bring about such a huge change in our dinnertime battles?! I highly recommend this book after reading more than my fair share of books about feeding kids!

By the way – you can easily turn this Berry and Goat Cheese Salad into a main dish by adding a little shredded rotisserie chicken. Yum!

Berry and Goat Cheese Salad
Print
clock clock iconcutlery cutlery iconflag flag iconfolder folder iconinstagram instagram iconpinterest pinterest iconfacebook facebook iconprint print iconsquares squares iconheart heart iconheart solid heart solid icon
Berry and Goat Cheese Salad

Berry and Goat Cheese Salad

  • Author: Sarah
Print Recipe
Pin Recipe

Ingredients

Mixed greens

Strawberries, sliced

Blueberries

Goat Cheese

Avocado

Candied Pecans (I buy mine at Trader Joe’s)

Balsamic vinaigrette dressing


Instructions

In a bowl, combine all ingredients (quantities of each to your liking).  Top with a drizzle of balsamic vinaigrette and serve immediately.


Did you make this recipe?

Tag @the.platefull on Instagram and hashtag it #theplatefull

Blistered Garlicky Green Beans

July 1, 2020~ Side Dishes, The Platefull Blog

Need a quick side dish that is packed with flavor and comes together in minutes? Blistered Garlicky Green Beans is it! I’m always looking for quick veggie sides – gotta get those veggies in! My kids actually like green beans better than I do. I love a green bean casserole, but fresh green beans are not typically my thing. I don’t like the squeaky-ness…anyone with me?! These Blistered Garlicky Green Beans are really good though! They get nice and crispy, and I think it eliminates that squeaky-ness. Very technical food terms here, by the way.

To start, trim the green beans, wash them, and make sure they are nice and dry. If there is water left on them, they will splatter even more when they hit the oil. I typically do this step on the weekend, so mine are ready to go as a quick side dish. Plus I hate trimming green beans and asparagus, so if I don’t do it right when I get home from the store, I probably won’t use them.

Add the olive oil to a pan and heat it over high heat, until shimmering. Make sure the green beans are nice and dry before you put them in the pan. They will splatter quite a bit, so a splatter screen can come in handy. Throw in the green beans and use tongs to spread them out evenly. Cook them, without disturbing them, for about 3 minutes. Then use tongs to flip them over (be very careful – the hot oil will splatter). Spread them out in an even layer again and let cook for about 4 more minutes.

Once they are blistered, add a sprinkle of salt and pepper and the sliced garlic. Let cook for about 1 more minute, being careful not to burn the garlic. I love to serve these with Parmesan Crusted Pork Chops. The green beans cook while the pork chops are in the oven.

Print
clock clock iconcutlery cutlery iconflag flag iconfolder folder iconinstagram instagram iconpinterest pinterest iconfacebook facebook iconprint print iconsquares squares iconheart heart iconheart solid heart solid icon
Garlicky Green Beans

Blistered Garlicky Green Beans

  • Author: Sarah
Print Recipe
Pin Recipe

Ingredients

Scale

3 Tbsp olive oil

1/2 pound fresh green beans, trimmed

3 garlic cloves, sliced

Salt and pepper, to taste


Instructions

Heat the olive oil in a skillet over high heat.  Once hot, add the green beans (be sure they are very dry – no water on them).  Spread them in an even layer and cook for about 3 minutes, until browning on the underside. Using tongs (and with an oven mitt on), carefully turn the green beans over.  Cook for 4 more minutes, rearranging with tongs as needed, until all sides are browned.  Add the sliced garlic and a sprinkle of salt and pepper.  Cook for one more minute, being careful not to burn the garlic.


Did you make this recipe?

Tag @the.platefull on Instagram and hashtag it #theplatefull

Parmesan Crusted Pork Chops

June 23, 2020~ Main, The Platefull Blog

The further we get into staying at home, the more I am completely over cooking! As someone who loves to cook, even I am tired of preparing meals three times a day. It seems as though all I do is cook, cleanup, and repeat. Who’s with me?! My goal for this weekend is to put together a list of my favorite freezer meals and get them prepped so that I can cut back on my time in the kitchen. Until then, it’s Parmesan Crusted Pork Chops to the rescue as a quick and easy weeknight meal!

As you well know by now, I love prep ahead recipes for weeknight meals. This Parmesan Crusted Pork Chops recipe is easy to prep ahead. Mix the Parmesan cheese, bread crumbs, garlic powder, and black pepper in a bowl. Cover and store in the fridge until you are ready to bake the pork chops. When ready, remove the mixture from the fridge and give it a quick stir with a fork. Rub the olive oil on the pork chops and press them into the bread crumb mixture. Shake off the excess and place on a baking pan with edges. I like to line my baking pan with foil to make cleanup easier.

Throw a veggie in a skillet (or microwave a bag of steamer veggies), the pork chops in the oven, and 30 minutes later, dinner is served! I love recipes like this! One of my favorite recipes to serve with Parmesan Crusted Pork Chops is my Blistered Garlicky Green Beans. They are oh-so-good!

What are your go-to easy meals right now?

Parmesan Crusted Pork Chops
Print
clock clock iconcutlery cutlery iconflag flag iconfolder folder iconinstagram instagram iconpinterest pinterest iconfacebook facebook iconprint print iconsquares squares iconheart heart iconheart solid heart solid icon
Parmesan Crusted Pork Chops

Parmesan Crusted Pork Chops

  • Author: Sarah
Print Recipe
Pin Recipe

Ingredients

Scale

4 boneless pork chops, 1/2 inch thick

1 Tbsp olive oil

1 cup grated Parmesan cheese

1 cup Italian breadcrumbs

1 tsp black pepper

1 tsp garlic powder


Instructions

Preheat oven to 350°.  Combine the Parmesan cheese, bread crumbs, pepper, and garlic powder in a bowl.  Rub the pork chops with olive oil, then press in the breadcrumb mixture on all sides, to coat.  Shake off excess and place on a foil-lined baking pan. Bake at 350° for 40-45 minutes, until pork chops are cooked through.


Did you make this recipe?

Tag @the.platefull on Instagram and hashtag it #theplatefull

Avocado and Egg Breakfast Stack

June 22, 2020~ Breakfast, The Platefull Blog

I am usually not a huge fan of breakfast. I typically stick to my morning routine, which consists of a smoothie. Recently, I’ve been doing pilates every morning and sometimes find myself much hungrier in the morning than I normally am. This Avocado and Egg Breakfast Stack was born out of me rummaging through my fridge and freezer on a particularly hungry morning, looking for something filling to eat that would still be Whole 30 compliant. It’s simple and satisfying.

Start by heating some olive oil in a skillet. Cook the hashbrown potatoes according to package directions. Then fry an egg. Mash up an avocado (or buy a little pre-mashed avocado cup, no judging here – that’s actually what I did!). Pile up the potatoes, mashed avocado, and fried egg and voila! Avocado and Egg Breakfast Stack! Top with an little hot sauce and you’re good to go!

Print
clock clock iconcutlery cutlery iconflag flag iconfolder folder iconinstagram instagram iconpinterest pinterest iconfacebook facebook iconprint print iconsquares squares iconheart heart iconheart solid heart solid icon

Avocado and Egg Breakfast Stack

5 from 1 review
  • Author: Sarah
Print Recipe
Pin Recipe

Ingredients

Scale

1 avocado, mashed

1/2 cup frozen hash brown potatoes

1 egg

Hot sauce


Instructions

Fry the hash browns in a non stick skillet, according to package directions, then remove from the skillet to a plate.  Crack an egg into the skillet, being careful not to break the yolk.  Fry the egg over medium heat for 1-2 minutes, then flip and fry on the other side for another 1-2 minutes, until the yolk is set to your liking.  When the fried egg is cooked, place on top of the hash browns.  Mash an avocado and place on top of the egg.  Top with salt, pepper, and hot sauce of your choice.


Did you make this recipe?

Tag @the.platefull on Instagram and hashtag it #theplatefull

Whole30 Mediterranean Turkey Wraps

May 22, 2020~ Main, The Platefull Blog

I am currently doing a Whole-30-ish. Ha. It’s my own way of forcing myself to focus with intention on my nutrition, but still allowing myself a few things that are not Whole 30 compliant. Anytime I’m focusing on nutrition, I’m constantly in search of easy, healthy recipes. Whole30 Mediterranean Turkey Wraps come together in 5 minutes and are a perfect solution for those raid-the-fridge days. Add any veggies you like!

I’m finding it especially hard to stick to good nutrition these days. Having the kids out of school while still trying to work a full time job is a lot. That’s why it’s essential that I have a set of go-to, low prep meals that I can fall back on. Otherwise, it’s way too easy to reach for the bag of chips. Or the Dot’s Pretzels. OMG. Have you tried Dot’s Pretzels?! Anyway…Whole30 Mediterranean Turkey Wraps are super simple to prepare, easy to pack as a portable lunch, and delicious! No cooking required.

If you are not concerned about keeping this recipe Whole 30 compliant, Feta is a wonderful addition! You can also switch it up by using hummus in place of the mayo. This still keeps it light and healthy, but gives it a little different flavor. Equally delicious!

If you are looking for other Whole 30 meal ideas, check out my roundup of easy Whole 30 recipes here!

Print
clock clock iconcutlery cutlery iconflag flag iconfolder folder iconinstagram instagram iconpinterest pinterest iconfacebook facebook iconprint print iconsquares squares iconheart heart iconheart solid heart solid icon

Whole 30 Mediterranean Turkey Wraps

  • Author: Sarah
Print Recipe
Pin Recipe

Ingredients

Butter lettuce leaves

Sliced deli turkey

Roasted red peppers

Diced cucumber

Sliced Kalamata olives

Sliced roasted red pepper

Diced jarred artichoke hearts

Crumbled feta cheese (optional)

Avocado Mayo


Instructions

Spread a small amount (about 1 tsp) of avocado mayo on each butter lettuce leaf.  Roll a slice of turkey and place in the middle.  Top with cucumber, olives, artichokes, roasted red pepper, and feta (if using).  Enjoy as a lettuce wrap!


Notes

To remain Whole 30 compliant, omit the Feta cheese.  

As another variation, use hummus in place of mayo (this is not Whole 30 compliant, but it is yummy and healthy!)

Did you make this recipe?

Tag @the.platefull on Instagram and hashtag it #theplatefull

Cuban Pork Bowls

May 19, 2020~ Main, The Platefull Blog

I have been loving bowls lately! They are simple to make and perfect for keeping in the fridge for easy lunches! Cuban Pork Bowls are so delicious, flavorful, and healthy. The pork is so good, easy in the slow cooker, and super versatile! Add it to salads, wraps, make a Cuban sandwich, soups, over rice with beans and guac, or in a bowl like this!

I like to make a big batch of this meat and then divide it into smaller portions to freeze. For a super quick weeknight meal, I buy frozen fire-roasted sweet potato cubes, pre-made guacamole, a can of cuban black beans from Trader Joe’s, and the frozen Organic Jasmine Rice from Trader Joe’s. Simply heat the meat, potatoes, beans and rice, and you’re done!

You can also easily make this meal Whole 30 compliant by leaving out the rice, or substituting cauliflower rice if that’s your thing.

Print
clock clock iconcutlery cutlery iconflag flag iconfolder folder iconinstagram instagram iconpinterest pinterest iconfacebook facebook iconprint print iconsquares squares iconheart heart iconheart solid heart solid icon
Cuban Pork Bowls

Cuban Pork Bowls

  • Author: Sarah
Print Recipe
Pin Recipe

Ingredients

Scale

For the Pork:

2 Tbsp extra virgin olive oil

1/2 cup orange juice

1/2 cup lime juice

1 1/2 tsp salt

1 tsp cumin

1 tsp dried oregano

1/4 tsp crushed red pepper flakes

1/8 tsp black pepper

7 cloves garlic, peeled and smashed

1 small sweet onion, sliced thin

1 bay leaf

3 pound pork shoulder

For the Bowls:

Roasted Sweet Potato, diced into 2 inch chunks

Rice, cooked

Cuban Style Black Beans, heated

Romain lettuce, chopped

Smashed avocado (or guacamole)


Instructions

Place the onion and bay leaf in the bottom of a slow cooker.  Place the pork shoulder on top of the onions.  In a bowl, combine remaining pork ingredients (oil, orange juice, lime juice, spices, and garlic).  Pour over the top of the pork shoulder.  Cover and cook on low for 8-9 hours, until tender.  Transfer the pork to a cutting board to shred, then return the shredded meat to the slow cooker and mix well with the sauce.

For the sweet potato, peel and dice the potato.  Toss with about 1 tsp olive oil and roast at 400 ° for 15-20 minutes, until beginning to brown. Alternatively, you can use frozen fire-roasted sweet potato chunks and heat.

For the beans, warm a can of Cuban style black beans on the stove.  (My favorite is Trader Joe’s brand).

Prepare the rice, according to package directions.  (I like to use the frozen Trader Joe’s Organic Jasmine Rice because I can quickly microwave it).

To prepare the bowls, layer rice in the bottom of a bowl.  Top with sweet potato, lettuce, beans, pork, and guacamole (or smashed avocado).


Did you make this recipe?

Tag @the.platefull on Instagram and hashtag it #theplatefull

Thyme and Garlic Roasted Sweet Potatoes

May 7, 2020~ Side Dishes, The Platefull Blog

Thyme and Garlic Roasted Sweet Potatoes are a really simple way to roast a veggie alongside whatever protein you are making for dinner. They are a flavorful, healthy side dish since sweet potatoes are nutrient dense and high in fiber. For some interesting facts on the nutritional value of sweet potatoes, check out this article. We eat sweet potatoes a lot, as I actually like them better than regular potatoes (which is a long way for me to come, because I used to hate them!). My kids will eat them too, finally. You know how they say to give a kid a food at least ten times before they will eat it? I’m pretty sure the person who wrote that rule doesn’t have kids. Either than or mine are a whole ‘notha level of stubborn. I have served them sweet potatoes, in every form imaginable, consistently (once a week or so) for TWO YEARS. They finally, finally, started eating them (and liking them!). What is that, 100 times of serving them?! Maybe its because they see how much I like sweet potatoes and that deterred them from trying them, out of pure stubbornness. I know you mommas feel my pain.

Anyway, back to the recipe. not only do these Thyme and Garlic Roasted Sweet Potatoes make a great side dish, if you are doing a Whole 30, they make a great base for a hamburger slider or Sloppy Joe meat too! For breakfast, you can top them with a fried egg and some hot sauce. They are super flexible!

Print
clock clock iconcutlery cutlery iconflag flag iconfolder folder iconinstagram instagram iconpinterest pinterest iconfacebook facebook iconprint print iconsquares squares iconheart heart iconheart solid heart solid icon
Thyme and Garlic Roasted Sweet Potatoes

Thyme and Garlic Roasted Sweet Potatoes

  • Author: Sarah
Print Recipe
Pin Recipe

Ingredients

Scale

2 medium sweet potatoes, peeled and cut into 1 1/2 inch thick rounds

1 1/2 Tbsp olive oil

2 cloves garlic, minced

2 Tbsp fresh thyme leaves

1/4 tsp salt

1/4 tsp pepper


Did you make this recipe?

Tag @the.platefull on Instagram and hashtag it #theplatefull

  • 1
  • 2
  • 3
  • …
  • 13
  • Next Page »

Categories

  • Appetizers
  • Baking
  • Breakfast
  • Dessert
  • Drinks
  • Kids
  • Lifestyle
  • Main
  • Recipes
  • Salads
  • Sauces and Dressings
  • Side Dishes
  • Soups
  • The Platefull Blog
  • Uncategorized

Archives

  • March 2025
  • July 2021
  • January 2021
  • July 2020
  • June 2020
  • May 2020
  • April 2020
  • March 2020
  • February 2020
  • January 2020
  • December 2019
  • November 2019
  • October 2019
  • September 2019
  • August 2019
  • September 2017
  • April 2017
  • March 2017
  • February 2017
  • January 2017
  • November 2016
  • October 2016

Recent Comments

  • Jennifer on Avocado and Egg Breakfast Stack
  • Christine Kish on Recipe Organization
  • Sarah on Easy Recipes for the Whole30
  • Jenn on Easy Recipes for the Whole30

- THEME BY ECLAIR DESIGNS -