The Platefull

Inspiring home cooks to be creative with accessible, nutritious recipes.

  • The Platefull Blog
  • Lifestyle
  • Kids
  • Shop
  • About
    • Privacy Policy, Terms & Conditions, and Disclosures

Spaghetti

December 6, 2019~ Main, The Platefull Blog

This is the spaghetti sauce recipe my Mom has always made for us. We always laugh because in our family cookbook, it’s called “Spicy Spaghetti” but there’s really nothing spicy about it! So, we’ll just call it Spaghetti. This spaghetti sauce happens to be Whole 30 compliant and it’s delicious over carrot or zucchini noodles. I serve it over organic, whole wheat noodles for my kids, but I often make carrot noodles for myself. However, my children will not be fooled by any sort of creative name for the carrot noodles – they know pasta isn’t orange and no non-carb alternative is acceptable. The great thing about this sauce is everyone can eat it on whatever they want. Side note – I buy the carrot noodles in the freezer section from Trader Joes. Means very limited work for me, which leaves me no excuse to not go the healthy, Whole 30 compliant route. I actually prefer carrot noodles over zucchini noodles. I think the texture is more similar to real pasta and they don’t water down the sauce like zucchini noodles can.

I keep jars of this spice mix already mixed up in my pantry, right next to the cans of tomato sauce. It makes a quick weeknight meal. This sauce also freezes very well – just thaw and reheat in a sauce pan.

This recipe is so simple and takes just a few ingredients – tomato sauce, spices, onion, and ground beef. I get ground beef from Trader Joe’s or Butcher Box. I always buy organic, 100% grass fed beef. I suppose that’s a debate for another day, but over the last year, I’ve really learned a lot about the importance of 100% grass fed and eating organic whenever possible. Trader Joe’s has great prices for 100% grass fed organic beef!

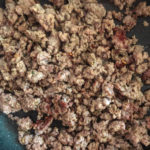
To start, add the onion and ground beef to a sauce pan.

Once the beef is cooked through, drain the grease. Then add the tomato sauce and spices.

Stir to combine and let the sauce simmer on the stove for up to a couple hours. If you don’t have time to let it simmer, that’s okay. Just let it go while the noodles cook and you’ll be fine.

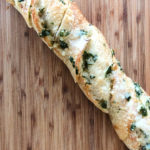
I like to serve this meal with my Parmesan and Roasted Garlic Bread and Apple Kale Salad (pictured above).
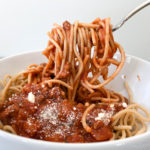
Print
clock clock iconcutlery cutlery iconflag flag iconfolder folder iconinstagram instagram iconpinterest pinterest iconfacebook facebook iconprint print iconsquares squares iconheart heart iconheart solid heart solid icon

Spaghetti

  • Author: Sarah
Print Recipe
Pin Recipe

Ingredients

Scale

1 lb ground beef

1/4 cup onion, chopped

2 15-oz cans tomato sauce

1/4 tsp garlic powder

1 bay leaf

1 tsp dried oregano

Sprinkle of dried parsley

1/2 tsp dried sage

1/4 tsp dried thyme

1/4 tsp marjoram

1 lb spaghetti noodles, cooked and drained


Instructions

In a saucepan, brown the ground beef with the onion.  Drain the grease.  Add 2 cans tomato sauce. Add 1/2 can water.  Add the spices and stir to combine.  Let the sauce simmer, up to a couple hours if time allows.  (If not, serve right away).  Serve over spaghetti noodles.


Did you make this recipe?

Tag @the.platefull on Instagram and hashtag it #theplatefull

Parmesan and Roasted Garlic Bread

December 5, 2019~ Baking, Side Dishes, The Platefull Blog

This is the fattiest, butteriest, cheesiest, but most delicious garlic bread ever made. Ha! That’s probably not the way you’re supposed to start a blog post, huh? It’s not low calorie, but I can promise it’ll be a crowd pleaser! When I make Italian food on weeknights, I typically go with frozen garlic knots or bread because….time. But, when I’m craving a slow meal on a chilly weekend night and time in the kitchen with my family, it’s usually Italian food and this bread on the menu.

Start by cutting the top off of the garlic bulbs and remove the loose “paper” from the outside edges of the bulb. Place in a muffin tin. Drizzle with a little olive oil, and sprinkle with salt and pepper. Cover the tops with foil and roast in a 400 degree oven for 40-45 minutes or until golden brown. Let cool, then squeeze the garlic cloves out of the bulb and into a bowl. You should either use the roasted garlic immediately, or if you want to do this step ahead, you can freeze the roasted garlic. There are two ways you could do this:

  • Method 1: Line a baking sheet with parchment paper. Lay each clove separately on the parchment paper and freeze. Once frozen, you can move the cloves to a Ziploc bag and place back in the freezer.
  • Method 2: Mash the roasted garlic cloves. Measure out 1 tsp portions into an ice cube tray, wrap in plastic wrap several times so it doesn’t make your freezer smell, and keep frozen. Note that once you do this, you will never be able to use that ice cube tray for anything else because it will absorb the garlic odor and taste.

Once the garlic is roasted, you will mash it and combine with softened butter, parsley, salt, and pepper. (In this picture, I have not yet removed the cloves from the bulb – please don’t try to mash the whole bulb – ha!).

Next you will slice the baguette on the diagonal, not slicing all the way through. You want the slices to be about an inch and a half to 2 inches apart.

You will then use a fork to stuff the roasted garlic and butter mixture into each diagonal slit. Open each slit slightly and sprinkle in some grated parmesan. Last, cover the top of the baguette with the butter mixture and sprinkle with grated parmesan cheese.

Bake at 350 for about 12-15 minutes, until starting to crisp on the outside.

Slice and serve!

Print
clock clock iconcutlery cutlery iconflag flag iconfolder folder iconinstagram instagram iconpinterest pinterest iconfacebook facebook iconprint print iconsquares squares iconheart heart iconheart solid heart solid icon

Parmesan and Roasted Garlic Bread

  • Author: Sarah
Print Recipe
Pin Recipe

Ingredients

Scale

3 garlic bulbs

2 Tbsp olive oil

2 sticks of butter, softened

2 Tbsp chopped flat-leaf parsley

2 sourdough baguettes

1/2 cup grated parmesan cheese


Instructions

Start by cutting the top off of the garlic bulbs and remove the loose “paper” from the outside edges of the bulb. Place in a muffin tin. Drizzle with a little olive oil, and sprinkle with salt and pepper. Cover the tops with foil and roast in a 400 degree oven for 40-45 minutes or until golden brown. Let cool, then squeeze the garlic cloves out of the bulb and into a bowl.

Adjust oven temperature to 350 degrees. Use a fork to mash the garlic, then add the 2 sticks of softened butter and parsley. Slice the baguettes diagonally, but not cutting through. Spread half of the butter mixture in between each slice on both baguettes, being careful not to tear the baguette apart at the bottom. Sprinkle parmesan cheese in between each slice. Spread the remaining butter mixture over the top of both baguettes and sprinkle on a little more parmesan cheese. Bake for 12-15 minutes until the butter is all melted and the bread is starting to crisp.


Did you make this recipe?

Tag @the.platefull on Instagram and hashtag it #theplatefull

Tops Gifts for Cooks under $25

December 4, 2019~ Lifestyle, The Platefull Blog

To say that I have a lot of kitchen tools is an understatement. I love to cook and I always love to try the newest gadgets for the kitchen! Over time though, I find myself going back to my tried and true favorites. If you’re looking for stocking stuffers for the cook in your life, here’s a list of my favorites. Each of these are tools that I use in my own kitchen on a regular basis and love! I’ve included links to each of these products to make your holiday shopping a cinch!

As an Amazon Associate I earn from qualifying purchases. I only recommend products I use in my own kitchen!

1: OXO Pineapple Corer I love to make salsas for tacos, etc with fresh pineapple, and my kids love to eat fresh pineapple for a snack, so I find myself using this tool much more often than I ever thought I would! It cores and slices at the same time, so all I have to do is cut the top off the pineapple, use this tool, and we are eating fresh pineapple seconds later. I also love that you get juice left in the bottom of the pineapple, which my boys fight over getting to drink!

2: OXO Good Grips 11 Inch Better Balloon Whisk I have an embarrassing number of whisks of every type. This is the one I use by far the most. The balloon whisk is sturdy and any time this one is clean, it’s the one I reach for. I should just order myself another one to replace the others I never use. Ha!

3: Mini Whisk I use my mini whisks every day when I’m making my fancy coffee. I add the syrup to my cup, the shot(s) of espresso, and whisk as I pour in the milk (there’s no fancy latte art going on here, so the milk just goes straight in the cup). I also use these alot when I’m mixing small amounts – like cornstarch into water, etc.

4: Lemon Squeezer So I know the TV chefs can squeeze a lemon and filter the seeds out with their bare hands, but, alas, I am not a TV Chef and I do not have those skills. So my Lemon Squeezer is a well loved tool in my kitchen. I use it for everything I squeeze a lemon for – tea, salad dressings, marinades, etc.

5: Kiwi peeler and cutter My kids love kiwis and I hate cutting kiwis! This tool, while I realize has one purpose, is seriously a lifesaver if kiwis are a regular thing in your house. It peels and cuts the kiwi all in one step, which makes serving kiwis a breeze!

6 & 7: Microplane and Microplane Glove I grouped these together because if you have a Microplane, you need the glove! I use my microplane all the time, for zesting oranges, lemons, and limes, grating cheese, ginger, and garlic. The glove has saved my fingers many times. I even use it any time I’m using a box grater!

8: Spice Jars I use these spice jars all. the. time. One of my keys to simplifying meal prep is to pre-mix spice mixes that I use alot. For example, I always have the spices pre-mixed in these containers for taco meat, spaghetti sauce, pork tenderloin seasoning, etc.

9: Cookie Dough Scoop I use my 1 Tbsp cookie dough scoop every time I make cookies. It just makes forming the cookies so much faster!

10: Jar Grips I find that these really do help with those tough-to-open jars! I also use this a lot to get lids off of my kid’s paint containers because those get stuck when the paint dries.

11: Measuring Cups I have multiple sets of measuring cups, from the cheapest of the cheap to ultra pricey. But these are the measuring cups I reach for the most. I love the “off” sizing like 2/3 and 3/4 cup. I also love the pouring spouts. They work so well when measuring liquids! They stack neatly in my drawer too. I actually bought mine as a set – see the Measuring Spoon link below.

12. OXO Thermometer Again, probably no surprise, but I’ve had several brands of thermometers in the past, some on the high end of the thermometer price ranges. This little thermometer is easy to store, gives a quick reading, and I don’t honestly notice a difference between it and the pricey ones. For any home cook, this one is perfectly good!

13. Measuring Spoons This might be weird, but I am super picky about measuring spoons. I like the stainless steel look, but they have to fit into my spice jars, which means the end cannot be round! The shape of these is perfect for spice jars! The 1 Tbsp doesn’t fit into some of my spice jars, so I just pour for those. The others do all fit though (at least any spice jar I’ve tried).

Enchilada Zucchini Boats

December 4, 2019~ Main

You guys, these are so delicious, I promise you won’t even notice that they are healthy! Ha. Automatically when someone says “healthy,” I think “not good.” Why is that?! Anyway, these are packed full of flavor and are totally satisfying. When I’m doing a Whole 30, I leave the cheese and sour cream off of mine and they are still equally delicious!

Start off by measuring out the spice mix. Note: I keep several spice mixes already prepped in my pantry. This is one of them. World Market has the cutest spice jars that are perfect for pre-measured spice mixes! Why make so many of my own spice mixes you ask? Because I can control the ingredients and I know my spice mixes don’t have any bad junk added that our bodies don’t need. Back to the recipe – measure the spices and open the can of tomato sauce.

Slice the zucchini in half, lengthwise and scoop out the middle to form little “boats” to hold the meat mixture. Bake them at 400 degrees for 20-25 minutes, until tender.

While the zucchini is baking, brown the ground beef and onion together, then add in the tomato sauce and spice mixture, stirring to combine well. Once the mixture is combined, whisk together the water and cornstarch (or arrowroot starch if Whole 30) and then stir into the meat mixture. Let it boil for a couple minutes so that it thickens, but keep stirring as it does.

Once the meat mixture has thickened and the zucchini is tender, remove the zucchini from the oven and spoon the meat mixture into the zucchini boats.

Sprinkle cheese over the top.

Bake at 400 for another 5-10 minutes.

Serve with your favorite enchilada toppings. I use chopped tomatoes, jalapenos, diced green onion, sour cream, guacamole, black olives, shredded lettuce, etc. Whatever I feel like that night!

I like to serve this with Trader Joe’s Mexican Style Roasted Corn with Cotija Cheese as a side dish. I can quickly heat it up while the enchiladas are finishing in the oven.

Print
clock clock iconcutlery cutlery iconflag flag iconfolder folder iconinstagram instagram iconpinterest pinterest iconfacebook facebook iconprint print iconsquares squares iconheart heart iconheart solid heart solid icon

Enchilada Zucchini Boats

  • Author: Sarah
Print Recipe
Pin Recipe

Ingredients

Scale

1 lb ground beef

3 medium zucchini, sliced in half lengthwise

1 Tbsp olive oil

1/2 cup chopped yellow onion

2 cloves garlic

1 15-ounce can tomato sauce

1 Tbsp ancho chili powder

1 Tbsp chili powder

1 tsp ground cumin

1/2 tsp paprika

2/3 cup water

1 1/2 tsp cornstarch

1 cup shredded cheddar cheese


Instructions

Preheat the oven to 400 degrees.  Use a spoon to scoop out the middle of each zucchini half, creating “boats.”  Brush the zucchini all over with olive oil and place in a 9×13 baking dish.  Bake until the zucchini is tender, about 20 minutes.

While the zucchini is baking, cook the ground beef and onion in a skillet.  Drain the excess fat.  Return to the heat, and add the garlic.  Cook for 1 more minute.  Add the tomato sauce and spices and stir well.  In a bowl, whisk together the cornstarch and water.  Add to the meat mixture and stir.  Allow the meat mixture to come to a boil and stir while boiling for about 1-2 minutes.  Reduce the heat to low and let it simmer for 5 minutes, until it has thickened some.

When the zucchini is tender, remove it from the oven.  Spoon the meat mixture into the boats.  Top with cheese and bake for another 5-10 minutes, until the cheese has melted.  Serve topped with your favorite enchilada toppings: diced green onion, chopped tomatoes, shredded lettuce, black olives, jalapenos, sour cream, salsa, or guacamole.


Did you make this recipe?

Tag @the.platefull on Instagram and hashtag it #theplatefull

Lemon, Garlic, and Herb Sea Bass

December 3, 2019~ Main

By now, you’ve hopefully made a few of my recipes and have faith that I wouldn’t post something I haven’t tried and loved, right?? Okay good, because this recipe is going to require a little faith. I know there will be the fish purists out there that think putting a dairy mixture on top of a perfectly good fish like sea bass is a travesty, but then I guess this recipe isn’t for you. I’m not a fish person. To be honest, it kinda grosses me out to make fish at home. And it’s not something I can say I truly love to eat. This recipe is the only exception. I will gladly make this at home, and not only that, but I even crave it! So just trust me when I say, it’s good. It’s really, really good.

Start by putting the fish on a baking pan. You can line it with parchment paper so it’s easier to scrape off, unless you like a good challenge like me. I ask for fillets from the tail end of the fish so that they are wider and thinner for a 4-5 ounce portion. When I’ve used thicker pieces of fish for this recipe, a 4-5 ounce portion is too skinny and it topples over. I’m glad I can make mistakes so you don’t have to.

Next, mix the yogurt mixture and top the fish with it, spreading it out evenly over the top.

Combine the panko with the olive oil to coat the panko breadcrumbs well. Spoon them on top of the yogurt mixture and gently press them into the yogurt mixture so they stick better.

Bake at 400 for about 15 minutes or so, until the fish is cooked through.

Print
clock clock iconcutlery cutlery iconflag flag iconfolder folder iconinstagram instagram iconpinterest pinterest iconfacebook facebook iconprint print iconsquares squares iconheart heart iconheart solid heart solid icon

Lemon, Garlic, and Herb Sea Bass

  • Author: Sarah
Print Recipe
Pin Recipe

Ingredients

Scale

4 Chilean Sea Bass fillets (4–5 ounces each)

1 Tbsp olive oil

1 cup whole wheat panko

1/3 cup full-fat Greek yogurt

3 Tbsp parmesan cheese, grated

1/4 cup fresh parsley, chopped

1/4 cup fresh basil, chopped

2–3 garlic cloves, finely minced

1 large lemon, zested (not juiced)

3/4 tsp sea salt

1/2 tsp paprika

1/4 tsp black pepper


Instructions

Preheat the oven to 400 degrees.  Line a baking sheet with parchment paper.  In a bowl, combine the panko and olive oil.  In another bowl, combine the greek yogurt, herbs, garlic, lemon zest, spices, and Parmesan.

Place the sea bass fillets on the parchment paper lined baking sheet.  Top with the yogurt mixture, to evenly coat the top.  Spoon the panko mixture over the top, gently pressing into the yogurt mixutre.

Bake until the fish is cooked, about 15 minutes, depending on the thickness of the fish.  Serve with a squeeze of lemon juice, if desired.


Notes

I find that thinner fillets of sea bass work best for this recipe (towards the tail end of the fish) so that they don’t topple over during baking.

Did you make this recipe?

Tag @the.platefull on Instagram and hashtag it #theplatefull

Prawn Saganaki

December 2, 2019~ Main, The Platefull Blog

This recipe has been in my Winter rotation for years. It’s healthy, easy to make, and a perfect warm comfort meal on cold days. I’ve been making this for almost 10 years now on a regular basis in the Winter and we still aren’t sick of it! Which says a lot, because there aren’t a ton of recipes that I remake. I love to try new things, so the things I remake consistently are truly loved in this house! I serve this recipe with sliced crusty bread and a simple salad, like Apple Kale Salad.

Print
clock clock iconcutlery cutlery iconflag flag iconfolder folder iconinstagram instagram iconpinterest pinterest iconfacebook facebook iconprint print iconsquares squares iconheart heart iconheart solid heart solid icon

Prawn Saganaki

  • Author: Sarah
Print Recipe
Pin Recipe

Ingredients

Scale

1 lb raw shrimp, peeled and deveined 

1 red onion, halved and thinly sliced

3 cloves garlic, minced

2 Tbsp tomato paste

1/2 cup white wine

1 15-oz can diced tomatoes

4 oz feta block, crumbled into large pieces (1/2 feta block)

2 Tbsp fresh parsley, chopped

1 Tbsp olive oil


Instructions

Preheat the oven to 350 degrees.  Heat the oil over medium heat in an oven safe pan. Add the onions to the pan and cook, stirring for about 3 minutes until soft.  Add the garlic and cook for 1 more minute.  Add the tomato paste and cook, stirring, for 1 minute.  Add the wine and let simmer for a couple minutes, until reduced by half.  Then add the diced tomatoes and let simmer for 5 minutes or until slightly thickened.  Lay the shrimp on top of the tomato mixture and crumble the feta into large pieces in the middle.  Bake for 10 minutes until the shrimp is cooked.  When it comes out of the oven, sprinkle with fresh chopped parsley.  Serve with crusty bread for dipping.


Did you make this recipe?

Tag @the.platefull on Instagram and hashtag it #theplatefull

Butternut Squash, Sausage, and Kale Lasagna

December 1, 2019~ Main, The Platefull Blog

This is a longtime Winter favorite of mine. It’s delicious, hearty, and comforting. It does take some work to make, but it’s totally worth it! Use my Italian Sausage (I keep it on hand in the freezer) to speed things up a little. It really is the perfect Winter weekend meal!

Start by chopping the kale and dicing the butternut squash (or save yourself some time and buy pre-cut butternut squash). Place the butternut squash in a baking dish, cover with plastic wrap, pierce the plastic wrap a few times, and microwave for 5 minutes.

Once the squash is cooked, add it and the kale to a large bowl. Wipe the dish that you cooked the squash in dry. Next, brown the sausage (if you had pre-cooked sausage in the freezer, just make sure it is fully thawed).

While the sausage is browning, you can make the sauce. Start by heating the oil in a saucepan and cooking the garlic for about 1 minute. Combine the flour and 1/2 cup of milk in a bowl and whisk, then add the milk mixture to the pan with the garlic. Whisk in the remaining milk and bring to a boil over medium high heat, whisking frequently. Once the sauce has thickened, remove from the heat and stir in 1 ounce of the Gruyere cheese and the parmesan cheese, salt and pepper.

Spray the baking dish with cooking spray and spread 1/3 cup of the cheese sauce over the bottom of the dish.

On top of the cheese sauce, layer 2 no boil noodles. Top with half of the veggie mixture and 1/2 of the sausage. Then pour on 2/3 cup of the remaining cheese sauce.

Add 2 more no boil noodles, the remaining veggie mixture and sausage, and another 2/3 cup cheese sauce. Top with the remaining 2 no boil noodles, then the remaining cheese sauce.

Cover with foil and bake at 450 for 15 minutes, then remove the foil and sprinkle with the remaining Gruyere cheese and pecans (don’t skip the pecans – trust me on this one!). Bake uncovered for 10 more minutes.

Print
clock clock iconcutlery cutlery iconflag flag iconfolder folder iconinstagram instagram iconpinterest pinterest iconfacebook facebook iconprint print iconsquares squares iconheart heart iconheart solid heart solid icon

Butternut Squash, Sausage, and Kale Lasagna

  • Author: Sarah
Print Recipe
Pin Recipe

Ingredients

Scale

6 no boil lasagna noodles

1/4 cup water

1 12-ounce package prechopped butternut squash

3 cups chopped kale

1 lb cooked Italian sausage

1 Tbsp olive oil

1 1/2 Tbsp minced garlic

1/4 cup flour

2 3/4 cup milk, divided

2 ounces shredded Gruyere cheese, divided

1 ounce Parmesan cheese, grated

1/2 tsp salt

1/4 tsp black pepper

cooking spray

3 Tbsp chopped pecans


Instructions

Preheat the oven to 450 degrees.  Place the butternut squash in an 8×8 baking dish.  Pour in the water, cover with plastic wrap, and pierce the plastic wrap 3 times to vent.  Microwave for 5 minutes or until the butternut squash is tender, then drain.  Place the chopped kale in a large bowl and add the butternut squash.  Wipe out the 8×8 baking dish, spray with cooking spray, and set aside.

While the butternut squash is cooking, brown the Italian sausage in a skillet (if you are using precooked Italian sausage, just make sure it is fully thawed).

Heat the oil in a small saucepan over medium heat.  Add the garlic and cook, stirring, for about 1 minute.  In a bowl, whisk together the flour and 1/2 cup of the milk, then add to the saucepan with the garlic.  Whisk in the remaining milk and continue whisking until smooth.  Bring the mixture to a boil, whisking frequently, until thickened.  Remove from the heat and stir in 1 ounce of gruyere cheese, the parmesan cheese, salt, and pepper.  Continue stirring until the cheese is melted and the sauce is smooth.  

Pour 1/3 cup of the cheese sauce into the bottom of the 8×8 baking dish.  Spread evenly over the bottom of the dish.  Layer 2 no boil noodles on top of the sauce.  Then layer half of the veggie mixture.  Then layer half of the sausage.  Top with 2/3 cup of the cheese sauce.  Then layer 2 no boil noodles, then the remaining half of the veggie mixture, then the remaining half of the Italian Sausage.  Top with 2/3 cup of the cheese sauce, then 2 more no boil noodles.  Pour the remaining cheese sauce over the top of the last layer of noodles.  Cover with foil and bake at 450 for 15 minutes.

Remove the foil and sprinkle with chopped pecans and remaining Gruyere.  Return to the oven and bake for another 10 minutes, until bubbly.  


Did you make this recipe?

Tag @the.platefull on Instagram and hashtag it #theplatefull

Italian Sausage

November 30, 2019~ Main, The Platefull Blog

I like to use my own spice mixes whenever possible because I control the ingredients. This Italian Sausage spice mix is perfect. I make it really simple for myself by prepping batches of Italian Sausage at once and storing it in the freezer. I store some precooked for use in soups or casseroles, just to make it extra easy. I also store some uncooked so that I can cook it when I’m preparing dishes that need the sausage flavor and grease in the pan. Another easy way to do it is to store the spice mix already prepped ahead of time. All you have to do then is combine it with the ground pork.

To make this Italian Sausage, first combine the spices.

Mix well with 2 lbs ground pork, to distribute evenly.

You can freeze it at this point, portioned into whatever sizes you like. Or, you can cook it and use immediately or freeze.

Print
clock clock iconcutlery cutlery iconflag flag iconfolder folder iconinstagram instagram iconpinterest pinterest iconfacebook facebook iconprint print iconsquares squares iconheart heart iconheart solid heart solid icon

Italian Sausage

  • Author: Sarah
Print Recipe
Pin Recipe

Ingredients

Scale

2 lbs ground pork

1 tsp pepper

2 tsp dried parsley

1 1/2 tsp Italian seasoning

1 tsp garlic powder

3/4 tsp crushed dried fennel seeds

1/2 tsp paprika

1 tsp minced dried onion

2 tsp salt


Instructions

Mix all spice ingredients together in a small bowl.  Add to 2 pounds ground pork and use your hands to mix well, distributing the spice mixture evenly.  


Did you make this recipe?

Tag @the.platefull on Instagram and hashtag it #theplatefull

Pumpkin Cream Cheese Braid

November 24, 2019~ Baking, Breakfast, The Platefull Blog

I’ve been working on a short-cut Cream Cheese Filled Pumpkin Muffin, so I’ve got a lot of pumpkin and cream cheese on hand. My kids love my Nutella Cream Cheese Braid, so with all this extra pumpkin, I thought, “why not?!” It turned out so delicious! It’s the perfect sweet accompaniment for an egg casserole. I’ll definitely be serving this for our guests at Thanksgiving!

To start, flatten out a sheet of crescent roll dough. You can either press the seams together or buy the dough sheet. (The dough sheet would be much easier). Make 2 inch slits diagonally along each edge of the dough, leaving space in the middle to place the filling.

Spread the cream cheese mixture and pumpkin down the center of the dough and fold up the ends.

Wrap each strip of dough up and over. I’m sure you’ll make yours look neater than mine!

After it comes out of the oven, glaze and serve!

Print
clock clock iconcutlery cutlery iconflag flag iconfolder folder iconinstagram instagram iconpinterest pinterest iconfacebook facebook iconprint print iconsquares squares iconheart heart iconheart solid heart solid icon

Pumpkin Cream Cheese Braid

  • Author: Sarah
Print Recipe
Pin Recipe

Ingredients

Scale

1 can crescent roll dough (preferably the non-perforated sheet)

4 oz cream cheese, softened

3 Tbsp white sugar, divided

1 1/4 tsp pumpkin pie spice, divided

2/3 cup canned pumpkin

1 Tbsp turbinado sugar

For the glaze:

2 oz cream cheese, softened

2 Tbsp milk

1 cup powdered sugar

1 tsp vanilla extract


Instructions

Preheat the oven to 375 degrees.  Lay a piece of parchment paper on a baking sheet.  Unroll the can of crescent roll dough.  If it is perforated, press the seams together to seal.  Cut diagonal strips on each side of the dough, leaving a solid strip in the center (where you will spread the filling).

Use a mixer to cream together the softened cream cheese, 2 Tbsp white sugar, and 1/2 tsp pumpkin pie spice.  Set aside.

In a small bowl, stir together 2/3 cup pumpkin puree, 1 Tbsp white sugar, and 1/2 tsp pumpkin pie spice.

Spread the cream cheese mixture down the center of the dough.  Then, spread the pumpkin mixture over the top of the cream cheese mixture.  Fold in the ends of the dough, then fold in the strips of dough to meet in the center.  

In a small bowl, combine 1 Tbsp turbinado sugar and 1/4 tsp pumpkin pie spice.  Sprinkle over the top before baking. 

Bake at 375 for 15 minutes.  While the braid is baking, in a mixer, cream together the ingredients for the glaze: cream cheese, milk, powdered sugar, and vanilla.  (Note that the vanilla will give it an off white color.  If you prefer a pure white color, leave the vanilla out.  I personally love the flavor of the vanilla glaze with the pumpkin pie spice).  

When the braid is finished baking, remove from the oven and drizzle with the glaze.  Let cool for a few minutes before slicing and serving.


Did you make this recipe?

Tag @the.platefull on Instagram and hashtag it #theplatefull

Apple Crisp

November 23, 2019~ Dessert, The Platefull Blog

In the Fall, I much prefer apple desserts to pumpkin. My favorite dessert is my homemade apple pie, but an apple crisp accomplishes essentially the same thing, with a lot less work!

I like to use a combination of different apple types in my pies and apple crips. I always do half Granny Smith and half of another kind (usually honey crisp, pink lady, or gala).

I love to serve this apple crisp topped with vanilla ice cream and caramel sauce. My favorite store bought caramel sauce is Trader Joe’s Fleur de Sel Caramel Sauce.

Print
clock clock iconcutlery cutlery iconflag flag iconfolder folder iconinstagram instagram iconpinterest pinterest iconfacebook facebook iconprint print iconsquares squares iconheart heart iconheart solid heart solid icon

Apple Crisp

  • Author: Sarah
  • Prep Time: 15 minutes
  • Cook Time: 45 minutes
  • Total Time: 1 hour
  • Yield: 8 servings 1x
Print Recipe
Pin Recipe

Ingredients

Scale

6 medium apples, peeled, cored, and sliced

1/2 cup granulated sugar

2 tsp all-purpose flour

1/2 tsp ground cinnamon

1/4 cup water

1/2 cup quick cooking oats

1/2 cup all-purpose flour

1/2 cup packed brown sugar

1/4 tsp baking powder

1/4 tsp baking soda

1/4 cup butter, melted


Instructions

Preheat the oven to 350 degrees.  Place the sliced apples in an 8×8 or 9×9 baking dish.  Combine the granulated sugar, 2 tsp flour, and cinnamon and sprinkle over the apple.  Pour the 1/4 cup of water over the apples and mix everything together.

In a medium bowl, combine the oats, remaining flour, brown sugar, baking powder, baking soda, and melted butter, stirring with a fork.  Crumble over the apple mixture.  Bake at 350 for 40-45 minutes, until the apples are soft and the topping is starting to brown.


Did you make this recipe?

Tag @the.platefull on Instagram and hashtag it #theplatefull

  • « Previous Page
  • 1
  • …
  • 6
  • 7
  • 8
  • 9
  • 10
  • …
  • 16
  • Next Page »

Categories

  • Appetizers
  • Baking
  • Breakfast
  • Dessert
  • Drinks
  • Kids
  • Lifestyle
  • Main
  • Recipes
  • Salads
  • Sauces and Dressings
  • Side Dishes
  • Soups
  • The Platefull Blog
  • Uncategorized

Archives

  • March 2025
  • July 2021
  • January 2021
  • July 2020
  • June 2020
  • May 2020
  • April 2020
  • March 2020
  • February 2020
  • January 2020
  • December 2019
  • November 2019
  • October 2019
  • September 2019
  • August 2019
  • September 2017
  • April 2017
  • March 2017
  • February 2017
  • January 2017
  • November 2016
  • October 2016

Recent Comments

  • Jennifer on Avocado and Egg Breakfast Stack
  • Christine Kish on Recipe Organization
  • Sarah on Easy Recipes for the Whole30
  • Jenn on Easy Recipes for the Whole30

- THEME BY ECLAIR DESIGNS -