The Platefull

Inspiring home cooks to be creative with accessible, nutritious recipes.

  • The Platefull Blog
  • Lifestyle
  • Kids
  • Shop
  • About
    • Privacy Policy, Terms & Conditions, and Disclosures

Archives for November 2019

Italian Sausage

November 30, 2019~ Main, The Platefull Blog

I like to use my own spice mixes whenever possible because I control the ingredients. This Italian Sausage spice mix is perfect. I make it really simple for myself by prepping batches of Italian Sausage at once and storing it in the freezer. I store some precooked for use in soups or casseroles, just to make it extra easy. I also store some uncooked so that I can cook it when I’m preparing dishes that need the sausage flavor and grease in the pan. Another easy way to do it is to store the spice mix already prepped ahead of time. All you have to do then is combine it with the ground pork.

To make this Italian Sausage, first combine the spices.

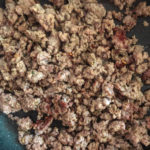
Mix well with 2 lbs ground pork, to distribute evenly.

You can freeze it at this point, portioned into whatever sizes you like. Or, you can cook it and use immediately or freeze.

Print
clock clock iconcutlery cutlery iconflag flag iconfolder folder iconinstagram instagram iconpinterest pinterest iconfacebook facebook iconprint print iconsquares squares iconheart heart iconheart solid heart solid icon

Italian Sausage

  • Author: Sarah
Print Recipe
Pin Recipe

Ingredients

Scale

2 lbs ground pork

1 tsp pepper

2 tsp dried parsley

1 1/2 tsp Italian seasoning

1 tsp garlic powder

3/4 tsp crushed dried fennel seeds

1/2 tsp paprika

1 tsp minced dried onion

2 tsp salt


Instructions

Mix all spice ingredients together in a small bowl.  Add to 2 pounds ground pork and use your hands to mix well, distributing the spice mixture evenly.  


Did you make this recipe?

Tag @the.platefull on Instagram and hashtag it #theplatefull

Pumpkin Cream Cheese Braid

November 24, 2019~ Baking, Breakfast, The Platefull Blog

I’ve been working on a short-cut Cream Cheese Filled Pumpkin Muffin, so I’ve got a lot of pumpkin and cream cheese on hand. My kids love my Nutella Cream Cheese Braid, so with all this extra pumpkin, I thought, “why not?!” It turned out so delicious! It’s the perfect sweet accompaniment for an egg casserole. I’ll definitely be serving this for our guests at Thanksgiving!

To start, flatten out a sheet of crescent roll dough. You can either press the seams together or buy the dough sheet. (The dough sheet would be much easier). Make 2 inch slits diagonally along each edge of the dough, leaving space in the middle to place the filling.

Spread the cream cheese mixture and pumpkin down the center of the dough and fold up the ends.

Wrap each strip of dough up and over. I’m sure you’ll make yours look neater than mine!

After it comes out of the oven, glaze and serve!

Print
clock clock iconcutlery cutlery iconflag flag iconfolder folder iconinstagram instagram iconpinterest pinterest iconfacebook facebook iconprint print iconsquares squares iconheart heart iconheart solid heart solid icon

Pumpkin Cream Cheese Braid

  • Author: Sarah
Print Recipe
Pin Recipe

Ingredients

Scale

1 can crescent roll dough (preferably the non-perforated sheet)

4 oz cream cheese, softened

3 Tbsp white sugar, divided

1 1/4 tsp pumpkin pie spice, divided

2/3 cup canned pumpkin

1 Tbsp turbinado sugar

For the glaze:

2 oz cream cheese, softened

2 Tbsp milk

1 cup powdered sugar

1 tsp vanilla extract


Instructions

Preheat the oven to 375 degrees.  Lay a piece of parchment paper on a baking sheet.  Unroll the can of crescent roll dough.  If it is perforated, press the seams together to seal.  Cut diagonal strips on each side of the dough, leaving a solid strip in the center (where you will spread the filling).

Use a mixer to cream together the softened cream cheese, 2 Tbsp white sugar, and 1/2 tsp pumpkin pie spice.  Set aside.

In a small bowl, stir together 2/3 cup pumpkin puree, 1 Tbsp white sugar, and 1/2 tsp pumpkin pie spice.

Spread the cream cheese mixture down the center of the dough.  Then, spread the pumpkin mixture over the top of the cream cheese mixture.  Fold in the ends of the dough, then fold in the strips of dough to meet in the center.  

In a small bowl, combine 1 Tbsp turbinado sugar and 1/4 tsp pumpkin pie spice.  Sprinkle over the top before baking. 

Bake at 375 for 15 minutes.  While the braid is baking, in a mixer, cream together the ingredients for the glaze: cream cheese, milk, powdered sugar, and vanilla.  (Note that the vanilla will give it an off white color.  If you prefer a pure white color, leave the vanilla out.  I personally love the flavor of the vanilla glaze with the pumpkin pie spice).  

When the braid is finished baking, remove from the oven and drizzle with the glaze.  Let cool for a few minutes before slicing and serving.


Did you make this recipe?

Tag @the.platefull on Instagram and hashtag it #theplatefull

Apple Crisp

November 23, 2019~ Dessert, The Platefull Blog

In the Fall, I much prefer apple desserts to pumpkin. My favorite dessert is my homemade apple pie, but an apple crisp accomplishes essentially the same thing, with a lot less work!

I like to use a combination of different apple types in my pies and apple crips. I always do half Granny Smith and half of another kind (usually honey crisp, pink lady, or gala).

I love to serve this apple crisp topped with vanilla ice cream and caramel sauce. My favorite store bought caramel sauce is Trader Joe’s Fleur de Sel Caramel Sauce.

Print
clock clock iconcutlery cutlery iconflag flag iconfolder folder iconinstagram instagram iconpinterest pinterest iconfacebook facebook iconprint print iconsquares squares iconheart heart iconheart solid heart solid icon

Apple Crisp

  • Author: Sarah
  • Prep Time: 15 minutes
  • Cook Time: 45 minutes
  • Total Time: 1 hour
  • Yield: 8 servings 1x
Print Recipe
Pin Recipe

Ingredients

Scale

6 medium apples, peeled, cored, and sliced

1/2 cup granulated sugar

2 tsp all-purpose flour

1/2 tsp ground cinnamon

1/4 cup water

1/2 cup quick cooking oats

1/2 cup all-purpose flour

1/2 cup packed brown sugar

1/4 tsp baking powder

1/4 tsp baking soda

1/4 cup butter, melted


Instructions

Preheat the oven to 350 degrees.  Place the sliced apples in an 8×8 or 9×9 baking dish.  Combine the granulated sugar, 2 tsp flour, and cinnamon and sprinkle over the apple.  Pour the 1/4 cup of water over the apples and mix everything together.

In a medium bowl, combine the oats, remaining flour, brown sugar, baking powder, baking soda, and melted butter, stirring with a fork.  Crumble over the apple mixture.  Bake at 350 for 40-45 minutes, until the apples are soft and the topping is starting to brown.


Did you make this recipe?

Tag @the.platefull on Instagram and hashtag it #theplatefull

Cream Cheese Filled Pumpkin Muffins with Cinnamon Streusel

November 22, 2019~ Baking, Breakfast, The Platefull Blog

This is the perfect Fall muffin recipe! These Cream Cheese Filled Pumpkin Muffins use a secret shortcut – Trader Joe’s Pumpkin Bread Mix. They are insanely good…its hard to eat just one! I am a huge fan of this Trader Joe’s mix, so I saw no reason to make this recipe harder that it had to be by reinventing the wheel! The Cinnamon Streusel topping might look familiar. It’s from my Perfect Blueberry Muffin recipe! It’s the perfect finishing touch to these muffins – don’t leave it off!

About 3 hours before making this recipe, start by making the filling, as it needs time to set up in the freezer. This prevents it from disintegrating into the muffin when baking, leaving you with plenty of delicious filling! Beat together the cream cheese and powdered sugar. Spray a piece of foil or press-n-seal with baking spray, then scoop the cream cheese mixture into a log shape. If you make the log the width of a piece of regular sized foil or wrap, it will be the perfect length! Use your hands to form it into a tight log, then freeze for 3 hours.

To make the log, I first spread the cream cheese mixture with a spatula into a log shape the best I can.

I then fold one side of the foil over and use that to form the cream cheese into a more firm log shape.

I then finish wrapping it and freeze! At this time, you can set out the butter to soften for the streusel topping.

After 3 hours, mix the pumpkin muffin mixture according to the package directions. Line a muffin tin and spray with baking spray. Fill the muffin cups about halfway with the muffin mix.

Remove the cream cheese log from the freezer and slice into 12 equal portions. Place 1 portion in the center of each muffin cup, lightly pressing down so it doesn’t fall over.

Top each muffin cup with muffin mix, filling the cup to the top. Make the streusel topping by combining the softened butter, flour, brown sugar, and cinnamon with a fork, until it makes small crumbles.

Top each muffin cup with cinnamon streusel topping and bake according to package directions.

The next step is to try to not eat all of these fluffy filled muffins at once!

Print
clock clock iconcutlery cutlery iconflag flag iconfolder folder iconinstagram instagram iconpinterest pinterest iconfacebook facebook iconprint print iconsquares squares iconheart heart iconheart solid heart solid icon

Cream Cheese Filled Pumpkin Muffins

  • Author: Sarah
Print Recipe
Pin Recipe

Ingredients

Scale

1 box Trader Joe’s Pumpkin Bread and Muffin Mix

1 8oz block cream cheese, softened

1 cup powdered sugar

1/4 cup butter, softened

1/3 cup flour

1/2 cup brown sugar

1 tsp cinnamon


Instructions

In a mixer, beat the cream cheese until smooth.  Add the powdered sugar and beat until smooth.  Spray a piece of foil or Press-N-Seal with baking spray.  Spoon the cream cheese mixture down the center to form a log shape.  Roll the wrapping around the cream cheese log, gently pressing as you go so that it forms a pretty solid log.  Freeze for 3 hours.

Once the cream cheese log is fairly solid, preheat the oven according to package directions.  Prepare the pumpkin muffin mix according to package directions.  Prepare a muffin tin with liners and spray lightly with cooking spray.  Fill each muffin cup halfway full with the pumpkin muffin mixture.  Prepare the cinnamon streusel topping by using a fork to combine the softened butter, flour, brown sugar, and cinnamon.  It should be in small crumbs.  Remove the cream cheese filling from the freezer and wrapping.  Cut into 12 equal pieces.  Place a cream cheese piece in the center of each muffin cup.  Scoop the remaining pumpkin muffin mixture over the top of the cream cheese filling.  Sprinkle the crumb topping on top.  Bake according to package directions.


Did you make this recipe?

Tag @the.platefull on Instagram and hashtag it #theplatefull

Cranberry Turkey Rolls

November 20, 2019~ Main, The Platefull Blog

This recipe is the perfect way to use up leftover Thanksgiving food and feed a crowd at the same time! It’s super quick to prep and uses up turkey and cranberry sauce. You and your guests will love these!

When it isn’t Thanksgiving time, I make these with thicker sliced deli turkey. We love to make these as a quick, prep ahead weeknight dinner too. I prep the rolls the day before, or morning of, and cover and refrigerate until ready to bake.

Print
clock clock iconcutlery cutlery iconflag flag iconfolder folder iconinstagram instagram iconpinterest pinterest iconfacebook facebook iconprint print iconsquares squares iconheart heart iconheart solid heart solid icon

Cranberry Turkey Rolls

  • Author: Sarah
  • Prep Time: 20 minutes
  • Cook Time: 25 minutes
  • Total Time: 45 minutes
  • Yield: 12 sandwiches 1x
Print Recipe
Pin Recipe

Ingredients

Scale

1 package Hawaiian Sweet Rolls (12 count)

2 cups diced turkey or thick sliced deli turkey

1 cup cranberry sauce

6 slices Swiss cheese

6 tbsp butter

1 tbsp yellow mustard

1 tbsp Worcestershire sauce

1/2 tbsp dried minced onion

Salt and pepper to taste

Grated Parmesan cheese

Dried parsley


Instructions

Preheat oven to 350 degrees.  Remove the rolls from the package, leaving in tact as a set of 12.  Use a bread knife or serrated knife to slice lengthwise, through the middle of the rolls.  You will have a set of “tops” and a set of “bottoms.”  

Place the bottom part of the rolls in a 9×13 dish coated with cooking spray.  Layer on the turkey and cheese.  Spread the cranberry sauce on the under side of the “tops” side of the rolls. (You can warm the cranberry sauce in the microwave for a few seconds if necessary to make it more spreadable). Place the top set of rolls on to form sandwiches.  

Melt the butter in the microwave.  Whisk in the yellow mustard, Worcestershire sauce, dried minced onion, and salt and pepper to taste.  Pour over the top of the rolls, covering the whole surface. Cover with foil and let sit for 15-20 minutes.  Bake, covered, for 20 minutes.  Uncover and bake for 5 more minutes.  Remove from the oven and sprinkle with grated parmesan cheese and dried parsley.  Serve immediately.


Did you make this recipe?

Tag @the.platefull on Instagram and hashtag it #theplatefull

Apple Glazed Pork Tenderloin

November 19, 2019~ Main, The Platefull Blog

I love simple, one pan dinners like this one. I use this spice rub for all pork tenderloin that I make and just switch up the sauce. For this recipe, I did a simple base of colorful potatoes, nestled the pork on top, and added apples partway through cooking. I topped it off with Trader Joe’s Apple Cider Jam, which when warm, makes the perfect sauce for pork. I stock up on jars of this apple cider jam every Fall!

To start, you will rub the spice mix over the pork tenderloin. With a little olive oil, brown both sides of the meat, then remove it from the pan. Add halved or quartered baby potatoes (make them all uniform in size) to the pan, then rest the pork tenderloin on top. Note that you will want your potatoes cut relatively small. Potatoes about golf ball size I quarter and if smaller, I halve. Roast at 375 for 15 minutes, then add peeled and sliced apples. Roast for 10 more minutes, then top the pork with the apple cider jam. Roast another 5 minutes, until the pork is cooked through and the potatoes are tender. Slice the pork and serve with the apples and potatoes. I usually warm a little more of the jam and drizzle over the top of each slice.

Print
clock clock iconcutlery cutlery iconflag flag iconfolder folder iconinstagram instagram iconpinterest pinterest iconfacebook facebook iconprint print iconsquares squares iconheart heart iconheart solid heart solid icon

Apple Glazed Pork Tenderloin

  • Author: Sarah
  • Prep Time: 5 minutes
  • Cook Time: 30 minutes
  • Total Time: 35 minutes
  • Yield: 4 servings 1x
Print Recipe
Pin Recipe

Ingredients

Scale

1–1.5 pound pork tenderloin

1 Tbsp olive oil

1/2 tsp salt

1/2 tsp pepper

1/2 tsp garlic powder

1/2 tsp dried thyme

1/2 tsp dried rosemary

1 bag baby potatoes (I use Little Potato Company’s Terrific Trio 1.5 lb bag), halved or quartered to be uniform in size

1 Granny Smith apple, peeled and sliced

1/4 cup Trader Joe’s Apple Cider Jam (plus more for serving)


Instructions

Preheat the oven to 375 degrees.  Heat the oil over medium high heat in an oven proof skillet (I use a Le Creuset French Braiser – you want one with deep enough sides to hold the potatoes).  Mix the salt, pepper, garlic powder, thyme, and rosemary in a small bowl.  Sprinkle over both sides of the pork tenderloin and press into the meat, covering all sides with the spice rub.  When the oil is hot, add the pork tenderloin to the skillet and sear on both sides, about 2 minutes per side.  Remove the pork tenderloin from the skillet.  Add the potatoes to the skillet, then place the pork tenderloin on top of the potatoes.  Place in the oven for 15 minutes.  While the pork is cooking, peel and slice an apple.  After the pork has cooked for 15 minutes, add the apple slices to the top of the potatoes and roast for another 10 minutes.  Then spread the apple cider jam over the top of the pork and put back in the oven for 5 more minutes, until the pork is cooked and the potatoes are tender.  To serve, slice the pork tenderloin, top with additional apple cider jam, if desired, and serve with the cooked potatoes and apples.


Notes

If you prepare your apples to be very soft, you can add them at the beginning.  I prefer that they are not terribly soft, so I add them part way through cooking.

Did you make this recipe?

Tag @the.platefull on Instagram and hashtag it #theplatefull

Grandma’s Stuffed Meatballs

November 16, 2019~ Main, The Platefull Blog

This meal has been my favorite since I was a kid. This is my Grandma’s Stuffed Meatball recipe and is my ultimate comfort food. I serve it with Green Bean Casserole and a baked potato – the way my Mom always made it for us growing up. Admittedly, it’s not the beautiful dish that food photographers dream of, but while it may not be pretty to photograph, I can promise you it sure does taste good! It’s the perfect cozy meal for chilly nights!

To start, use your hands to mix the evaporated milk into the hamburger. Lightly press it flat in the bowl so that it forms an even surface. Use your fingertips to press lines into the surface to divide evenly into 6 portions.

In a bowl, combine the cream of mushroom soup, ketchup, and Worcestershire sauce. Roll the portions of meat into balls, then press into a patty. Place stuffing in the middle of the patty and form the meat mixture around the stuffing, so that the stuffing is enclosed on the inside. Place the stuffed meatballs into an 8×8 baking dish.

Top with the sauce mixture and bake at 350 degrees for 1 hour.

Serve with green bean casserole (which can be placed into the oven halfway through the meatball cooking time) and a baked potato.

Belgian Waffles

November 15, 2019~ Breakfast, The Platefull Blog

I love to make a big breakfast on the weekends for my boys. It’s just a nice, slow way to start our weekend and they look forward to it every week. Their normal request is pancakes, but they love waffles too. (Super different, right?). Anytime we have waffles, they want a mountain of whipped cream. You’re only a kid once, right?! I normally serve my Oat Protein Waffles, but every now and then I make these as a special treat. They aren’t exactly healthy, but they sure are good!

You’ll start by mixing the wet and dry ingredients in separate bowls and whipping the egg whites until stiff peaks form.

Then you’ll combine the wet and dry ingredients in the larger mixing bowl.

Fold in the egg whites.

Heat and oil your waffle iron according to manufacturer’s directions. I have the Cuisinart Griddler, which I heat to 400 degrees.

Cook the waffles about 5 minutes, or until they are light golden brown. Serve topped with strawberries and whipped cream. Other ideas for toppings are berries, bananas, caramel sauce, or chocolate chips. You could also go for the traditional butter and syrup. 🙂

Print
clock clock iconcutlery cutlery iconflag flag iconfolder folder iconinstagram instagram iconpinterest pinterest iconfacebook facebook iconprint print iconsquares squares iconheart heart iconheart solid heart solid icon

Belgian Waffles

  • Author: Sarah
Print Recipe
Pin Recipe

Ingredients

Scale

2 cups all purpose flour

3/4 cup granulated sugar

3 1/2 tsp baking powder

2 eggs, separated

1 1/2 cups whole milk

1 cup butter, melted

1 tsp vanilla extract


Instructions

In a large mixing bowl, whisk together the flour, sugar, and baking powder.  With an electric mixer, beat the egg whites until stiff peaks form.  Set aside.  In another mixing bowl, whisk the egg yolks, whole milk, and vanilla.  Slowly drizzle in the melted butter, while whisking.  Pour the wet ingredients into the dry ingredients and stir until just combined.  Gently fold in the egg whites.

Cook in a waffle iron that has been sprayed with cooking spray, according to manufacturer’s directions.  In the Cuisinart Griddler, with the waffle plates clipped in, preheat to 400 degrees and cook the waffles for 5-6 minutes, until light golden brown.


Did you make this recipe?

Tag @the.platefull on Instagram and hashtag it #theplatefull

Street Corn Salad

November 14, 2019~ Side Dishes, The Platefull Blog

This is my favorite side dish to serve with any type of Mexican food. It’s best in the Summer, when you can cut fresh sweet corn off the cob, but it works in the Winter with frozen fire roasted corn (or frozen sweet corn). It’s simple to make and a super flavorful, healthy side dish! I like to serve this side dish with Chicken Chimichangas.

Print
clock clock iconcutlery cutlery iconflag flag iconfolder folder iconinstagram instagram iconpinterest pinterest iconfacebook facebook iconprint print iconsquares squares iconheart heart iconheart solid heart solid icon

Street Corn Salad

  • Author: Sarah
Print Recipe
Pin Recipe

Ingredients

Scale

4 ears fresh corn, cut from cob or 3 1/2 cups frozen corn

1 1/2 Tbsp vegetable oil

1/3 cup chopped red onion

1/3 cup cilantro leaves, chopped

1 jalapeño pepper, seeded and minced

1 clove garlic, minced

3 oz Cotija or Feta cheese, crumbled

3 Tbsp Avocado Mayonnaise (or regular mayo)

1 1/2 Tbsp fresh lime juice, divided

1/4 tsp chili powder

1/4 tsp ancho chili powder

1 large avocado, diced

Salt to taste


Instructions

After chopping the red onion, place it in a colander and run cold water over the onion (this will remove the bite from a red onion).  Let drain.  

Heat vegetable oil in a large skillet over medium high heat. Add corn (fresh or frozen – no need to thaw), season with salt to taste and toss, then let cook, tossing only occasionally (about every 2 minutes) until corn is charred (about 6 – 10 minutes total). Remove from heat and let cool slightly.

In a serving bowl, mix together the mayonnaise, 1 Tbsp lime juice, regular chili powder, and ancho chili powder.  Add in the corn, red onion, cilantro, jalapeño, garlic, and half of the cheese.  Stir to combine.  Squeeze the remaining 1/2 Tbsp lime juice over diced avocado.  Top the salad with the avocado and remaining cheese. 


Notes

If you want less spice, you can leave out the jalapeño.  You can also use 1/2 tsp of regular chili powder instead of 1/4 regular and 1/4 ancho Chile powders.

Did you make this recipe?

Tag @the.platefull on Instagram and hashtag it #theplatefull

Chicken Chimichangas

November 13, 2019~ Main, The Platefull Blog

This recipe has always been a freezer staple in our house. I prep batches of these, wrap them individually, and freeze them for a quick weeknight meal. Let them thaw overnight in the fridge, place on a baking sheet, and bake. Couldn’t be easier! I top them with store bought guacamole, salsa, and sour cream. Side note – My boys don’t like any sort of spicy food, so when I make these, I prep theirs before I add the pepper jack cheese to the filling.

These can either be baked, or made in the air fryer. If cooking in the air fryer, you’ll need to let them come to room temperature on the counter before cooking, otherwise the filling won’t get warm. I love the extra crispy shell that the air fryer produces, but I don’t usually have time to let them come to room temp, so the oven it is! The oven instructions are in the recipe below. For the air fryer, cook at 400 for 7-8 minutes, flipping halfway through cooking.

Here’s step by step how to fold the chimichanga. Place the filling in the center, offset toward one edge of the tortilla.

Fold the edge closest to the filling over the filling and use your fingers to tuck the tortilla around the filling, pulling towards you to wrap tightly around the filling.

Fold in the edges.

Roll the chimichanga forward, to finish the wrap.

Now wrap individually and freeze, or bake. I typically make these for dinner one night and bake half and freeze half. That way, I’m prepping two meals at once! I like to serve these with my Street Corn Salad.

Print
clock clock iconcutlery cutlery iconflag flag iconfolder folder iconinstagram instagram iconpinterest pinterest iconfacebook facebook iconprint print iconsquares squares iconheart heart iconheart solid heart solid icon

Chicken Chimichangas

  • Author: Sarah
  • Prep Time: 10 minutes
  • Cook Time: 30 minutes
  • Total Time: 40 minutes
  • Yield: 8 servings 1x
Print Recipe
Pin Recipe

Ingredients

Scale

8 oz pkg. cream cheese, softened

8 oz. Pepperjack cheese, shredded

1 1/2 Tbsp. taco seasoning

1 lb. rotisserie chicken, shredded

8 flour tortillas, burrito size

cooking spray

shredded cheddar cheese

green onions, for garnish

sour cream

salsa

guacamole


Instructions

Preheat the oven to 350 degrees.  Mix together the cream cheese, cheddar cheese, pepper jack cheese, and taco seasoning.  Mix in the chicken.  Divide the filling between the 8 flour tortillas.  Roll into chimichangas and spray the outsides with cooking spray.  Bake at 350 for 30 minutes, flipping once halfway through baking.  Serve with salsa, guacamole, sour cream, and green onions.


Notes

To freeze these, do not bake.  Once you have filled and rolled the chimichanga, wrap individually in plastic wrap, place in a ziploc bag, and freeze.  Before baking, let thaw in the refrigerator overnight.

Did you make this recipe?

Tag @the.platefull on Instagram and hashtag it #theplatefull

  • 1
  • 2
  • 3
  • Next Page »

Categories

  • Appetizers
  • Baking
  • Breakfast
  • Dessert
  • Drinks
  • Kids
  • Lifestyle
  • Main
  • Recipes
  • Salads
  • Sauces and Dressings
  • Side Dishes
  • Soups
  • The Platefull Blog
  • Uncategorized

Archives

  • March 2025
  • July 2021
  • January 2021
  • July 2020
  • June 2020
  • May 2020
  • April 2020
  • March 2020
  • February 2020
  • January 2020
  • December 2019
  • November 2019
  • October 2019
  • September 2019
  • August 2019
  • September 2017
  • April 2017
  • March 2017
  • February 2017
  • January 2017
  • November 2016
  • October 2016

Recent Comments

  • Jennifer on Avocado and Egg Breakfast Stack
  • Christine Kish on Recipe Organization
  • Sarah on Easy Recipes for the Whole30
  • Jenn on Easy Recipes for the Whole30

- THEME BY ECLAIR DESIGNS -