The Platefull

Inspiring home cooks to be creative with accessible, nutritious recipes.

  • The Platefull Blog
  • Lifestyle
  • Kids
  • Shop
  • About
    • Privacy Policy, Terms & Conditions, and Disclosures

Lemon, Garlic, and Herb Sea Bass

December 3, 2019~ Main

By now, you’ve hopefully made a few of my recipes and have faith that I wouldn’t post something I haven’t tried and loved, right?? Okay good, because this recipe is going to require a little faith. I know there will be the fish purists out there that think putting a dairy mixture on top of a perfectly good fish like sea bass is a travesty, but then I guess this recipe isn’t for you. I’m not a fish person. To be honest, it kinda grosses me out to make fish at home. And it’s not something I can say I truly love to eat. This recipe is the only exception. I will gladly make this at home, and not only that, but I even crave it! So just trust me when I say, it’s good. It’s really, really good.

Start by putting the fish on a baking pan. You can line it with parchment paper so it’s easier to scrape off, unless you like a good challenge like me. I ask for fillets from the tail end of the fish so that they are wider and thinner for a 4-5 ounce portion. When I’ve used thicker pieces of fish for this recipe, a 4-5 ounce portion is too skinny and it topples over. I’m glad I can make mistakes so you don’t have to.

Next, mix the yogurt mixture and top the fish with it, spreading it out evenly over the top.

Combine the panko with the olive oil to coat the panko breadcrumbs well. Spoon them on top of the yogurt mixture and gently press them into the yogurt mixture so they stick better.

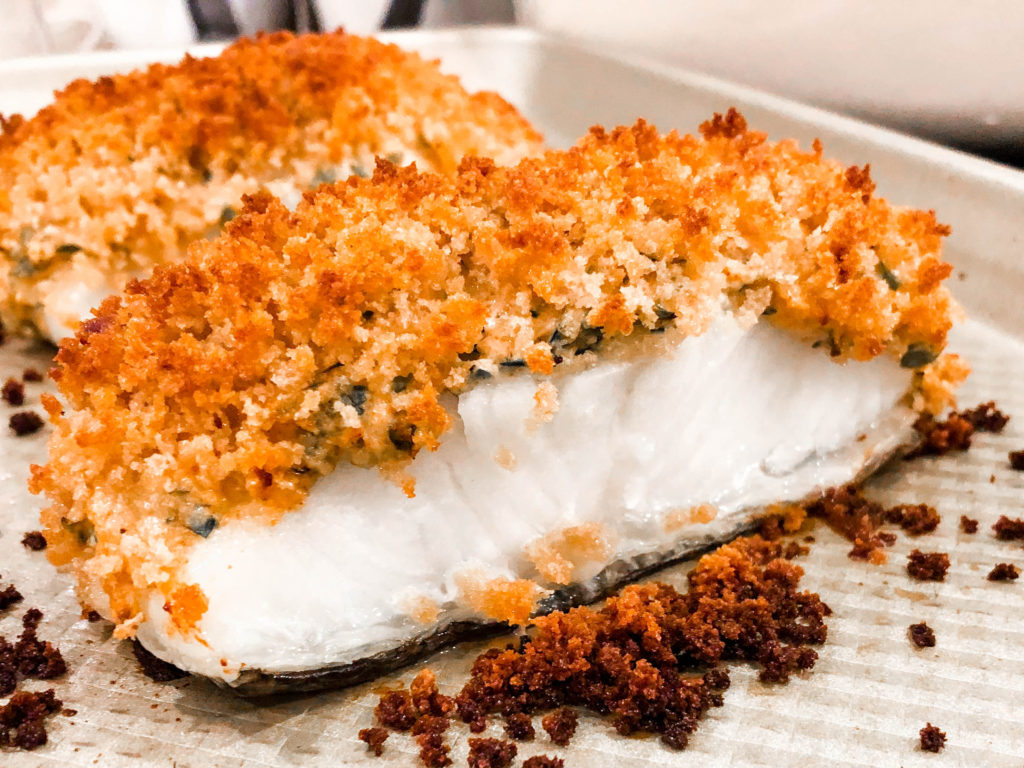
Bake at 400 for about 15 minutes or so, until the fish is cooked through.

Print
clock clock iconcutlery cutlery iconflag flag iconfolder folder iconinstagram instagram iconpinterest pinterest iconfacebook facebook iconprint print iconsquares squares iconheart heart iconheart solid heart solid icon

Lemon, Garlic, and Herb Sea Bass

  • Author: Sarah
Print Recipe
Pin Recipe

Ingredients

Scale

4 Chilean Sea Bass fillets (4–5 ounces each)

1 Tbsp olive oil

1 cup whole wheat panko

1/3 cup full-fat Greek yogurt

3 Tbsp parmesan cheese, grated

1/4 cup fresh parsley, chopped

1/4 cup fresh basil, chopped

2–3 garlic cloves, finely minced

1 large lemon, zested (not juiced)

3/4 tsp sea salt

1/2 tsp paprika

1/4 tsp black pepper


Instructions

Preheat the oven to 400 degrees.  Line a baking sheet with parchment paper.  In a bowl, combine the panko and olive oil.  In another bowl, combine the greek yogurt, herbs, garlic, lemon zest, spices, and Parmesan.

Place the sea bass fillets on the parchment paper lined baking sheet.  Top with the yogurt mixture, to evenly coat the top.  Spoon the panko mixture over the top, gently pressing into the yogurt mixutre.

Bake until the fish is cooked, about 15 minutes, depending on the thickness of the fish.  Serve with a squeeze of lemon juice, if desired.


Notes

I find that thinner fillets of sea bass work best for this recipe (towards the tail end of the fish) so that they don’t topple over during baking.

Did you make this recipe?

Tag @the.platefull on Instagram and hashtag it #theplatefull

Prawn Saganaki

December 2, 2019~ Main, The Platefull Blog

This recipe has been in my Winter rotation for years. It’s healthy, easy to make, and a perfect warm comfort meal on cold days. I’ve been making this for almost 10 years now on a regular basis in the Winter and we still aren’t sick of it! Which says a lot, because there aren’t a ton of recipes that I remake. I love to try new things, so the things I remake consistently are truly loved in this house! I serve this recipe with sliced crusty bread and a simple salad, like Apple Kale Salad.

Print
clock clock iconcutlery cutlery iconflag flag iconfolder folder iconinstagram instagram iconpinterest pinterest iconfacebook facebook iconprint print iconsquares squares iconheart heart iconheart solid heart solid icon

Prawn Saganaki

  • Author: Sarah
Print Recipe
Pin Recipe

Ingredients

Scale

1 lb raw shrimp, peeled and deveined 

1 red onion, halved and thinly sliced

3 cloves garlic, minced

2 Tbsp tomato paste

1/2 cup white wine

1 15-oz can diced tomatoes

4 oz feta block, crumbled into large pieces (1/2 feta block)

2 Tbsp fresh parsley, chopped

1 Tbsp olive oil


Instructions

Preheat the oven to 350 degrees.  Heat the oil over medium heat in an oven safe pan. Add the onions to the pan and cook, stirring for about 3 minutes until soft.  Add the garlic and cook for 1 more minute.  Add the tomato paste and cook, stirring, for 1 minute.  Add the wine and let simmer for a couple minutes, until reduced by half.  Then add the diced tomatoes and let simmer for 5 minutes or until slightly thickened.  Lay the shrimp on top of the tomato mixture and crumble the feta into large pieces in the middle.  Bake for 10 minutes until the shrimp is cooked.  When it comes out of the oven, sprinkle with fresh chopped parsley.  Serve with crusty bread for dipping.


Did you make this recipe?

Tag @the.platefull on Instagram and hashtag it #theplatefull

Butternut Squash, Sausage, and Kale Lasagna

December 1, 2019~ Main, The Platefull Blog

This is a longtime Winter favorite of mine. It’s delicious, hearty, and comforting. It does take some work to make, but it’s totally worth it! Use my Italian Sausage (I keep it on hand in the freezer) to speed things up a little. It really is the perfect Winter weekend meal!

Start by chopping the kale and dicing the butternut squash (or save yourself some time and buy pre-cut butternut squash). Place the butternut squash in a baking dish, cover with plastic wrap, pierce the plastic wrap a few times, and microwave for 5 minutes.

Once the squash is cooked, add it and the kale to a large bowl. Wipe the dish that you cooked the squash in dry. Next, brown the sausage (if you had pre-cooked sausage in the freezer, just make sure it is fully thawed).

While the sausage is browning, you can make the sauce. Start by heating the oil in a saucepan and cooking the garlic for about 1 minute. Combine the flour and 1/2 cup of milk in a bowl and whisk, then add the milk mixture to the pan with the garlic. Whisk in the remaining milk and bring to a boil over medium high heat, whisking frequently. Once the sauce has thickened, remove from the heat and stir in 1 ounce of the Gruyere cheese and the parmesan cheese, salt and pepper.

Spray the baking dish with cooking spray and spread 1/3 cup of the cheese sauce over the bottom of the dish.

On top of the cheese sauce, layer 2 no boil noodles. Top with half of the veggie mixture and 1/2 of the sausage. Then pour on 2/3 cup of the remaining cheese sauce.

Add 2 more no boil noodles, the remaining veggie mixture and sausage, and another 2/3 cup cheese sauce. Top with the remaining 2 no boil noodles, then the remaining cheese sauce.

Cover with foil and bake at 450 for 15 minutes, then remove the foil and sprinkle with the remaining Gruyere cheese and pecans (don’t skip the pecans – trust me on this one!). Bake uncovered for 10 more minutes.

Print
clock clock iconcutlery cutlery iconflag flag iconfolder folder iconinstagram instagram iconpinterest pinterest iconfacebook facebook iconprint print iconsquares squares iconheart heart iconheart solid heart solid icon

Butternut Squash, Sausage, and Kale Lasagna

  • Author: Sarah
Print Recipe
Pin Recipe

Ingredients

Scale

6 no boil lasagna noodles

1/4 cup water

1 12-ounce package prechopped butternut squash

3 cups chopped kale

1 lb cooked Italian sausage

1 Tbsp olive oil

1 1/2 Tbsp minced garlic

1/4 cup flour

2 3/4 cup milk, divided

2 ounces shredded Gruyere cheese, divided

1 ounce Parmesan cheese, grated

1/2 tsp salt

1/4 tsp black pepper

cooking spray

3 Tbsp chopped pecans


Instructions

Preheat the oven to 450 degrees.  Place the butternut squash in an 8×8 baking dish.  Pour in the water, cover with plastic wrap, and pierce the plastic wrap 3 times to vent.  Microwave for 5 minutes or until the butternut squash is tender, then drain.  Place the chopped kale in a large bowl and add the butternut squash.  Wipe out the 8×8 baking dish, spray with cooking spray, and set aside.

While the butternut squash is cooking, brown the Italian sausage in a skillet (if you are using precooked Italian sausage, just make sure it is fully thawed).

Heat the oil in a small saucepan over medium heat.  Add the garlic and cook, stirring, for about 1 minute.  In a bowl, whisk together the flour and 1/2 cup of the milk, then add to the saucepan with the garlic.  Whisk in the remaining milk and continue whisking until smooth.  Bring the mixture to a boil, whisking frequently, until thickened.  Remove from the heat and stir in 1 ounce of gruyere cheese, the parmesan cheese, salt, and pepper.  Continue stirring until the cheese is melted and the sauce is smooth.  

Pour 1/3 cup of the cheese sauce into the bottom of the 8×8 baking dish.  Spread evenly over the bottom of the dish.  Layer 2 no boil noodles on top of the sauce.  Then layer half of the veggie mixture.  Then layer half of the sausage.  Top with 2/3 cup of the cheese sauce.  Then layer 2 no boil noodles, then the remaining half of the veggie mixture, then the remaining half of the Italian Sausage.  Top with 2/3 cup of the cheese sauce, then 2 more no boil noodles.  Pour the remaining cheese sauce over the top of the last layer of noodles.  Cover with foil and bake at 450 for 15 minutes.

Remove the foil and sprinkle with chopped pecans and remaining Gruyere.  Return to the oven and bake for another 10 minutes, until bubbly.  


Did you make this recipe?

Tag @the.platefull on Instagram and hashtag it #theplatefull

Italian Sausage

November 30, 2019~ Main, The Platefull Blog

I like to use my own spice mixes whenever possible because I control the ingredients. This Italian Sausage spice mix is perfect. I make it really simple for myself by prepping batches of Italian Sausage at once and storing it in the freezer. I store some precooked for use in soups or casseroles, just to make it extra easy. I also store some uncooked so that I can cook it when I’m preparing dishes that need the sausage flavor and grease in the pan. Another easy way to do it is to store the spice mix already prepped ahead of time. All you have to do then is combine it with the ground pork.

To make this Italian Sausage, first combine the spices.

Mix well with 2 lbs ground pork, to distribute evenly.

You can freeze it at this point, portioned into whatever sizes you like. Or, you can cook it and use immediately or freeze.

Print
clock clock iconcutlery cutlery iconflag flag iconfolder folder iconinstagram instagram iconpinterest pinterest iconfacebook facebook iconprint print iconsquares squares iconheart heart iconheart solid heart solid icon

Italian Sausage

  • Author: Sarah
Print Recipe
Pin Recipe

Ingredients

Scale

2 lbs ground pork

1 tsp pepper

2 tsp dried parsley

1 1/2 tsp Italian seasoning

1 tsp garlic powder

3/4 tsp crushed dried fennel seeds

1/2 tsp paprika

1 tsp minced dried onion

2 tsp salt


Instructions

Mix all spice ingredients together in a small bowl.  Add to 2 pounds ground pork and use your hands to mix well, distributing the spice mixture evenly.  


Did you make this recipe?

Tag @the.platefull on Instagram and hashtag it #theplatefull

Cranberry Turkey Rolls

November 20, 2019~ Main, The Platefull Blog

This recipe is the perfect way to use up leftover Thanksgiving food and feed a crowd at the same time! It’s super quick to prep and uses up turkey and cranberry sauce. You and your guests will love these!

When it isn’t Thanksgiving time, I make these with thicker sliced deli turkey. We love to make these as a quick, prep ahead weeknight dinner too. I prep the rolls the day before, or morning of, and cover and refrigerate until ready to bake.

Print
clock clock iconcutlery cutlery iconflag flag iconfolder folder iconinstagram instagram iconpinterest pinterest iconfacebook facebook iconprint print iconsquares squares iconheart heart iconheart solid heart solid icon

Cranberry Turkey Rolls

  • Author: Sarah
  • Prep Time: 20 minutes
  • Cook Time: 25 minutes
  • Total Time: 45 minutes
  • Yield: 12 sandwiches 1x
Print Recipe
Pin Recipe

Ingredients

Scale

1 package Hawaiian Sweet Rolls (12 count)

2 cups diced turkey or thick sliced deli turkey

1 cup cranberry sauce

6 slices Swiss cheese

6 tbsp butter

1 tbsp yellow mustard

1 tbsp Worcestershire sauce

1/2 tbsp dried minced onion

Salt and pepper to taste

Grated Parmesan cheese

Dried parsley


Instructions

Preheat oven to 350 degrees.  Remove the rolls from the package, leaving in tact as a set of 12.  Use a bread knife or serrated knife to slice lengthwise, through the middle of the rolls.  You will have a set of “tops” and a set of “bottoms.”  

Place the bottom part of the rolls in a 9×13 dish coated with cooking spray.  Layer on the turkey and cheese.  Spread the cranberry sauce on the under side of the “tops” side of the rolls. (You can warm the cranberry sauce in the microwave for a few seconds if necessary to make it more spreadable). Place the top set of rolls on to form sandwiches.  

Melt the butter in the microwave.  Whisk in the yellow mustard, Worcestershire sauce, dried minced onion, and salt and pepper to taste.  Pour over the top of the rolls, covering the whole surface. Cover with foil and let sit for 15-20 minutes.  Bake, covered, for 20 minutes.  Uncover and bake for 5 more minutes.  Remove from the oven and sprinkle with grated parmesan cheese and dried parsley.  Serve immediately.


Did you make this recipe?

Tag @the.platefull on Instagram and hashtag it #theplatefull

Apple Glazed Pork Tenderloin

November 19, 2019~ Main, The Platefull Blog

I love simple, one pan dinners like this one. I use this spice rub for all pork tenderloin that I make and just switch up the sauce. For this recipe, I did a simple base of colorful potatoes, nestled the pork on top, and added apples partway through cooking. I topped it off with Trader Joe’s Apple Cider Jam, which when warm, makes the perfect sauce for pork. I stock up on jars of this apple cider jam every Fall!

To start, you will rub the spice mix over the pork tenderloin. With a little olive oil, brown both sides of the meat, then remove it from the pan. Add halved or quartered baby potatoes (make them all uniform in size) to the pan, then rest the pork tenderloin on top. Note that you will want your potatoes cut relatively small. Potatoes about golf ball size I quarter and if smaller, I halve. Roast at 375 for 15 minutes, then add peeled and sliced apples. Roast for 10 more minutes, then top the pork with the apple cider jam. Roast another 5 minutes, until the pork is cooked through and the potatoes are tender. Slice the pork and serve with the apples and potatoes. I usually warm a little more of the jam and drizzle over the top of each slice.

Print
clock clock iconcutlery cutlery iconflag flag iconfolder folder iconinstagram instagram iconpinterest pinterest iconfacebook facebook iconprint print iconsquares squares iconheart heart iconheart solid heart solid icon

Apple Glazed Pork Tenderloin

  • Author: Sarah
  • Prep Time: 5 minutes
  • Cook Time: 30 minutes
  • Total Time: 35 minutes
  • Yield: 4 servings 1x
Print Recipe
Pin Recipe

Ingredients

Scale

1–1.5 pound pork tenderloin

1 Tbsp olive oil

1/2 tsp salt

1/2 tsp pepper

1/2 tsp garlic powder

1/2 tsp dried thyme

1/2 tsp dried rosemary

1 bag baby potatoes (I use Little Potato Company’s Terrific Trio 1.5 lb bag), halved or quartered to be uniform in size

1 Granny Smith apple, peeled and sliced

1/4 cup Trader Joe’s Apple Cider Jam (plus more for serving)


Instructions

Preheat the oven to 375 degrees.  Heat the oil over medium high heat in an oven proof skillet (I use a Le Creuset French Braiser – you want one with deep enough sides to hold the potatoes).  Mix the salt, pepper, garlic powder, thyme, and rosemary in a small bowl.  Sprinkle over both sides of the pork tenderloin and press into the meat, covering all sides with the spice rub.  When the oil is hot, add the pork tenderloin to the skillet and sear on both sides, about 2 minutes per side.  Remove the pork tenderloin from the skillet.  Add the potatoes to the skillet, then place the pork tenderloin on top of the potatoes.  Place in the oven for 15 minutes.  While the pork is cooking, peel and slice an apple.  After the pork has cooked for 15 minutes, add the apple slices to the top of the potatoes and roast for another 10 minutes.  Then spread the apple cider jam over the top of the pork and put back in the oven for 5 more minutes, until the pork is cooked and the potatoes are tender.  To serve, slice the pork tenderloin, top with additional apple cider jam, if desired, and serve with the cooked potatoes and apples.


Notes

If you prepare your apples to be very soft, you can add them at the beginning.  I prefer that they are not terribly soft, so I add them part way through cooking.

Did you make this recipe?

Tag @the.platefull on Instagram and hashtag it #theplatefull

Grandma’s Stuffed Meatballs

November 16, 2019~ Main, The Platefull Blog

This meal has been my favorite since I was a kid. This is my Grandma’s Stuffed Meatball recipe and is my ultimate comfort food. I serve it with Green Bean Casserole and a baked potato – the way my Mom always made it for us growing up. Admittedly, it’s not the beautiful dish that food photographers dream of, but while it may not be pretty to photograph, I can promise you it sure does taste good! It’s the perfect cozy meal for chilly nights!

To start, use your hands to mix the evaporated milk into the hamburger. Lightly press it flat in the bowl so that it forms an even surface. Use your fingertips to press lines into the surface to divide evenly into 6 portions.

In a bowl, combine the cream of mushroom soup, ketchup, and Worcestershire sauce. Roll the portions of meat into balls, then press into a patty. Place stuffing in the middle of the patty and form the meat mixture around the stuffing, so that the stuffing is enclosed on the inside. Place the stuffed meatballs into an 8×8 baking dish.

Top with the sauce mixture and bake at 350 degrees for 1 hour.

Serve with green bean casserole (which can be placed into the oven halfway through the meatball cooking time) and a baked potato.

Chicken Chimichangas

November 13, 2019~ Main, The Platefull Blog

This recipe has always been a freezer staple in our house. I prep batches of these, wrap them individually, and freeze them for a quick weeknight meal. Let them thaw overnight in the fridge, place on a baking sheet, and bake. Couldn’t be easier! I top them with store bought guacamole, salsa, and sour cream. Side note – My boys don’t like any sort of spicy food, so when I make these, I prep theirs before I add the pepper jack cheese to the filling.

These can either be baked, or made in the air fryer. If cooking in the air fryer, you’ll need to let them come to room temperature on the counter before cooking, otherwise the filling won’t get warm. I love the extra crispy shell that the air fryer produces, but I don’t usually have time to let them come to room temp, so the oven it is! The oven instructions are in the recipe below. For the air fryer, cook at 400 for 7-8 minutes, flipping halfway through cooking.

Here’s step by step how to fold the chimichanga. Place the filling in the center, offset toward one edge of the tortilla.

Fold the edge closest to the filling over the filling and use your fingers to tuck the tortilla around the filling, pulling towards you to wrap tightly around the filling.

Fold in the edges.

Roll the chimichanga forward, to finish the wrap.

Now wrap individually and freeze, or bake. I typically make these for dinner one night and bake half and freeze half. That way, I’m prepping two meals at once! I like to serve these with my Street Corn Salad.

Print
clock clock iconcutlery cutlery iconflag flag iconfolder folder iconinstagram instagram iconpinterest pinterest iconfacebook facebook iconprint print iconsquares squares iconheart heart iconheart solid heart solid icon

Chicken Chimichangas

  • Author: Sarah
  • Prep Time: 10 minutes
  • Cook Time: 30 minutes
  • Total Time: 40 minutes
  • Yield: 8 servings 1x
Print Recipe
Pin Recipe

Ingredients

Scale

8 oz pkg. cream cheese, softened

8 oz. Pepperjack cheese, shredded

1 1/2 Tbsp. taco seasoning

1 lb. rotisserie chicken, shredded

8 flour tortillas, burrito size

cooking spray

shredded cheddar cheese

green onions, for garnish

sour cream

salsa

guacamole


Instructions

Preheat the oven to 350 degrees.  Mix together the cream cheese, cheddar cheese, pepper jack cheese, and taco seasoning.  Mix in the chicken.  Divide the filling between the 8 flour tortillas.  Roll into chimichangas and spray the outsides with cooking spray.  Bake at 350 for 30 minutes, flipping once halfway through baking.  Serve with salsa, guacamole, sour cream, and green onions.


Notes

To freeze these, do not bake.  Once you have filled and rolled the chimichanga, wrap individually in plastic wrap, place in a ziploc bag, and freeze.  Before baking, let thaw in the refrigerator overnight.

Did you make this recipe?

Tag @the.platefull on Instagram and hashtag it #theplatefull

The Ultimate Thanksgiving Menu

November 10, 2019~ Lifestyle, Main

Does the thought of preparing Thanksgiving dinner from scratch overwhelm you? It does me too, honestly. It’s a lot to prep and I hate feeling like I’m missing out on all of the fun because I have to spend the whole day in the kitchen! After years of being in charge of the Thanksgiving meal, I’ve nailed it down to a science. Most of my Thanksgiving menu is prepped ahead, meaning that on the day of, I get to relax and watch the Macy’s Thanksgiving Day Parade with everyone else! I’ve got the recipes and the game plan all laid out for you here…couldn’t be easier! So, what’s on the menu you ask?

  • Thanksgiving Herbed Butter Turkey
  • Garlic Herb Mashed Potatoes with Crispy Fried Sage
  • Traditional Sage Stuffing
  • Sweet Potato Casserole
  • Green Bean Casserole
  • Grandma Ruth’s Sweet Corn
  • Pomegranate and Vanilla Buttered Brussels
  • Pear and Cranberry Chopped Salad
  • Pumpkin Cheesecake
  • Apple Cider Sangria

After scrolling through all of those pictures, are you hungry yet?! If you’re ready to get cooking (or planning), here’s the step by step schedule of how to get all of this food on the table (while all still warm, which is quite a feat!).

Up to 12 months in Advance:

  • Grandma Ruth’s Sweet Corn: This corn should be prepared and frozen ahead. For serving, simply microwave until hot! My family makes huge batches of this corn in the summer, at the height of sweet corn season, and freezes for the winter.

4-5 Days in Advance:

  • If the turkey is frozen, place in in the refrigerator to thaw. Assume about 24 hours for every 5 pounds. I usually give my bird an extra 24 hours in the fridge, so assuming I have a 15-20 pound bird, I need 4-5 days for it to thaw.

1 Day in Advance:

  • Turkey: Soften the butter, chop the herbs, and make the herb butter. Quarter the orange, lemon, and onion. Cover and refrigerate.
  • Garlic Herb Mashed Potatoes: Prepare the potatoes, up to the point of baking. Chop the sage for the crispy sage topping. Cover and refrigerate.
  • Sweet Potato Casserole: Prepare the sweet potato mixture, place in the baking dish, cover, and refrigerate. Mix the dry ingredients together for the crumb topping, and store in an airtight container on the counter. You will add the butter to the crumb topping and put the topping on the casserole just before baking.
  • Green Bean Casserole: Mix the green beans, cream of mushroom soup, milk, salt, and pepper (everything except the fried onions). Pour into a baking dish. Cover and refrigerate.
  • Pomegranate and Vanilla Buttered Brussels: Prepare the Brussel sprouts by halving them (or into quarters if you have large sprouts). Soften the butter and mix in the vanilla bean paste. Prepare the pomegranate (or buy the pomegranate arils to save yourself a prep step).
  • Traditional Sage Stuffing: Prepare the stuffing up to the point of baking. Place in a baking dish, cover, and refrigerate.
  • Pumpkin Cheesecake: Make the pumpkin cheesecake. Let cool. Do not top with whipped cream or pecans, just cover and refrigerate undecorated.
  • Apple Cider Sangria: Mix all ingredients and fruit in a pitcher. Cover and refrigerate. (This is actually much better if it’s had time to sit for a day before serving).

Thanksgiving Day

  • 1-2 hours before the turkey goes in the oven, set out the herb butter mixture for the turkey to soften.
  • T-5.5 hours: Roast the Brussel sprouts; cool and refrigerate. Reduce oven temp. Get turkey out of the fridge and prep with the herb butter. Let sit on the counter while the Brussel sprouts roast.
  • T-4.75 hours: TURKEY GOES IN THE OVEN (Assume about a 4 hour cook time).
  • T-1.5 hours: Stuffing goes in the oven (350 degrees), prepare crumb mixture for sweet potatoes and put on top of the sweet potato casserole. Set out the vanilla butter mixture for the Brussel sprouts to soften.
  • T-45 minutes: Turkey comes out, tent and rest. Sweet potato casserole goes in the oven (350 degrees), add French Fried Onions to green bean casserole and stir. Remove the foil from the stuffing.
  • T-30 minutes: Garlic Herb Mashed Potatoes and Green Bean Casserole go in oven. Mix the Brussel sprouts and vanilla butter together and place in a baking dish. Prep the salad, but do not dress.
  • T-15 minutes: Brussel sprouts go in the oven to heat through. Heat butter on the stove to fry the sage for the mashed potatoes. Carve the turkey. Microwave the corn. (Recruit a helper if you can for these last 15 minutes until the finish line!)
  • T-5 minutes: Top the green bean casserole with a sprinkle of French Fried Onions.
  • Go-Time! Mashed potatoes, sweet potatoes, green beans, Brussel sprouts, and stuffing come out. Top the mashed potatoes with crispy fried sage and browned butter. Toss the Brussel sprouts with pomegranate arils and pecans.
  • EAT!
  • When ready for dessert, decorate the top of the cheesecake with whipped cream and sprinkle with chopped pecans.

Thanksgiving Herb Buttered Turkey

November 10, 2019~ Main, Recipes, The Platefull Blog

This is my absolute favorite Thanksgiving Turkey. The herb butter keeps the turkey moist and provides great flavor. Don’t skip out on the fresh herbs for this recipe – they are a must. Plan on 1.25-1.5 pounds of turkey for each person. For leftovers, 1.5 pounds per person is a good sized turkey.

It’s really a quite simple recipe. Chop the herbs, grate the lemon zest, and mix with the softened butter. You can mix the herb butter, then cover and refrigerate until Thanksgiving Day. You will just need to allow time for the herb butter to soften again.

To prep the turkey, first let it thaw in the fridge. You can plan on about 24 hours for every 5 pounds. I usually give myself another 24 hour buffer just in case it isn’t fully thawed. When you are ready to prep the turkey, remove the neck and giblets. Pat the turkey dry with paper towels, but do not rinse it in your sink. Place the turkey in a roasting pan, breast side up. Use your fingers to gently separate the skin over the breast portion of the turkey so that you can spread the herb butter under the skin. Be careful not to poke holes in the skin. If you can get down to the leg portion without tearing through the skin, spread the butter mixture there too. Spread the herb butter over the top of the turkey. If you find the herb butter hard to spread, microwave it for a few seconds (it doesn’t need to melt fully, just soften more) and use a pastry or grilling brush to brush it on. Last, you will stuff the turkey with the quartered orange, lemon, and onion. Tuck the wings under, and tie the legs if that has not already been done for you.

Bake the turkey at 325 using the following as a rough guideline for an unstuffed turkey:

  • 8-12 pounds: 2 3/4 hours to 3 hours
  • 12-14 pounds: 3 hours to 3 3/4 hours
  • 14-18 pounds: 3 3/4 hours to 4 1/4 hours
  • 18-20 pounds: 4 1/4 hours to 4 1/2 hours
  • 20-24 pounds: 4 1/2 hours to 5 hours
Print
clock clock iconcutlery cutlery iconflag flag iconfolder folder iconinstagram instagram iconpinterest pinterest iconfacebook facebook iconprint print iconsquares squares iconheart heart iconheart solid heart solid icon

Thanksgiving Herb Buttered Turkey

  • Author: Sarah
Print Recipe
Pin Recipe

Ingredients

Scale

2 sticks butter, softened

1 Tbsp chopped sage

1 Tbsp chopped thyme

1 Tbsp chopped Rosemary

1 Tbsp lemon zest

1 lemon, quartered

1 onion quartered

1 orange, quartered


Instructions

Preheat oven to 325 degrees.  Combine the softened butter with the chopped fresh herbs and lemon zest.  Remove the neck and giblets.  Pat the turkey dry with paper towels, but do not rinse it in your sink.  Place the turkey in a roasting pan, breast side up.  Use your fingers to gently separate the skin over the breast portion of the turkey.  Spread not quite half of the butter mixture under the skin, working it as far around the turkey as you can, being careful not to poke holes in the skin.  If you can get down to the leg portion without tearing through the skin, spread the butter mixture there too.  Spread the herb butter over the top of the turkey.  If you find the herb butter hard to spread, microwave it for a few seconds (it doesn’t need to melt, just soften a little more) and use a pastry or grilling brush to brush it on the outside of the turkey.  Last, stuff the turkey cavity with the quartered orange, lemon, and onion.  Tuck the wings under, and tie the legs if that has not already been done for you. Roast the turkey at 325 until the thickest part reads 160-165 degrees.  Remove from the oven and let it rest for 30 minutes before carving.


Notes

I am typically roasting brussel sprouts at 400 degrees right before putting the turkey in the oven.  When the turkey goes in, my oven is at 400 but I immediately lower the temp to 325.  Starting in a hotter oven will help the skin get crispier.

Did you make this recipe?

Tag @the.platefull on Instagram and hashtag it #theplatefull

  • « Previous Page
  • 1
  • 2
  • 3
  • 4
  • 5
  • 6
  • Next Page »

Categories

  • Appetizers
  • Baking
  • Breakfast
  • Dessert
  • Drinks
  • Kids
  • Lifestyle
  • Main
  • Recipes
  • Salads
  • Sauces and Dressings
  • Side Dishes
  • Soups
  • The Platefull Blog
  • Uncategorized

Archives

  • March 2025
  • July 2021
  • January 2021
  • July 2020
  • June 2020
  • May 2020
  • April 2020
  • March 2020
  • February 2020
  • January 2020
  • December 2019
  • November 2019
  • October 2019
  • September 2019
  • August 2019
  • September 2017
  • April 2017
  • March 2017
  • February 2017
  • January 2017
  • November 2016
  • October 2016

Recent Comments

  • Jennifer on Avocado and Egg Breakfast Stack
  • Christine Kish on Recipe Organization
  • Sarah on Easy Recipes for the Whole30
  • Jenn on Easy Recipes for the Whole30

- THEME BY ECLAIR DESIGNS -