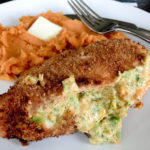
I love to make this Chicken Parmesan in my air fryer for an extra crispy coating, but it could just as easily be cooked on the stove in a skillet. This can easily be prepped ahead for a quick weeknight meal kit. To do this, prepare the bread crumb mixture (everything except the parmesan cheese) and store in an airtight container. Slice and pound the chicken breasts and store in the fridge. The night you plan to serve this recipe, simply add the cheese to the breadcrumb mixture and you’re on your way!

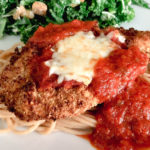
Air Fryer Chicken Parmesan
- Prep Time: 20 minutes
- Cook Time: 9 minutes
- Total Time: 29 minutes
- Yield: 4 servings 1x
Ingredients
2 chicken breasts
1/4 cup grated parmesan cheese
1/2 cup panko
1/2 cup whole wheat breadcrumbs
1/2 tsp garlic powder
1/2 tsp onion powder
1/2 tsp Italian seasoning
1 egg, lightly beaten
2 Tbsp shredded mozzarella
Spaghetti noodles
1 jar pasta sauce (my favorite is Trader Joe’s Roasted Garlic Marinara)
Instructions
Preheat the air fryer to 360 degrees. Bring a large pot of water to a boil for the spaghetti noodles. Pour the jar of pasta sauce into a small saucepan and heat over medium heat until just starting to bubble. Turn the heat down to low and simmer while you are making the chicken.
Slice the chicken breasts in half, lengthwise and pound to about 1/4 inch thick. In a bowl, combine the parmesan cheese, whole wheat breadcrumbs, panko, and spices. Stir to combine. In another bowl, lightly beat an egg. Dip the chicken breast in the egg, coating both sides. Then lightly press the chicken breast into the bread crumb mixture. Flip the chicken over and press the other side into the breadcrumb mixture so that both sides are evenly coated. Gently shake the excess off and place the chicken into the air fryer. Cook for 6 minutes, then flip the chicken over. Top with 1 Tbsp sauce (don’t let it run over the edge, so use less if needed). Top with 1 Tbsp shredded mozzarella and cook for 3 minutes more, or until cooked through.
While the chicken is cooking, cook the spaghetti noodles.
Serve the chicken on top of spaghetti noodles and top with pasta sauce.
Notes
To cook this chicken on the stove, heat 2 Tbsp olive oil in a skillet on medium heat. Cook the chicken breasts on each side for 4-5 minutes, until cooked through.