Any time that I have guests coming to stay with us, this is one of my go-to breakfast recipes. Its savory and delicious and goes perfect with caramel rolls or another breakfast sweet. The best part is that it’s easy to prep. You can either prep the whole thing the night before, refrigerate, and bake in the morning, or you can just cook the bacon the night before and assemble in the morning. This recipe makes enough for a crowd, in a 9×13 pan.


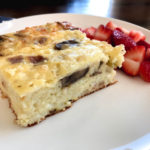
Bacon Green Chile Egg Casserole
Ingredients
6 eggs, lightly beaten
1 lb shredded Monterey Jack cheese
1 cup milk
1 lb small curd cottage cheese
1 can diced green chiles
2 cups sliced fresh mushrooms
1 cup cooked diced bacon
I cup all-purpose flour
1 1/2 tsp baking powder
1/4 tsp salt
Instructions
Preheat the oven to 350. In a small bowl, whisk together the flour, baking powder, and salt. In a large bowl, crack the eggs and beat lightly. Add the Monterey Jack cheese, milk, cottage cheese, green chiles, mushrooms, and bacon. Stir together. Add the flour mixture and stir to combine well.
Spray a 9×13 pan with cooking spray. Pour the egg mixture into the pan. Bake at 350 for 45 minutes.