The Platefull

Inspiring home cooks to be creative with accessible, nutritious recipes.

  • The Platefull Blog
  • Lifestyle
  • Kids
  • Shop
  • About
    • Privacy Policy, Terms & Conditions, and Disclosures

Blistered Garlicky Green Beans

July 1, 2020~ Side Dishes, The Platefull Blog

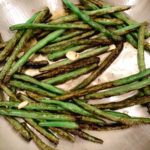
Need a quick side dish that is packed with flavor and comes together in minutes? Blistered Garlicky Green Beans is it! I’m always looking for quick veggie sides – gotta get those veggies in! My kids actually like green beans better than I do. I love a green bean casserole, but fresh green beans are not typically my thing. I don’t like the squeaky-ness…anyone with me?! These Blistered Garlicky Green Beans are really good though! They get nice and crispy, and I think it eliminates that squeaky-ness. Very technical food terms here, by the way.

To start, trim the green beans, wash them, and make sure they are nice and dry. If there is water left on them, they will splatter even more when they hit the oil. I typically do this step on the weekend, so mine are ready to go as a quick side dish. Plus I hate trimming green beans and asparagus, so if I don’t do it right when I get home from the store, I probably won’t use them.

Add the olive oil to a pan and heat it over high heat, until shimmering. Make sure the green beans are nice and dry before you put them in the pan. They will splatter quite a bit, so a splatter screen can come in handy. Throw in the green beans and use tongs to spread them out evenly. Cook them, without disturbing them, for about 3 minutes. Then use tongs to flip them over (be very careful – the hot oil will splatter). Spread them out in an even layer again and let cook for about 4 more minutes.

Once they are blistered, add a sprinkle of salt and pepper and the sliced garlic. Let cook for about 1 more minute, being careful not to burn the garlic. I love to serve these with Parmesan Crusted Pork Chops. The green beans cook while the pork chops are in the oven.

Print
clock clock iconcutlery cutlery iconflag flag iconfolder folder iconinstagram instagram iconpinterest pinterest iconfacebook facebook iconprint print iconsquares squares iconheart heart iconheart solid heart solid icon
Garlicky Green Beans

Blistered Garlicky Green Beans

  • Author: Sarah
Print Recipe
Pin Recipe

Ingredients

Scale

3 Tbsp olive oil

1/2 pound fresh green beans, trimmed

3 garlic cloves, sliced

Salt and pepper, to taste


Instructions

Heat the olive oil in a skillet over high heat.  Once hot, add the green beans (be sure they are very dry – no water on them).  Spread them in an even layer and cook for about 3 minutes, until browning on the underside. Using tongs (and with an oven mitt on), carefully turn the green beans over.  Cook for 4 more minutes, rearranging with tongs as needed, until all sides are browned.  Add the sliced garlic and a sprinkle of salt and pepper.  Cook for one more minute, being careful not to burn the garlic.


Did you make this recipe?

Tag @the.platefull on Instagram and hashtag it #theplatefull

Thyme and Garlic Roasted Sweet Potatoes

May 7, 2020~ Side Dishes, The Platefull Blog

Thyme and Garlic Roasted Sweet Potatoes are a really simple way to roast a veggie alongside whatever protein you are making for dinner. They are a flavorful, healthy side dish since sweet potatoes are nutrient dense and high in fiber. For some interesting facts on the nutritional value of sweet potatoes, check out this article. We eat sweet potatoes a lot, as I actually like them better than regular potatoes (which is a long way for me to come, because I used to hate them!). My kids will eat them too, finally. You know how they say to give a kid a food at least ten times before they will eat it? I’m pretty sure the person who wrote that rule doesn’t have kids. Either than or mine are a whole ‘notha level of stubborn. I have served them sweet potatoes, in every form imaginable, consistently (once a week or so) for TWO YEARS. They finally, finally, started eating them (and liking them!). What is that, 100 times of serving them?! Maybe its because they see how much I like sweet potatoes and that deterred them from trying them, out of pure stubbornness. I know you mommas feel my pain.

Anyway, back to the recipe. not only do these Thyme and Garlic Roasted Sweet Potatoes make a great side dish, if you are doing a Whole 30, they make a great base for a hamburger slider or Sloppy Joe meat too! For breakfast, you can top them with a fried egg and some hot sauce. They are super flexible!

Print
clock clock iconcutlery cutlery iconflag flag iconfolder folder iconinstagram instagram iconpinterest pinterest iconfacebook facebook iconprint print iconsquares squares iconheart heart iconheart solid heart solid icon
Thyme and Garlic Roasted Sweet Potatoes

Thyme and Garlic Roasted Sweet Potatoes

  • Author: Sarah
Print Recipe
Pin Recipe

Ingredients

Scale

2 medium sweet potatoes, peeled and cut into 1 1/2 inch thick rounds

1 1/2 Tbsp olive oil

2 cloves garlic, minced

2 Tbsp fresh thyme leaves

1/4 tsp salt

1/4 tsp pepper


Did you make this recipe?

Tag @the.platefull on Instagram and hashtag it #theplatefull

The Best Baked Beans

February 16, 2020~ Side Dishes, The Platefull Blog

Baked Beans are a summer time staple in our house. They just pair so perfectly with grilled food! I love this recipe because it makes a huge batch that I can store in the freezer in smaller portions. These baked beans are perfect. Sweet, savory, and a little smoky with that delicious bacon flavor. I like to serve these with any grilled meat or my Cowboy Stuffed Chicken. These are absolutely the best baked beans, no doubt about it!

Start by sautéing the onions in butter over medium heat.

In a large bowl, combine all remaining ingredients except the bacon.

Add the sautéed onions to the mixture and stir to combine well. Pour the mixture into a 9×13 baking dish that has been sprayed with cooking spray. Top with the slices of bacon and bake at 325° for 2-3 hours. When the beans come out of the oven, use a large serving spoon to gently press on the top to accumulate the bacon fat and skim off.

Print
clock clock iconcutlery cutlery iconflag flag iconfolder folder iconinstagram instagram iconpinterest pinterest iconfacebook facebook iconprint print iconsquares squares iconheart heart iconheart solid heart solid icon
The Best Baked Beans

The Best Baked Beans

  • Author: Sarah
Print Recipe
Pin Recipe

Ingredients

Scale

5 cans pork and beans (VanCamp’s)

1 large yellow sweet onion, chopped

2 Tbsp butter

3/4 cup ketchup

1/2 cup molasses

3 Tbsp yellow mustard

1/2 cup brown sugar

6 slices uncooked bacon, each slice cut into thirds


Instructions

Preheat the oven to 325°.  Spray a 9×13 baking dish with cooking spray.

Heat a skillet over medium heat and melt the butter in the pan.  Add the chopped onions and cook until translucent.  In a large bowl, add the beans, onions, ketchup, molasses, mustard, and brown sugar.  Stir to mix well.  Scoop out into the baking dish.  Top with the slices of bacon and bake, uncovered, at 325° for 2-3 hours, until carmelized and bubbly.  When the beans come out of the oven, use a large serving spoon to gently press on the top to skim off the bacon fat.


Did you make this recipe?

Tag @the.platefull on Instagram and hashtag it #theplatefull

Cheddar and Green Chile Cornbread

February 13, 2020~ Side Dishes, The Platefull Blog

There really is nothing better than Cheddar and Green Chile Cornbread with a bowl of chili. Today is the coldest day that we’ve had all winter and I’m thinking I need to make a trip to the store for that exact meal! Although, I don’t really want to go out in this cold…decisions, decisions. In case you missed it, I of course love my own chili recipe, but here’s another recipe from one of my favorite food bloggers that I like to make to switch things up sometimes! Both are absolutely delicious! And of course, the perfect side dish for any chili recipe is Cheddar and Green Chile Cornbread! It’s easy to make and is always a crowd pleaser. I’ve gotten so many compliments on this recipe over the years!

My favorite thing about this cornbread is that it’s not dry at all! Most cornbreads come out pretty dry, which isn’t that appealing to me. Give this one a try and let me know what you think!

Cheddar and Green Chile Cornbread
Print
clock clock iconcutlery cutlery iconflag flag iconfolder folder iconinstagram instagram iconpinterest pinterest iconfacebook facebook iconprint print iconsquares squares iconheart heart iconheart solid heart solid icon
Cheddar and Green Chile Cornbread

Cheddar and Green Chile Cornbread

  • Author: Sarah
Print Recipe
Pin Recipe

Ingredients

Scale

1/2 cup butter, melted

1/2 cup sugar

2 eggs

1/2 (15 oz) can cream-style corn

1 (4 oz) can chopped green chiles, drained

1/4 cup shredded Monterey Jack cheese

1/4 cup shredded cheddar cheese

1/2 cup flour

1/2 cup yellow cornmeal

2 tsp baking powder


Instructions

Preheat oven to 300°.  Grease an 8×8 square baking dish.  Beat together the butter and sugar, then add the eggs one at a time and beat until combined well.  Stir in the corn, chiles, and cheeses.  Add the flour, cornmeal, and baking powder. and stir to combine.  Pour into the pan and bake at 300° for 1 hour.


Did you make this recipe?

Tag @the.platefull on Instagram and hashtag it #theplatefull

Fruit Salsa

February 4, 2020~ Side Dishes, The Platefull Blog

Fruit Salsa is my go-to recipe when I need to bring a side dish to a party. It’s healthy and the fruit is already cut into little pieces, so it’s perfect for little kids! I often make a big batch of this fruit salsa and we eat it many ways throughout the week. We eat it with cinnamon sugar pita chips, on pancakes, on oatmeal, on fruit pizza, or just by itself! Sometimes I just use leftovers of this as our side of fruit for a weeknight meal. It really doesn’t matter how I serve it, my boys simply love this stuff!

I do not use added sugar (outside of what is in the fruit preserves), but if you would like yours a little sweeter, try adding 1 Tbsp granulated sugar and 1 Tbsp brown sugar. I try to be very conscientious of our added sugar intake and I honestly think that with the fruit and the fruit preserves, its plenty sweet!

Print
clock clock iconcutlery cutlery iconflag flag iconfolder folder iconinstagram instagram iconpinterest pinterest iconfacebook facebook iconprint print iconsquares squares iconheart heart iconheart solid heart solid icon
Fruit Salsa

Fruit Salsa

  • Author: Sarah
Print Recipe
Pin Recipe

Ingredients

Scale

2 kiwis, peeled and diced

2 Golden Delicious apples, peeled, cored, and diced

1 6-oz carton raspberries

1 16-oz carton strawberries, diced

1 6-oz carton blueberries

2 mangoes, diced

3 Tbsp blackberry preserves

Cinnamon Sugar Pita Chips (I use Stacy’s)


Instructions

Combine all of the diced fruit and berries in a large bowl.  Add the fruit preserves and stir gently to combine.  Cover and refrigerate 1 hour before serving.


Did you make this recipe?

Tag @the.platefull on Instagram and hashtag it #theplatefull

Cinnamon Applesauce

January 9, 2020~ Side Dishes, The Platefull Blog

This recipe is so simple, but makes the most incredible applesauce! I’ve always bought the pouches of organic cinnamon applesauce for the boys, but they are so expensive! They go through the stuff like water, so I thought, why not make my own? I use organic ingredients, and it’s so much cheaper than buying all of those pouches! Simply place peeled, sliced apples into a crockpot, top with the remaining ingredients, and let it cook in the crockpot. Mash, whisk, and serve! It’s soooo good warm on a cold day!

Feel free to swap out the sugar for honey, or leave it out all together for a little more tart applesauce. A lot of times, I leave it out altogether in order to reduce our added sugar intake.

Print
clock clock iconcutlery cutlery iconflag flag iconfolder folder iconinstagram instagram iconpinterest pinterest iconfacebook facebook iconprint print iconsquares squares iconheart heart iconheart solid heart solid icon
Cinnamon Applesauce

Cinnamon Applesauce

  • Author: Sarah
Print Recipe
Pin Recipe

Ingredients

Scale

6 medium apples, peeled and sliced (I use half honeycrisp or pink lady and half granny smith)

1/2 cup granulated sugar

1/2 tsp ground cinnamon

1/2 cup water


Instructions

Place the apples into a slow cooker.  Sprinkle the sugar and cinnamon over then top, then pour the water in.  Set the slow cooker to high and cook for 4 hours.  Once the apples are soft, use a whisk to mash them and stir until smooth (or to the consistency that you prefer).  Store in the fridge.


Did you make this recipe?

Tag @the.platefull on Instagram and hashtag it #theplatefull

Pickled Red Cabbage

January 3, 2020~ Side Dishes, The Platefull Blog

This recipe is perfect for The Med Bowl. It’s simple to prepare and can last in the fridge all week while you eat Med Bowls for lunch!

Print
clock clock iconcutlery cutlery iconflag flag iconfolder folder iconinstagram instagram iconpinterest pinterest iconfacebook facebook iconprint print iconsquares squares iconheart heart iconheart solid heart solid icon
Pickled Cabbage

Pickled Red Cabbage

  • Author: Sarah
Print Recipe
Pin Recipe

Ingredients

Scale

6 oz red cabbage, shredded

2 c white vinegar

1/2 Tbsp dried parsley

1/2 tbsp chili flakes

1/2 Tbsp peppercorns

1/2 Tbsp ground ginger


Instructions

To a small saucepan, add the vinegar, parsley, chili flakes, peppercorns, and ginger.  Bring to a boil, then reduce heat and let simmer for 15-20 minutes.  In the meantime, place the shredded red cabbage in a canning jar.  Let the vinegar mixture cool completely, then pour over the red cabbage, through a strainer.  Close with the lid and refrigerate for up to 1 week.


Did you make this recipe?

Tag @the.platefull on Instagram and hashtag it #theplatefull

Espinaca

December 12, 2019~ Appetizers, Side Dishes, The Platefull Blog

I love cheese dip of any sort, but this Espinaca is especially delicious! I use Homemade Velveeta in this recipe, but of course you can use store bought. It’s the perfect side for Smoky Pulled Sheet Pan Chicken Nachos!

This recipe is simple to make – all ingredients get thrown in a pot (or the crockpot) together and cooked over low to medium-low heat until melted and combined. That’s it!

Print
clock clock iconcutlery cutlery iconflag flag iconfolder folder iconinstagram instagram iconpinterest pinterest iconfacebook facebook iconprint print iconsquares squares iconheart heart iconheart solid heart solid icon

Espinaca

  • Author: Sarah
Print Recipe
Pin Recipe

Ingredients

Scale

16 oz cream cheese

1/2 pint heavy cream

2 4-oz cans Rotel tomatoes, drained

1/4 cup diced jalapeno

8 oz frozen chopped spinach, thawed and squeezed dry

4 chicken bouillon cubes

8 oz Velveeta cheese

1/2 cup milk

1/2 onion, chopped


Instructions

Mix all ingredients together in a saucepan over medium low heat, stirring occasionally, until all ingredients are melted and well combined.


Notes

This recipe can also be made in the crockpot.  Place all ingredients in the crockpot over low heat, and stir occasionally.

Did you make this recipe?

Tag @the.platefull on Instagram and hashtag it #theplatefull

Parmesan and Roasted Garlic Bread

December 5, 2019~ Baking, Side Dishes, The Platefull Blog

This is the fattiest, butteriest, cheesiest, but most delicious garlic bread ever made. Ha! That’s probably not the way you’re supposed to start a blog post, huh? It’s not low calorie, but I can promise it’ll be a crowd pleaser! When I make Italian food on weeknights, I typically go with frozen garlic knots or bread because….time. But, when I’m craving a slow meal on a chilly weekend night and time in the kitchen with my family, it’s usually Italian food and this bread on the menu.

Start by cutting the top off of the garlic bulbs and remove the loose “paper” from the outside edges of the bulb. Place in a muffin tin. Drizzle with a little olive oil, and sprinkle with salt and pepper. Cover the tops with foil and roast in a 400 degree oven for 40-45 minutes or until golden brown. Let cool, then squeeze the garlic cloves out of the bulb and into a bowl. You should either use the roasted garlic immediately, or if you want to do this step ahead, you can freeze the roasted garlic. There are two ways you could do this:

  • Method 1: Line a baking sheet with parchment paper. Lay each clove separately on the parchment paper and freeze. Once frozen, you can move the cloves to a Ziploc bag and place back in the freezer.
  • Method 2: Mash the roasted garlic cloves. Measure out 1 tsp portions into an ice cube tray, wrap in plastic wrap several times so it doesn’t make your freezer smell, and keep frozen. Note that once you do this, you will never be able to use that ice cube tray for anything else because it will absorb the garlic odor and taste.

Once the garlic is roasted, you will mash it and combine with softened butter, parsley, salt, and pepper. (In this picture, I have not yet removed the cloves from the bulb – please don’t try to mash the whole bulb – ha!).

Next you will slice the baguette on the diagonal, not slicing all the way through. You want the slices to be about an inch and a half to 2 inches apart.

You will then use a fork to stuff the roasted garlic and butter mixture into each diagonal slit. Open each slit slightly and sprinkle in some grated parmesan. Last, cover the top of the baguette with the butter mixture and sprinkle with grated parmesan cheese.

Bake at 350 for about 12-15 minutes, until starting to crisp on the outside.

Slice and serve!

Print
clock clock iconcutlery cutlery iconflag flag iconfolder folder iconinstagram instagram iconpinterest pinterest iconfacebook facebook iconprint print iconsquares squares iconheart heart iconheart solid heart solid icon

Parmesan and Roasted Garlic Bread

  • Author: Sarah
Print Recipe
Pin Recipe

Ingredients

Scale

3 garlic bulbs

2 Tbsp olive oil

2 sticks of butter, softened

2 Tbsp chopped flat-leaf parsley

2 sourdough baguettes

1/2 cup grated parmesan cheese


Instructions

Start by cutting the top off of the garlic bulbs and remove the loose “paper” from the outside edges of the bulb. Place in a muffin tin. Drizzle with a little olive oil, and sprinkle with salt and pepper. Cover the tops with foil and roast in a 400 degree oven for 40-45 minutes or until golden brown. Let cool, then squeeze the garlic cloves out of the bulb and into a bowl.

Adjust oven temperature to 350 degrees. Use a fork to mash the garlic, then add the 2 sticks of softened butter and parsley. Slice the baguettes diagonally, but not cutting through. Spread half of the butter mixture in between each slice on both baguettes, being careful not to tear the baguette apart at the bottom. Sprinkle parmesan cheese in between each slice. Spread the remaining butter mixture over the top of both baguettes and sprinkle on a little more parmesan cheese. Bake for 12-15 minutes until the butter is all melted and the bread is starting to crisp.


Did you make this recipe?

Tag @the.platefull on Instagram and hashtag it #theplatefull

Street Corn Salad

November 14, 2019~ Side Dishes, The Platefull Blog

This is my favorite side dish to serve with any type of Mexican food. It’s best in the Summer, when you can cut fresh sweet corn off the cob, but it works in the Winter with frozen fire roasted corn (or frozen sweet corn). It’s simple to make and a super flavorful, healthy side dish! I like to serve this side dish with Chicken Chimichangas.

Print
clock clock iconcutlery cutlery iconflag flag iconfolder folder iconinstagram instagram iconpinterest pinterest iconfacebook facebook iconprint print iconsquares squares iconheart heart iconheart solid heart solid icon

Street Corn Salad

  • Author: Sarah
Print Recipe
Pin Recipe

Ingredients

Scale

4 ears fresh corn, cut from cob or 3 1/2 cups frozen corn

1 1/2 Tbsp vegetable oil

1/3 cup chopped red onion

1/3 cup cilantro leaves, chopped

1 jalapeño pepper, seeded and minced

1 clove garlic, minced

3 oz Cotija or Feta cheese, crumbled

3 Tbsp Avocado Mayonnaise (or regular mayo)

1 1/2 Tbsp fresh lime juice, divided

1/4 tsp chili powder

1/4 tsp ancho chili powder

1 large avocado, diced

Salt to taste


Instructions

After chopping the red onion, place it in a colander and run cold water over the onion (this will remove the bite from a red onion).  Let drain.  

Heat vegetable oil in a large skillet over medium high heat. Add corn (fresh or frozen – no need to thaw), season with salt to taste and toss, then let cook, tossing only occasionally (about every 2 minutes) until corn is charred (about 6 – 10 minutes total). Remove from heat and let cool slightly.

In a serving bowl, mix together the mayonnaise, 1 Tbsp lime juice, regular chili powder, and ancho chili powder.  Add in the corn, red onion, cilantro, jalapeño, garlic, and half of the cheese.  Stir to combine.  Squeeze the remaining 1/2 Tbsp lime juice over diced avocado.  Top the salad with the avocado and remaining cheese. 


Notes

If you want less spice, you can leave out the jalapeño.  You can also use 1/2 tsp of regular chili powder instead of 1/4 regular and 1/4 ancho Chile powders.

Did you make this recipe?

Tag @the.platefull on Instagram and hashtag it #theplatefull

  • 1
  • 2
  • 3
  • Next Page »

Categories

  • Appetizers
  • Baking
  • Breakfast
  • Dessert
  • Drinks
  • Kids
  • Lifestyle
  • Main
  • Recipes
  • Salads
  • Sauces and Dressings
  • Side Dishes
  • Soups
  • The Platefull Blog
  • Uncategorized

Archives

  • March 2025
  • July 2021
  • January 2021
  • July 2020
  • June 2020
  • May 2020
  • April 2020
  • March 2020
  • February 2020
  • January 2020
  • December 2019
  • November 2019
  • October 2019
  • September 2019
  • August 2019
  • September 2017
  • April 2017
  • March 2017
  • February 2017
  • January 2017
  • November 2016
  • October 2016

Recent Comments

  • Jennifer on Avocado and Egg Breakfast Stack
  • Christine Kish on Recipe Organization
  • Sarah on Easy Recipes for the Whole30
  • Jenn on Easy Recipes for the Whole30

- THEME BY ECLAIR DESIGNS -