The Platefull

Inspiring home cooks to be creative with accessible, nutritious recipes.

  • The Platefull Blog
  • Lifestyle
  • Kids
  • Shop
  • About
    • Privacy Policy, Terms & Conditions, and Disclosures

Cream Cheese Filled Pumpkin Muffins with Cinnamon Streusel

November 22, 2019~ Baking, Breakfast, The Platefull Blog

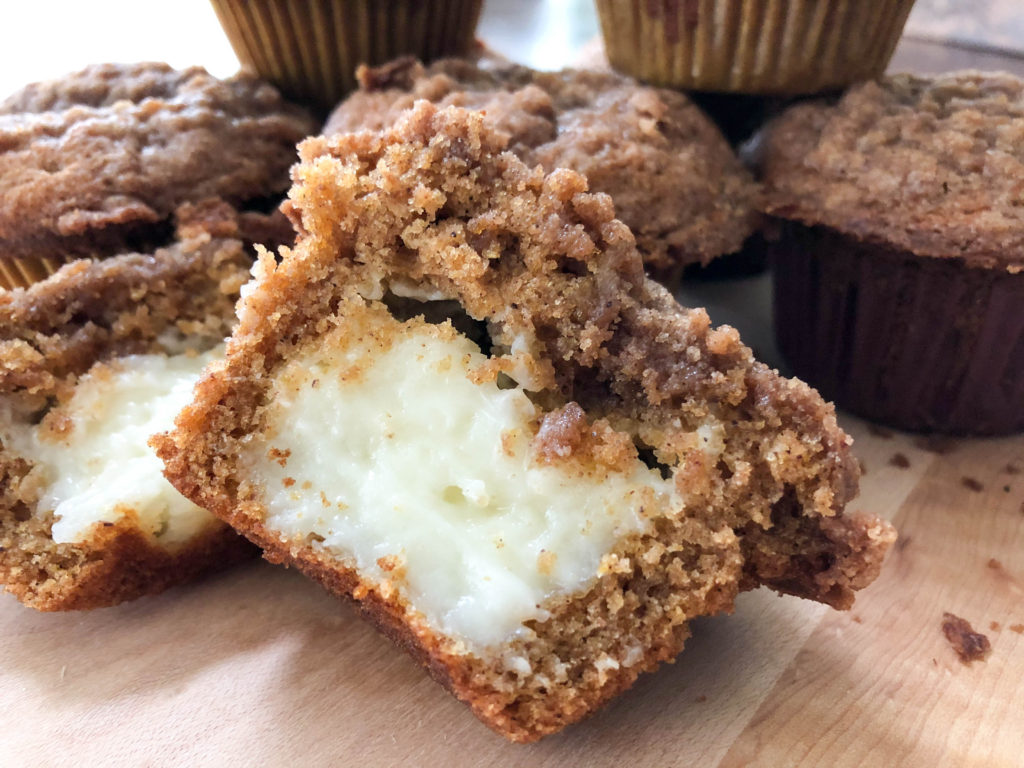
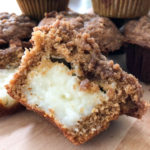
This is the perfect Fall muffin recipe! These Cream Cheese Filled Pumpkin Muffins use a secret shortcut – Trader Joe’s Pumpkin Bread Mix. They are insanely good…its hard to eat just one! I am a huge fan of this Trader Joe’s mix, so I saw no reason to make this recipe harder that it had to be by reinventing the wheel! The Cinnamon Streusel topping might look familiar. It’s from my Perfect Blueberry Muffin recipe! It’s the perfect finishing touch to these muffins – don’t leave it off!

About 3 hours before making this recipe, start by making the filling, as it needs time to set up in the freezer. This prevents it from disintegrating into the muffin when baking, leaving you with plenty of delicious filling! Beat together the cream cheese and powdered sugar. Spray a piece of foil or press-n-seal with baking spray, then scoop the cream cheese mixture into a log shape. If you make the log the width of a piece of regular sized foil or wrap, it will be the perfect length! Use your hands to form it into a tight log, then freeze for 3 hours.

To make the log, I first spread the cream cheese mixture with a spatula into a log shape the best I can.

I then fold one side of the foil over and use that to form the cream cheese into a more firm log shape.

I then finish wrapping it and freeze! At this time, you can set out the butter to soften for the streusel topping.

After 3 hours, mix the pumpkin muffin mixture according to the package directions. Line a muffin tin and spray with baking spray. Fill the muffin cups about halfway with the muffin mix.

Remove the cream cheese log from the freezer and slice into 12 equal portions. Place 1 portion in the center of each muffin cup, lightly pressing down so it doesn’t fall over.

Top each muffin cup with muffin mix, filling the cup to the top. Make the streusel topping by combining the softened butter, flour, brown sugar, and cinnamon with a fork, until it makes small crumbles.

Top each muffin cup with cinnamon streusel topping and bake according to package directions.

The next step is to try to not eat all of these fluffy filled muffins at once!

Print
clock clock iconcutlery cutlery iconflag flag iconfolder folder iconinstagram instagram iconpinterest pinterest iconfacebook facebook iconprint print iconsquares squares iconheart heart iconheart solid heart solid icon

Cream Cheese Filled Pumpkin Muffins

  • Author: Sarah
Print Recipe
Pin Recipe

Ingredients

Scale

1 box Trader Joe’s Pumpkin Bread and Muffin Mix

1 8oz block cream cheese, softened

1 cup powdered sugar

1/4 cup butter, softened

1/3 cup flour

1/2 cup brown sugar

1 tsp cinnamon


Instructions

In a mixer, beat the cream cheese until smooth.  Add the powdered sugar and beat until smooth.  Spray a piece of foil or Press-N-Seal with baking spray.  Spoon the cream cheese mixture down the center to form a log shape.  Roll the wrapping around the cream cheese log, gently pressing as you go so that it forms a pretty solid log.  Freeze for 3 hours.

Once the cream cheese log is fairly solid, preheat the oven according to package directions.  Prepare the pumpkin muffin mix according to package directions.  Prepare a muffin tin with liners and spray lightly with cooking spray.  Fill each muffin cup halfway full with the pumpkin muffin mixture.  Prepare the cinnamon streusel topping by using a fork to combine the softened butter, flour, brown sugar, and cinnamon.  It should be in small crumbs.  Remove the cream cheese filling from the freezer and wrapping.  Cut into 12 equal pieces.  Place a cream cheese piece in the center of each muffin cup.  Scoop the remaining pumpkin muffin mixture over the top of the cream cheese filling.  Sprinkle the crumb topping on top.  Bake according to package directions.


Did you make this recipe?

Tag @the.platefull on Instagram and hashtag it #theplatefull

Cranberry Turkey Rolls

November 20, 2019~ Main, The Platefull Blog

This recipe is the perfect way to use up leftover Thanksgiving food and feed a crowd at the same time! It’s super quick to prep and uses up turkey and cranberry sauce. You and your guests will love these!

When it isn’t Thanksgiving time, I make these with thicker sliced deli turkey. We love to make these as a quick, prep ahead weeknight dinner too. I prep the rolls the day before, or morning of, and cover and refrigerate until ready to bake.

Print
clock clock iconcutlery cutlery iconflag flag iconfolder folder iconinstagram instagram iconpinterest pinterest iconfacebook facebook iconprint print iconsquares squares iconheart heart iconheart solid heart solid icon

Cranberry Turkey Rolls

  • Author: Sarah
  • Prep Time: 20 minutes
  • Cook Time: 25 minutes
  • Total Time: 45 minutes
  • Yield: 12 sandwiches 1x
Print Recipe
Pin Recipe

Ingredients

Scale

1 package Hawaiian Sweet Rolls (12 count)

2 cups diced turkey or thick sliced deli turkey

1 cup cranberry sauce

6 slices Swiss cheese

6 tbsp butter

1 tbsp yellow mustard

1 tbsp Worcestershire sauce

1/2 tbsp dried minced onion

Salt and pepper to taste

Grated Parmesan cheese

Dried parsley


Instructions

Preheat oven to 350 degrees.  Remove the rolls from the package, leaving in tact as a set of 12.  Use a bread knife or serrated knife to slice lengthwise, through the middle of the rolls.  You will have a set of “tops” and a set of “bottoms.”  

Place the bottom part of the rolls in a 9×13 dish coated with cooking spray.  Layer on the turkey and cheese.  Spread the cranberry sauce on the under side of the “tops” side of the rolls. (You can warm the cranberry sauce in the microwave for a few seconds if necessary to make it more spreadable). Place the top set of rolls on to form sandwiches.  

Melt the butter in the microwave.  Whisk in the yellow mustard, Worcestershire sauce, dried minced onion, and salt and pepper to taste.  Pour over the top of the rolls, covering the whole surface. Cover with foil and let sit for 15-20 minutes.  Bake, covered, for 20 minutes.  Uncover and bake for 5 more minutes.  Remove from the oven and sprinkle with grated parmesan cheese and dried parsley.  Serve immediately.


Did you make this recipe?

Tag @the.platefull on Instagram and hashtag it #theplatefull

Apple Glazed Pork Tenderloin

November 19, 2019~ Main, The Platefull Blog

I love simple, one pan dinners like this one. I use this spice rub for all pork tenderloin that I make and just switch up the sauce. For this recipe, I did a simple base of colorful potatoes, nestled the pork on top, and added apples partway through cooking. I topped it off with Trader Joe’s Apple Cider Jam, which when warm, makes the perfect sauce for pork. I stock up on jars of this apple cider jam every Fall!

To start, you will rub the spice mix over the pork tenderloin. With a little olive oil, brown both sides of the meat, then remove it from the pan. Add halved or quartered baby potatoes (make them all uniform in size) to the pan, then rest the pork tenderloin on top. Note that you will want your potatoes cut relatively small. Potatoes about golf ball size I quarter and if smaller, I halve. Roast at 375 for 15 minutes, then add peeled and sliced apples. Roast for 10 more minutes, then top the pork with the apple cider jam. Roast another 5 minutes, until the pork is cooked through and the potatoes are tender. Slice the pork and serve with the apples and potatoes. I usually warm a little more of the jam and drizzle over the top of each slice.

Print
clock clock iconcutlery cutlery iconflag flag iconfolder folder iconinstagram instagram iconpinterest pinterest iconfacebook facebook iconprint print iconsquares squares iconheart heart iconheart solid heart solid icon

Apple Glazed Pork Tenderloin

  • Author: Sarah
  • Prep Time: 5 minutes
  • Cook Time: 30 minutes
  • Total Time: 35 minutes
  • Yield: 4 servings 1x
Print Recipe
Pin Recipe

Ingredients

Scale

1–1.5 pound pork tenderloin

1 Tbsp olive oil

1/2 tsp salt

1/2 tsp pepper

1/2 tsp garlic powder

1/2 tsp dried thyme

1/2 tsp dried rosemary

1 bag baby potatoes (I use Little Potato Company’s Terrific Trio 1.5 lb bag), halved or quartered to be uniform in size

1 Granny Smith apple, peeled and sliced

1/4 cup Trader Joe’s Apple Cider Jam (plus more for serving)


Instructions

Preheat the oven to 375 degrees.  Heat the oil over medium high heat in an oven proof skillet (I use a Le Creuset French Braiser – you want one with deep enough sides to hold the potatoes).  Mix the salt, pepper, garlic powder, thyme, and rosemary in a small bowl.  Sprinkle over both sides of the pork tenderloin and press into the meat, covering all sides with the spice rub.  When the oil is hot, add the pork tenderloin to the skillet and sear on both sides, about 2 minutes per side.  Remove the pork tenderloin from the skillet.  Add the potatoes to the skillet, then place the pork tenderloin on top of the potatoes.  Place in the oven for 15 minutes.  While the pork is cooking, peel and slice an apple.  After the pork has cooked for 15 minutes, add the apple slices to the top of the potatoes and roast for another 10 minutes.  Then spread the apple cider jam over the top of the pork and put back in the oven for 5 more minutes, until the pork is cooked and the potatoes are tender.  To serve, slice the pork tenderloin, top with additional apple cider jam, if desired, and serve with the cooked potatoes and apples.


Notes

If you prepare your apples to be very soft, you can add them at the beginning.  I prefer that they are not terribly soft, so I add them part way through cooking.

Did you make this recipe?

Tag @the.platefull on Instagram and hashtag it #theplatefull

Grandma’s Stuffed Meatballs

November 16, 2019~ Main, The Platefull Blog

This meal has been my favorite since I was a kid. This is my Grandma’s Stuffed Meatball recipe and is my ultimate comfort food. I serve it with Green Bean Casserole and a baked potato – the way my Mom always made it for us growing up. Admittedly, it’s not the beautiful dish that food photographers dream of, but while it may not be pretty to photograph, I can promise you it sure does taste good! It’s the perfect cozy meal for chilly nights!

To start, use your hands to mix the evaporated milk into the hamburger. Lightly press it flat in the bowl so that it forms an even surface. Use your fingertips to press lines into the surface to divide evenly into 6 portions.

In a bowl, combine the cream of mushroom soup, ketchup, and Worcestershire sauce. Roll the portions of meat into balls, then press into a patty. Place stuffing in the middle of the patty and form the meat mixture around the stuffing, so that the stuffing is enclosed on the inside. Place the stuffed meatballs into an 8×8 baking dish.

Top with the sauce mixture and bake at 350 degrees for 1 hour.

Serve with green bean casserole (which can be placed into the oven halfway through the meatball cooking time) and a baked potato.

Belgian Waffles

November 15, 2019~ Breakfast, The Platefull Blog

I love to make a big breakfast on the weekends for my boys. It’s just a nice, slow way to start our weekend and they look forward to it every week. Their normal request is pancakes, but they love waffles too. (Super different, right?). Anytime we have waffles, they want a mountain of whipped cream. You’re only a kid once, right?! I normally serve my Oat Protein Waffles, but every now and then I make these as a special treat. They aren’t exactly healthy, but they sure are good!

You’ll start by mixing the wet and dry ingredients in separate bowls and whipping the egg whites until stiff peaks form.

Then you’ll combine the wet and dry ingredients in the larger mixing bowl.

Fold in the egg whites.

Heat and oil your waffle iron according to manufacturer’s directions. I have the Cuisinart Griddler, which I heat to 400 degrees.

Cook the waffles about 5 minutes, or until they are light golden brown. Serve topped with strawberries and whipped cream. Other ideas for toppings are berries, bananas, caramel sauce, or chocolate chips. You could also go for the traditional butter and syrup. 🙂

Print
clock clock iconcutlery cutlery iconflag flag iconfolder folder iconinstagram instagram iconpinterest pinterest iconfacebook facebook iconprint print iconsquares squares iconheart heart iconheart solid heart solid icon

Belgian Waffles

  • Author: Sarah
Print Recipe
Pin Recipe

Ingredients

Scale

2 cups all purpose flour

3/4 cup granulated sugar

3 1/2 tsp baking powder

2 eggs, separated

1 1/2 cups whole milk

1 cup butter, melted

1 tsp vanilla extract


Instructions

In a large mixing bowl, whisk together the flour, sugar, and baking powder.  With an electric mixer, beat the egg whites until stiff peaks form.  Set aside.  In another mixing bowl, whisk the egg yolks, whole milk, and vanilla.  Slowly drizzle in the melted butter, while whisking.  Pour the wet ingredients into the dry ingredients and stir until just combined.  Gently fold in the egg whites.

Cook in a waffle iron that has been sprayed with cooking spray, according to manufacturer’s directions.  In the Cuisinart Griddler, with the waffle plates clipped in, preheat to 400 degrees and cook the waffles for 5-6 minutes, until light golden brown.


Did you make this recipe?

Tag @the.platefull on Instagram and hashtag it #theplatefull

Street Corn Salad

November 14, 2019~ Side Dishes, The Platefull Blog

This is my favorite side dish to serve with any type of Mexican food. It’s best in the Summer, when you can cut fresh sweet corn off the cob, but it works in the Winter with frozen fire roasted corn (or frozen sweet corn). It’s simple to make and a super flavorful, healthy side dish! I like to serve this side dish with Chicken Chimichangas.

Print
clock clock iconcutlery cutlery iconflag flag iconfolder folder iconinstagram instagram iconpinterest pinterest iconfacebook facebook iconprint print iconsquares squares iconheart heart iconheart solid heart solid icon

Street Corn Salad

  • Author: Sarah
Print Recipe
Pin Recipe

Ingredients

Scale

4 ears fresh corn, cut from cob or 3 1/2 cups frozen corn

1 1/2 Tbsp vegetable oil

1/3 cup chopped red onion

1/3 cup cilantro leaves, chopped

1 jalapeño pepper, seeded and minced

1 clove garlic, minced

3 oz Cotija or Feta cheese, crumbled

3 Tbsp Avocado Mayonnaise (or regular mayo)

1 1/2 Tbsp fresh lime juice, divided

1/4 tsp chili powder

1/4 tsp ancho chili powder

1 large avocado, diced

Salt to taste


Instructions

After chopping the red onion, place it in a colander and run cold water over the onion (this will remove the bite from a red onion).  Let drain.  

Heat vegetable oil in a large skillet over medium high heat. Add corn (fresh or frozen – no need to thaw), season with salt to taste and toss, then let cook, tossing only occasionally (about every 2 minutes) until corn is charred (about 6 – 10 minutes total). Remove from heat and let cool slightly.

In a serving bowl, mix together the mayonnaise, 1 Tbsp lime juice, regular chili powder, and ancho chili powder.  Add in the corn, red onion, cilantro, jalapeño, garlic, and half of the cheese.  Stir to combine.  Squeeze the remaining 1/2 Tbsp lime juice over diced avocado.  Top the salad with the avocado and remaining cheese. 


Notes

If you want less spice, you can leave out the jalapeño.  You can also use 1/2 tsp of regular chili powder instead of 1/4 regular and 1/4 ancho Chile powders.

Did you make this recipe?

Tag @the.platefull on Instagram and hashtag it #theplatefull

Chicken Chimichangas

November 13, 2019~ Main, The Platefull Blog

This recipe has always been a freezer staple in our house. I prep batches of these, wrap them individually, and freeze them for a quick weeknight meal. Let them thaw overnight in the fridge, place on a baking sheet, and bake. Couldn’t be easier! I top them with store bought guacamole, salsa, and sour cream. Side note – My boys don’t like any sort of spicy food, so when I make these, I prep theirs before I add the pepper jack cheese to the filling.

These can either be baked, or made in the air fryer. If cooking in the air fryer, you’ll need to let them come to room temperature on the counter before cooking, otherwise the filling won’t get warm. I love the extra crispy shell that the air fryer produces, but I don’t usually have time to let them come to room temp, so the oven it is! The oven instructions are in the recipe below. For the air fryer, cook at 400 for 7-8 minutes, flipping halfway through cooking.

Here’s step by step how to fold the chimichanga. Place the filling in the center, offset toward one edge of the tortilla.

Fold the edge closest to the filling over the filling and use your fingers to tuck the tortilla around the filling, pulling towards you to wrap tightly around the filling.

Fold in the edges.

Roll the chimichanga forward, to finish the wrap.

Now wrap individually and freeze, or bake. I typically make these for dinner one night and bake half and freeze half. That way, I’m prepping two meals at once! I like to serve these with my Street Corn Salad.

Print
clock clock iconcutlery cutlery iconflag flag iconfolder folder iconinstagram instagram iconpinterest pinterest iconfacebook facebook iconprint print iconsquares squares iconheart heart iconheart solid heart solid icon

Chicken Chimichangas

  • Author: Sarah
  • Prep Time: 10 minutes
  • Cook Time: 30 minutes
  • Total Time: 40 minutes
  • Yield: 8 servings 1x
Print Recipe
Pin Recipe

Ingredients

Scale

8 oz pkg. cream cheese, softened

8 oz. Pepperjack cheese, shredded

1 1/2 Tbsp. taco seasoning

1 lb. rotisserie chicken, shredded

8 flour tortillas, burrito size

cooking spray

shredded cheddar cheese

green onions, for garnish

sour cream

salsa

guacamole


Instructions

Preheat the oven to 350 degrees.  Mix together the cream cheese, cheddar cheese, pepper jack cheese, and taco seasoning.  Mix in the chicken.  Divide the filling between the 8 flour tortillas.  Roll into chimichangas and spray the outsides with cooking spray.  Bake at 350 for 30 minutes, flipping once halfway through baking.  Serve with salsa, guacamole, sour cream, and green onions.


Notes

To freeze these, do not bake.  Once you have filled and rolled the chimichanga, wrap individually in plastic wrap, place in a ziploc bag, and freeze.  Before baking, let thaw in the refrigerator overnight.

Did you make this recipe?

Tag @the.platefull on Instagram and hashtag it #theplatefull

Bunny Juice

November 11, 2019~ Drinks, The Platefull Blog

Apparently we have a thing for naming juices after animals (see the Green Gorilla Juice recipe), but hey, if it makes juicing fun for my kids, I’m all for it! They love this juice and so do I. During cold and flu season, I’ll sometimes add in a small piece of peeled turmeric, but it stains my hands pretty badly, so it’s not my favorite thing to do. :). More often, you’ll find me buying a turmeric shot at Whole Foods and just dumping it in at the end. I also sometime buy a ginger shot if I don’t feel like peeling ginger. I know, lazy. Another great add in is mango juice!

Print
clock clock iconcutlery cutlery iconflag flag iconfolder folder iconinstagram instagram iconpinterest pinterest iconfacebook facebook iconprint print iconsquares squares iconheart heart iconheart solid heart solid icon

  • Author: Sarah
  • Prep Time: 10 minutes
  • Total Time: 10 minutes
  • Yield: 4 servings 1x
Print Recipe
Pin Recipe

Ingredients

Scale

8 oranges, peeled and quartered

5 carrots, ends removed and halved

1 lemon, peeled and quartered

1 1-inch piece of ginger, peeled


Instructions

Run all ingredients through a juicer. Chill before serving.


Did you make this recipe?

Tag @the.platefull on Instagram and hashtag it #theplatefull

The Ultimate Thanksgiving Menu

November 10, 2019~ Lifestyle, Main

Does the thought of preparing Thanksgiving dinner from scratch overwhelm you? It does me too, honestly. It’s a lot to prep and I hate feeling like I’m missing out on all of the fun because I have to spend the whole day in the kitchen! After years of being in charge of the Thanksgiving meal, I’ve nailed it down to a science. Most of my Thanksgiving menu is prepped ahead, meaning that on the day of, I get to relax and watch the Macy’s Thanksgiving Day Parade with everyone else! I’ve got the recipes and the game plan all laid out for you here…couldn’t be easier! So, what’s on the menu you ask?

  • Thanksgiving Herbed Butter Turkey
  • Garlic Herb Mashed Potatoes with Crispy Fried Sage
  • Traditional Sage Stuffing
  • Sweet Potato Casserole
  • Green Bean Casserole
  • Grandma Ruth’s Sweet Corn
  • Pomegranate and Vanilla Buttered Brussels
  • Pear and Cranberry Chopped Salad
  • Pumpkin Cheesecake
  • Apple Cider Sangria

After scrolling through all of those pictures, are you hungry yet?! If you’re ready to get cooking (or planning), here’s the step by step schedule of how to get all of this food on the table (while all still warm, which is quite a feat!).

Up to 12 months in Advance:

  • Grandma Ruth’s Sweet Corn: This corn should be prepared and frozen ahead. For serving, simply microwave until hot! My family makes huge batches of this corn in the summer, at the height of sweet corn season, and freezes for the winter.

4-5 Days in Advance:

  • If the turkey is frozen, place in in the refrigerator to thaw. Assume about 24 hours for every 5 pounds. I usually give my bird an extra 24 hours in the fridge, so assuming I have a 15-20 pound bird, I need 4-5 days for it to thaw.

1 Day in Advance:

  • Turkey: Soften the butter, chop the herbs, and make the herb butter. Quarter the orange, lemon, and onion. Cover and refrigerate.
  • Garlic Herb Mashed Potatoes: Prepare the potatoes, up to the point of baking. Chop the sage for the crispy sage topping. Cover and refrigerate.
  • Sweet Potato Casserole: Prepare the sweet potato mixture, place in the baking dish, cover, and refrigerate. Mix the dry ingredients together for the crumb topping, and store in an airtight container on the counter. You will add the butter to the crumb topping and put the topping on the casserole just before baking.
  • Green Bean Casserole: Mix the green beans, cream of mushroom soup, milk, salt, and pepper (everything except the fried onions). Pour into a baking dish. Cover and refrigerate.
  • Pomegranate and Vanilla Buttered Brussels: Prepare the Brussel sprouts by halving them (or into quarters if you have large sprouts). Soften the butter and mix in the vanilla bean paste. Prepare the pomegranate (or buy the pomegranate arils to save yourself a prep step).
  • Traditional Sage Stuffing: Prepare the stuffing up to the point of baking. Place in a baking dish, cover, and refrigerate.
  • Pumpkin Cheesecake: Make the pumpkin cheesecake. Let cool. Do not top with whipped cream or pecans, just cover and refrigerate undecorated.
  • Apple Cider Sangria: Mix all ingredients and fruit in a pitcher. Cover and refrigerate. (This is actually much better if it’s had time to sit for a day before serving).

Thanksgiving Day

  • 1-2 hours before the turkey goes in the oven, set out the herb butter mixture for the turkey to soften.
  • T-5.5 hours: Roast the Brussel sprouts; cool and refrigerate. Reduce oven temp. Get turkey out of the fridge and prep with the herb butter. Let sit on the counter while the Brussel sprouts roast.
  • T-4.75 hours: TURKEY GOES IN THE OVEN (Assume about a 4 hour cook time).
  • T-1.5 hours: Stuffing goes in the oven (350 degrees), prepare crumb mixture for sweet potatoes and put on top of the sweet potato casserole. Set out the vanilla butter mixture for the Brussel sprouts to soften.
  • T-45 minutes: Turkey comes out, tent and rest. Sweet potato casserole goes in the oven (350 degrees), add French Fried Onions to green bean casserole and stir. Remove the foil from the stuffing.
  • T-30 minutes: Garlic Herb Mashed Potatoes and Green Bean Casserole go in oven. Mix the Brussel sprouts and vanilla butter together and place in a baking dish. Prep the salad, but do not dress.
  • T-15 minutes: Brussel sprouts go in the oven to heat through. Heat butter on the stove to fry the sage for the mashed potatoes. Carve the turkey. Microwave the corn. (Recruit a helper if you can for these last 15 minutes until the finish line!)
  • T-5 minutes: Top the green bean casserole with a sprinkle of French Fried Onions.
  • Go-Time! Mashed potatoes, sweet potatoes, green beans, Brussel sprouts, and stuffing come out. Top the mashed potatoes with crispy fried sage and browned butter. Toss the Brussel sprouts with pomegranate arils and pecans.
  • EAT!
  • When ready for dessert, decorate the top of the cheesecake with whipped cream and sprinkle with chopped pecans.

Pumpkin Cheesecake

November 10, 2019~ Baking, Dessert, The Platefull Blog

Every year for Thanksgiving, I make my apple pie. It’s beautiful and delicious and my absolute favorite. But, the weird people in my family love pumpkin pie. I will never understand the love for pumpkin pie, with its mushy texture. But, I do love pumpkin flavor. This cheesecake makes the perfect compromise! Don’t ask me how the mushiness of cheesecake is okay but the mushiness of pumpkin pie is inedible…that’s just the way it is. This cheesecake can be made ahead and refrigerated. On Thanksgiving Day, just decorate and serve!

Start by preparing the crust. Combine the melted butter with the graham cracker crumbs and 1 Tbsp of the sugar. I try to buy graham cracker crumbs, but if I can’t find them, I let my kids turn graham crackers into crumbs for me since they are experts at making crumbs.

Then, press the crumb mixture into a springform pan. I used a pan with a bottom that lifts out because I couldn’t find my springform pan and I just wanted to eat the cheesecake already. It worked fine too.

Once you’ve mixed the filling, pour it into the pan and bake for 60-70 minutes at 350.

It will turn golden on top. My cheesecakes always crack, and it really doesn’t bother me because I just cover them with a topping. If you are super fussed about your cheesecake cracking, rumor has it you could try starting with room temperature cream cheese and bake it in a water bath. Sounds like a lot of effort to me for a cheesecake that will taste the same. I say just cover the top with whipped cream and no one will ever know. 😉

Print
clock clock iconcutlery cutlery iconflag flag iconfolder folder iconinstagram instagram iconpinterest pinterest iconfacebook facebook iconprint print iconsquares squares iconheart heart iconheart solid heart solid icon

Pumpkin Cheesecake

  • Author: Sarah
Print Recipe
Pin Recipe

Ingredients

Scale

1 1/2 cups graham cracker crumbs

5 Tbsp butter, melted

1 cup plus 1 Tbsp granulated sugar

3 8-oz packages cream cheese, softened

1 tsp vanilla extract

1 cup canned pumpkin

3 eggs

1/2 tsp cinnamon

1/4 tsp nutmeg

1/4 tsp allspice

Whipped Cream, for serving

Chopped Pecans, for serving


Instructions

Preheat the oven to 350 degrees.  Combine graham cracker crumbs, melted butter, and 1 Tbsp sugar.  Stir with a fork until the mixture is combined well with the butter.  It should be crumbly.  Pour the crust mixture into an 8 inch springform pan.  Press the crumb mixture into the bottom and about 2/3 of the way up the sides of the pan.  Bake the crust for 5 minutes, then set aside.

In a mixing bowl, add the cream cheese, 1 cup of sugar, and vanilla.  Beat until smooth.  Add the eggs, pumpkin, and spices and beat until well combined.  Pour the filling into the crust.  Bake for 60-70 minutes.  Allow the cheesecake to cool completely before refrigerating. 

When ready to serve, top the cheesecake with whipped cream and chopped pecans.


Did you make this recipe?

Tag @the.platefull on Instagram and hashtag it #theplatefull

  • « Previous Page
  • 1
  • …
  • 7
  • 8
  • 9
  • 10
  • 11
  • …
  • 16
  • Next Page »

Categories

  • Appetizers
  • Baking
  • Breakfast
  • Dessert
  • Drinks
  • Kids
  • Lifestyle
  • Main
  • Recipes
  • Salads
  • Sauces and Dressings
  • Side Dishes
  • Soups
  • The Platefull Blog
  • Uncategorized

Archives

  • March 2025
  • July 2021
  • January 2021
  • July 2020
  • June 2020
  • May 2020
  • April 2020
  • March 2020
  • February 2020
  • January 2020
  • December 2019
  • November 2019
  • October 2019
  • September 2019
  • August 2019
  • September 2017
  • April 2017
  • March 2017
  • February 2017
  • January 2017
  • November 2016
  • October 2016

Recent Comments

  • Jennifer on Avocado and Egg Breakfast Stack
  • Christine Kish on Recipe Organization
  • Sarah on Easy Recipes for the Whole30
  • Jenn on Easy Recipes for the Whole30

- THEME BY ECLAIR DESIGNS -